Blog
All Blog Posts | Next Post | Previous Post

 TMS WEB Core and More with Andrew:
Notifications via Browser Push Notifications
Bookmarks:
Monday, August 14, 2023

In our recent post about sending Notifications
via E-mail, we used XData/Indy to take care of the actual delivery of the e-mail rather
than using our TMS WEB Core app. In this post, we're going to take a look at a relatively new notifications mechanism - at
least when compared to e-mail - Browser Push Notifications. Here, the client has to be configured in such a way
as to allow such notifications, and we'll also need to get the user's permission. Browser Push Notifications have
been getting a bit of extra attention more recently, as support has been added for PWA apps in iOS/iPadOS 16.4, released a few months ago. This is kind of a big deal, but it comes with a
substantial hurdle - the PWA app has to be added to the user's home screen.
Requirements.
As with notification e-mails, let's assume that we want to be able to send notifications to all of our users, potentially on all of their devices, and that these are notifications that the user wants to receive. No unsolicited marketing material or other content not directly related to what the user wants to know about. And let's assume that the user is at least aware of what desktop notifications are and will not be put off by the idea generally.
We'll need to ask the user for permission to do this, which will involve the browser itself
presenting the user with a confirmation prompt. Note that the user can also revoke this permission at any time,
so this is by no means a guaranteed notification mechanism, but it can still be useful.
Another distinction here is that notifications are configured separately on each device or, more specifically,
each browser on each device. It is possible to receive multiple notifications on the same device by configuring
notifications in different browsers, for example. Which is fun to test but not very practical. On the other
hand, if you want to receive notifications on your desktop, iPhone, and iPad, you'll have to configure notifications on
all three.
Nothing overly problematic there, but the next item is a bit more troublesome. To generate push notifications based on events occurring when not using the web app, we'll need some kind of push notification server.
Ideally, this would just be an extra feature we could add to an existing TMS XData server. The TMS WEB Core Demos/Basics/PushNotifications example includes an example - PushNotificationSer - but no source code is provided at the moment. Embarcadero's RAD Server includes a Push Notification service as well. Hopefully, in the near future, an XData solution will be available.
For today, we're going to look at another approach, using NodeJS to very quickly build a small push
notification server. A ready-made library, web-push,
can be used to handle all the encryption details for us. And by combining a few online tutorials, we can put
together a pretty reasonable server without much effort at all.
For a client web app to receive notifications, a TMS WEB Core web app in our case, we need to ensure that we have the following in place.
- Using a secured web server to deliver our app and notifications.
- A service worker (aka a PWA app).
- A valid e-mail for the push service.
- Public/Private key pair - VAPID is used in this case. More on that shortly.
Ideally, we'll also be able to add a bit of customization to our notifications, such as including an icon, a link, and even a larger image. We'd also like to provide options for the user to decide what kinds of notifications they'd like to receive.
Push Notifications Server.
There is more than one way to do this, of course. And there are many "push notification services" available that provide something similar. But a push notification service might be one of the simpler things to set up, so let's create one from scratch.
We'll look for an XData solution another time, but for now, we'll just use NodeJS - essentially JavaScript running on a server. There are a handful of blogs that describe how to do this in various ways. We're using this example mashed together with this example as a base for our push notification server.
Note that by setting up such a service, it could be used by our TMS WEB Core apps, but also any other web apps or client software that wants to deliver such notifications. So while we're creating this server for our purposes, it is generally applicable to a much wider audience as well.
The example here walks through setting up a push notification server for the "blaugment.com" domain and web app (a topic for another day!). The TMS WEB Core app is served up on an HTTPS-enabled Apache web server running on Ubuntu, which can be found at https://www.blaugment.com. This doesn't particularly matter all that much, just providing a bit of context.
The SSL certificates for this website were generated via LetsEncrypt, and we'll be using those in our push notifications server here as well. Our goal is to run an HTTP/2 server which itself requires TLS. This is similar in purpose to SSL and can use the same keys we have from LetsEncrypt. HTTP/2 may be listed as necessary for push notifications in certain settings. I'm not entirely sure whether it is strictly required here, but as we're starting from nothing, we might as well set it up this way initially rather than have to come back and figure it out later if it turns out to be a requirement.
To get started with a new NodeJS project, we'll want to be sure that we've got the latest version of NodeJS and npm installed, and then
create an empty project using its tools.
# n latest
# npm install -g npm@latest
# node -v
v20.5.0
# npm -v
9.8.1
# npm init -y
Wrote to /home/blaugment/push/package.json:

{
  "name": "push",
  "version": "1.0.0",
  "description": "",
  "main": "index.js",
  "scripts": {
    "test": "echo \"Error: no test specified\" && exit 1"
  },
  "keywords": [],
  "author": "",
  "license": "ISC"
}
Next, we'll want to install all the packages for this project. Not too many. We've mentioned web-push already. We'll want to store the subscription information somewhere, and as we've used SQLite in other projects, we can
just as easily use it here. The body-parser library
is used to extract data out of the POST requests that the server receives. We'll of course need to deal with
CORS, so there's a package for that. And to help expedite things, we're using express
- a NodeJS framework for just such purposes. But this was designed without HTTP/2 support, so we'll need to
upgrade it, using the http2-express-bridge
package.
# npm install body-parser express http2-express-bridge web-push cors sqlite3
Once these are installed (just takes a moment), we'll need a pair of keys for encrypting the notification messages. These can be generated from the command line directly, or by visiting https://www.vapidkeys.com.
# ./node_modules/.bin/web-push generate-vapid-keys

=======================================

Public Key:
BKsFfaWHUl4uA6XTyvgrjub4PQOjjg-KVFWx_pBKXjXJFatp4rDNdeRlkH1U5hVioADFZfUBQaUnALBuOQtczWo

Private Key:
2F4ezLOX6y1JoLurvPtrl-zWOXxrYbz2pW6cp2YTaK4

=======================================
These are the public/private keys that are used to encrypt the notification content delivered to the clients,
separate from the LetsEncrypt keys to encrypt the communication with the push notification server.
Note that when using JWTs normally, as we've been doing routinely in our TMS XData projects, we don't typically encrypt the data being sent - we rely on SSL to keep that data private, and there's little reason to incur the overhead of encrypting the data separately as well We just carefully check that the JWT is valid.
With
notifications, particularly when using third-party push notification services, we don't want anyone else looking
at the notification content at any point along the way, so the data itself gets encrypted. It also helps that
the data is generally very small and thus the overhead isn't as expensive as encrypting megabytes of data
flowing through an endpoint.
There are other ways to handle these keys, but let's just put them into their own files in the project directory - vapid-public.key and vapid-private.key - and reference them in the script that we're about to create.
There's also the need to separately authorize requests that we'll be using to handle the submission of
the notifications that we want to send out. The idea here is that the push notification server will need to pass along
notifications of some kind coming from somewhere else, so we'll add an endpoint for that. But we don't want
just anyone using it, so we'll add another key, and store it in send-auth.key.
Then we have the code for the actual push notification server - server.js. This might be unfamiliar territory - running
JavaScript on a server instead of just in the client, but it is still JavaScript syntax and works much the same
way. As this isn't running in a browser sandbox, other capabilities can be built into our script. When running,
this script will essentially be a fully functional HTTP/2-enabled, secured, web server. Much like running an
XData server, for example, but with only a basic set of tools to work with, as configured.
// Push Notification Server
// https://pusher.com/tutorials/push-notifications-node-service-workers/#set-up-the-server
// https://javascript.plainenglish.io/serving-hello-world-with-http2-and-express-js-4dd0ffe76860
// Project packages
const express = require('express');
const http2Express = require('http2-express-bridge');
const http2 = require('http2');
const webPush = require('web-push');
const bodyParser = require('body-parser');
const cors = require('cors');
// Other supporting packages
const path = require('path');
const { readFileSync } = require('fs')
// Setup Express erver with support for HTTP/2
const app = http2Express(express);
app.use(bodyParser.json());
app.use(express.static(path.join(__dirname, 'client')));
// Fun with CORS
app.use(cors());
// Setup SQLite Database
var sqlite3 = require('sqlite3').verbose();
var db = new sqlite3.Database('subscriptions.sqlite');
db.run("CREATE TABLE IF NOT EXISTS subscribers(browser TEXT, account TEXT, preferences TEXT, subscription TEXT)");
// Server options
const options = {
allowHTTP1: true,
port: 28293,
key: readFileSync('/etc/letsencrypt/live/blaugment.com/privkey.pem', { encoding: 'utf8', flag: 'r'}),
cert: readFileSync('/etc/letsencrypt/live/blaugment.com/cert.pem', { encoding: 'utf8', flag: 'r'}),
ca: readFileSync('/etc/letsencrypt/live/blaugment.com/fullchain.pem', { encoding: 'utf8', flag: 'r'}),
vapidPublicKey: readFileSync('vapid-public.key', { encoding: 'utf8', flag: 'r' }).toString().split("\n")[0],
vapidPrivateKey: readFileSync('vapid-private.key', { encoding: 'utf8', flag: 'r' }).toString().split("\n")[0],
sendAuth: readFileSync('send-auth.key', { encoding: 'utf8', flag: 'r' }).toString().split("\n")[0]
}
// Configure web-push
webPush.setVapidDetails('mailto:concierge@blaugment.com', options.vapidPublicKey, options.vapidPrivateKey);
// Endpoint for basic testing purposes
app.get('/hello', (req, res) => {
res.send('Hello World\n');
})
// Endpoint for subscribe
app.post('/subscribe', (req, res) => {
const subscription = req.body.subscription;
const account = req.body.userID;
const preferences = req.body.userData;
const browser = req.body.browserID;
db.run("DELETE FROM subscribers where (browser = '"+browser+"') and (account = '"+account+"')");
db.run("INSERT INTO subscribers (browser, account, preferences, subscription) VALUES('"+browser+"', '"+account+"', '"+preferences+"', '"+JSON.stringify(subscription)+"')");
res.status(201).json({});
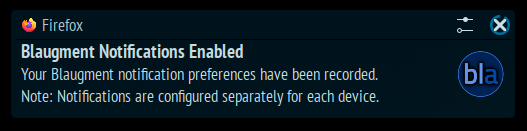
const payload = JSON.stringify({
title: 'Blaugment Notifications Enabled',
body: 'Your Blaugment notification preferences have been recorded.\nNote: Notifications are configured separately for each device.',
icon: 'https://www.blaugment.com/favicon-192x192.png',
image: "https://www.blaugment.com/banner-1000x500.png",
data: { url: "https://www.blaugment.com" }
});
webPush.sendNotification(subscription, payload)
.catch(error => console.error(error));
});
// Endpoint for unsubscribe
app.post('/unsubscribe', (req, res) => {
const account = req.body.userID;
const browser = req.body.browserID;
const unsuball = req.body.unsubscribeAll;
if (unsuball == true) {
db.run("DELETE FROM subscribers where account = '"+account+"'");
} else {
db.run("DELETE FROM subscribers where (browser = '"+browser+"') and (account = '"+account+"')");
}
res.status(201).json({});
});
// Endpoint for notify
app.post('/notify', (req, res) => {
const auth = req.body.auth;
const title = req.body.title;
const body = req.body.body;
const preferences = req.body.preferences;
const account = req.body.account;
const image = req.body.image;
const url = req.body.url;
if (auth == options.sendAuth) {
const payload = JSON.stringify({
title: title,
body: body,
icon: 'https://www.blaugment.com/favicon-192x192.png',
image: image,
data: { url: url }
});
var sent = 0;
db.all("SELECT subscription FROM subscribers where (account = '"+account+"') and (preferences LIKE '%"+preferences+"%')", function(dberr, rows) {
rows.forEach(function (row) {
sent += 1;
webPush.sendNotification(JSON.parse(row.subscription), payload)
.catch(error => console.error(error));
});
res.status(201).json({sent: sent});
});
} else {
res.status(401).json({error: "Authorization key was not validated"});
}
});
// Launch the server
server = http2.createSecureServer(options, app);
server.listen(options.port, () => {
console.log('Push Notification Server (Express) running -> PORT ${server.address().port}');
});
There's a lot going on in there, but what it boils down to is a web server with four endpoints that we can use. We'll have a look at those shortly. But first, as a server, we'll want this to be running all of the time, particularly after a server reboot. As this example is running on Linux (Ubuntu), we can turn this into a service pretty easily.
We'll
first need a bash script to call. Here, we've set it up to also send an email whenever the server process
starts. The delay is purposeful. If there is an error in our script, we'd not want to overload the system by just
trying to restart the service immediately, so it is delayed briefly.
#!/bin/bash
while true
do
  echo "Push Notification Server Started on "`hostname` | mail concierge@blaugment.com -s "Push Notification Server Started on "`hostname`
  cd /home/blaugment/push
  node server.js
  sleep 15
done
For Ubuntu and similar Linux platforms, enabling a service just involves adding a file to a systemd folder. In this case, we'll be creating the /etc/systemd/system/push.service that will point at our script, which is in /home/blaugment/push/server.js. We want it to start after the networking system starts.
[Unit]
After=network.service

[Service]
ExecStart=/home/blaugment/push/push.sh

[Install]
WantedBy=default.target
Then we can set some file permissions and get our service up and running.
# sudo chmod 664 /home/blaugment/push/push.sh
# sudo chmod 664 /etc/systemd/system/push.service
# sudo systemctl daemon-reload
# sudo systemctl enable push.service
Created symlink /etc/systemd/system/default.target.wants/push.service -> /etc/systemd/system/push.service.
# sudo systemctl start push.service
# sudo ystemctl status push.service
● push.service
     Loaded: loaded (/etc/systemd/system/push.service; enabled; vendor preset: enabled)
     Active: active (running) since Tue 2023-08-01 18:24:41 PDT; 6s ago
   Main PID: 1770407 (push.sh)
      Tasks: 11 (limit: 19099)
     Memory: 17.8M
        CPU: 401ms
     CGroup: /system.slice/push.service
             ├─1770407 /bin/bash /home/blaugment/push/push.sh
             └─1770415 node server.js

Aug 01 18:24:41 festival.500foods.com systemd[1]: Started push.service.
Aug 01 18:24:41 festival.500foods.com push.sh[1770415]: Push Notification Server (Express) running -> PORT 28293
As with any systemd service, we can use systemctl to stop, start, or get the status as we've done above. But
with that, our push notification server is complete! Let's have a look at what it's actually doing.
Hello Endpoint.
We can test the basic accessibility of our push notification server by using the /hello endpoint with curl,
both locally and on a remote system, to ensure any firewall rules have been factored in. This isn't an
essential endpoint - it can be removed after testing. But it is helpful to have something to work with
initially that doesn't require parameters and other work just to see if the server is reachable.
$ curl -i https://blaugment.com:28293/hello
HTTP/2 200
access-control-allow-origin: *
x-powered-by: Express with http2-express-bridge
content-type: text/html; charset=utf-8
content-length: 12
etag: W/"c-ZIpqb//9qgutsjuLr5C2Fo3Razo"
date: Wed, 02 Aug 2023 01:49:02 GMT

Hello World
$
Note that if an attempt is made to access the server without using HTTPS, nothing comes back.
$ curl -i http://blaugment.com:28293/hello
curl: (52) Empty reply from server

$
There are a couple of things to note. This is reporting back as HTTP/2 which is what we want. And our CORS package is doing
its job, adding the "access-control-allow-orign: *" to our server. This is a case where it might very well
make sense to be more specific and configure CORS to only allow the domain name of the web app that is using this service. There's
little reason for anyone else to use it unless you're providing a push notification service to others. And even
if you were, the server is simple enough that it might make more sense just to launch another instance of it for
another project. For now, and to make testing a little easier, we'll leave it as is.
Subscribe Endpoint.
This is used to register a subscriber (a user's browser) and is called from the client. It includes several parameters that
we'll need.
  const subscription = req.body.subscription;
  const account = req.body.userID;
  const preferences = req.body.userData;
  const browser = req.body.browserID;
The subscription value contains all the nitty gritty stuff related to how we'll send notifications to this
subscriber. It has the encryption key information and an endpoint used to connect to the browser, among other
things. We don't much care about the details here, just that they're populated.
The userID is whatever we want it to be - a user identifier of some kind that is specific to our web app.
The userData (preferences) value is also whatever we want it to be -
maybe a list of product categories for an e-commerce site. Or a list of event types for a monitoring system of
some kind. The idea is that we can then pass the push notification server a new notification along with a type, and the push notification service will deliver the notification to those who have set their preferences to include that type. We'll cover this more a little later, as well as other options for where this logic might reside.
The browserID is also important, a unique identifier for the user's browser. We will use it in combination with the userID to manage the subscription. We'll also use both of these values in the unsubscribe endpoint
What do we do with this information? For the most part, in this endpoint, all we do is store it in a database, replacing any existing reference to the same account and browser. Note that it is possible to have multiple
accounts tied to the same browser, so if you're using this with multiple projects, this allows you to have
separate notifications for each project and each browser, or even multiple accounts in the same project with the
same browser.
To have a look at the SQLite database contents that are populated by this endpoint, it is easy enough to run a
query from the command line directly. We'll see more examples of this a little later.
# sqlite3 subscriptions.sqlite "select account, browser, preferences from subscribers order by account,browser"
One of the benefits (at this stage) of using SQLite is its simplicity.
Unsubscribe Endpoint.
This is used to unregister a subscriber and is also called from the client.
  const account = req.body.userID;
  const browser = req.body.browserID;
  const unsuball = req.body.unsubscribeAll;
Here, the userID and the browserID are the same as what we received for the subscribe calls, so we can just
delete the matching record in the database.
The unsubscribeAll flag is used to determine whether we should delete all the matching accounts (matching userID values), thus unsubscribing the user from notifications across all their devices.
Note that removing all the matching browserID references isn't perhaps the best approach here because several different (unrelated) projects might have the same browser subscribers. No reason
to unsubscribe an account from an unrelated project in this particular arrangement.
Notify Endpoint.
Our fourth and final endpoint is the one used to generate the actual notifications.
This is not intended to be used by the same client but rather by whatever system is used to generate notifications. For example, if the intent is to provide the user a notification whenever someone logs into their account (presumably just them!), a call to this endpoint might be made from inside a TMS XData endpoint that is handling the login. Or if there is a new product added to a product database somewhere else, there might be a task running there that then takes that new product database entry and generates a notification by calling this endpoint.
The idea, generally, is that this endpoint is called by something else. It could even be set up on a different
port, being mindful of any multiuser SQLite considerations, with different access restrictions. For now, we're
using it in our client app for demonstration purposes. The parameters we're expecting include the following.
  const auth = req.body.auth;
  const title = req.body.title;
  const body = req.body.body;
  const preferences = req.body.preferences;
  const account = req.body.account;
  const image = req.body.image;
  const url = req.body.url;
We've set up a separate key for the "auth" parameter. If we pass in the same key, then
authorization is granted. This is another one of those "don't add that to the client" scenarios, as if this key
were embedded in a client web app, it would be trivial for someone to extract it and then potentially send
notifications to our users. Not good.
The rest of the parameters aren't so complicated. The title parameter
is for the title of the notification, and the body parameter is for the body of the notification. HTML isn't allowed in these values, but you
can add newlines using "\n". The account reflects whom the notification is being sent to. We're
explicitly providing an account, but we could specify a wildcard value or some other flag to indicate that we
want to send a notification to all accounts or all subscribers. The preferences value here is compared to the preferences value provided during the subscribe step. If this value is found in that value, then we have a match and will send the notification.
These are used to build a query against the subscribers table in our SQLite database, returning a list of subscription values that we can then use to send the notifications. This will typically involve sending notifications to a single account, where multiple records may be returned only if they have subscribed using multiple devices or browsers.
If the preferences align, the notification is sent. The endpoint returns the number of notifications sent, just as a courtesy.
Note that the preferences mechanism is entirely arbitrary. It could be expanded to include a
separate table with many more options, or even with time ranges (don't notify me outside of office hours!), or
any other criteria that you might use. For our example, we will just use a set of values. If the category
passed in here is among the values that were registered when the subscriber record was created, using a simple
SQL query, then the notification is sent. Alternatively, perhaps the preferences mechanism might be ignored, and instead, the notifications are always sent, with the idea that this determination of who gets what notification is determined entirely elsewhere.
In this endpoint, we're also sending the notification along with an icon of our choosing. This could have been configured as another parameter just as easily, but as it will be the same icon for every invocation in this case, that didn't seem necessary. We'll see a little later where this icon appears, and also the conditions where it specifically doesn't appear.
If we want to send a notification from the command line directly, we can use curl, assuming we know the account name and preferences value that will match an existing subscriber record. A notification from the Actorious project might look something like this (remove all the line breaks).
curl -i
  -X POST https://www.blaugment.com:28293/notify
  -H 'Content-Type: application/json'
  -d '{
    "auth":"blablablabla",
    "account":"Blaugment/Andrew",
    "title":"It's Kate Mara's birthday!",
    "body":"Kate is an American actress, born on February 27, 1983",
    "preferences":";400;",
    "image":"https://image.tmdb.org/t/p/w185/xZYD8wYHMmN9dMMPiohnKEFoTGx.jpg",
    "url":"https://www.actorious.com/?R=PrqL-Kate-Mara"
  }'
Note that the same Push Notification Server could be used to send out notifications for any number of different web apps, which is what has given rise to so many publicly available Push Notification Services.
More Endpoints?
There are other endpoints that might be useful, such as one to check whether a subscription exists. Or one to update a subscription. But we can manage that state in the browser directly for the time being, using localStorage to keep track of what the user preferences are, for example.
We could also add administrative
endpoints. How many subscriptions are there? How many users? How many notifications have been sent? That sort of
thing. Those might make use of the same auth token that is used by this notify endpoint, returning the results
of different SQL queries. To make that more useful, we might also log more information about what was sent, when were the subscriptions
created, and so on, to get a better overall picture of the notification subsystem for our projects.
Client Setup.
The primary client environment we're interested in here is of course our TMS WEB Core projects. And to help us out, we've already got a TWebPushNotifications component that we can use that is included with TMS WEB Core.
There is also a sample project, mentioned earlier, that can be found in the Demos/Basics/PushNotifications folder, along with the PushNotificationServer that is part of the demo. This demo works pretty well all on its own, but we can't replicate it ourselves without our own server, which we've just built.
For our example, we'll
include largely the same basic UI that TMS used in their demo, but in our case, the server UI will also be included in our TMS WEB Core project, so it is a little
easier to test our push notification server, as it doesn't have a UI of its own.
To start with, we'll need a "subscribe" TWebButton, an "account" TWebEdit, and some options that we'll use to
reflect the preferences that we're using to help the user filter out only the
notifications that they are interested in. Typically the account value would be something unique to our project and not really
editable or even visible to the user. Helpful when testing, though. We'll keep a copy of all of these values in localStorage so that if the
page is reloaded, we'll remember where we were at without having to ask our push notification server for the details.
The important part is the TWebPushNotifications component. We can drop one of these on our form and then update the properties as follows.
- RegisterSubscriptionURL: https://blaugment.com:28293/subscribe
- UnregisterSubscriptionURL: https://blaugment.com:28293/unsubscribe
- VapidPublicKey: BKsFfaWHUl4uA6XTyvgrjub4PQOjjg-KVFWx_pBKXjXJFatp4rDNdeRlkH1U5hVioADFZfUBQaUnALBuOQtczWo
ServiceWorkerURL: serviceworker.js
Note that the ServiceWorker already exists in our project, being the PWA that it is, but we'll need to add a
little something extra to deal with the incoming push notifications that the ServiceWorker will handle. Here's
the updated serviceworker.js file. The two stanzas at the end have been added.
var CACHE_NAME = "$(ProjectName)";
var CACHED_URLS = [
  "$(ProjectHTML)",
  $(FileList)
  ];

self.addEventListener('install', function(event) {
                event.waitUntil(
                                caches.open(CACHE_NAME).then(function(cache) {
                                return cache.addAll(CACHED_URLS);
                })
                                );
});


self.addEventListener('fetch',function(event) {
   event.respondWith(
     fetch(event.request).catch(function() {
                   return caches.match(event.request).then(function(response) {
       if (response) {
                                   return response;
       } else if (event.request.headers.get("accept").includes("text/html")) {
                                   return caches.match("$(ProjectHTML)");
                   }
                   });
   })
                   );
});

// Register event listener for the 'push' event.
self.addEventListener('push', function(event) {
  const payload = event.data.json();
  event.waitUntil(
    self.registration.showNotification(payload.title, {

      body:  payload.body,
      icon:  payload.icon,
      image: payload.image,
      data:  { url: payload.data.url }
    })
  );
});

// Open up a URL when notification is clicked
self.addEventListener('notificationclick', function(event) {
  event.notification.close();
  if (event.notification.data.url !== undefined) {
    event.waitUntil(
      clients
        .openWindow(event.notification.data.url)
        .then((windowClient) => (windowClient ? windowClient.focus() : null))
    );
  };
});
Also, note that a PWA is limited to having just one ServiceWorker registered. The name and location of this JavaScript file can be set in the TMS WEB Core Project options. We'll cover more about the last stanza, handling notification clicks, closer to the end of this post.
Client Interface.
To make this a little nicer to test, let's put together an interface using Bootstrap. Note that as we created
our project using the PWA template, we'll have to add Bootstrap separately. Here's what our interface looks
like initially, for the client portion.
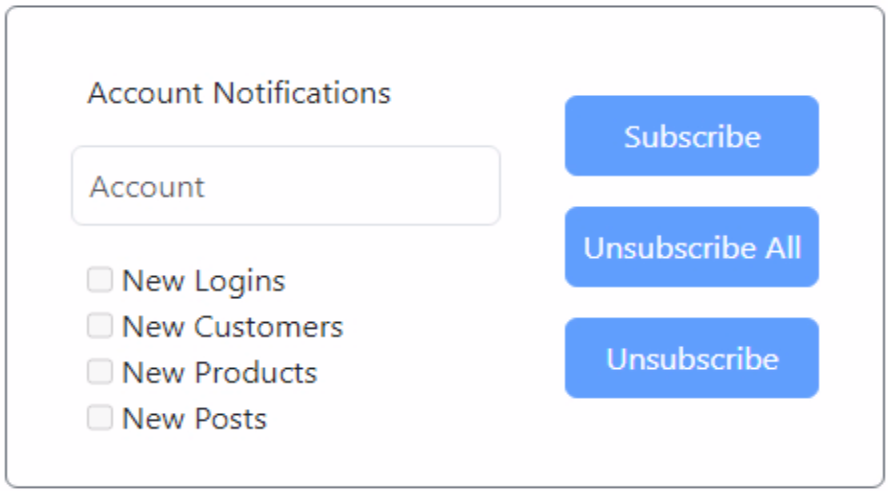
Notifications Interface.
The buttons on the right are initially disabled as there's no account specified and we've not used it
previously, so nothing has been loaded. If the Account value changes, we'll check and see if there's a match in
localStorage. If there is, we can update the information with what we know. Let's say we want to be notified
about everything.
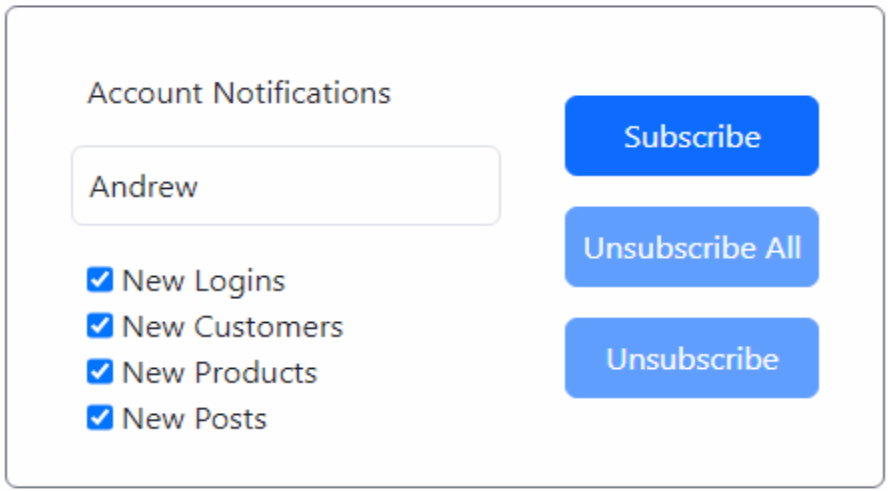
Notifications Populated.
From here, clicking the subscribe button will trigger the call to our Push Notification Server.
procedure TForm1.WebButton1Click(Sender: TObject);
begin
  WebPushNotifications1.RegistrationUserID := GetAccountName;
  WebPushNotifications1.RegistrationUserData := GetPreferences;
  WebPushNotifications1.RegisterServiceWorker;
end;

function TForm1.GetAccountName: String;
begin
  Result := 'Blaugment/' + encodeURIComponent(WebEdit1.Text);
end;

function TForm1.GetPreferences: String;
begin
  Result := ';';
  if WebCheckBox1.Checked then Result := Result + '100;';
  if WebCheckBox2.Checked then Result := Result + '200;';
  if WebCheckBox3.Checked then Result := Result + '300;';
  if WebCheckBox4.Checked then Result := Result + '400;';
end;
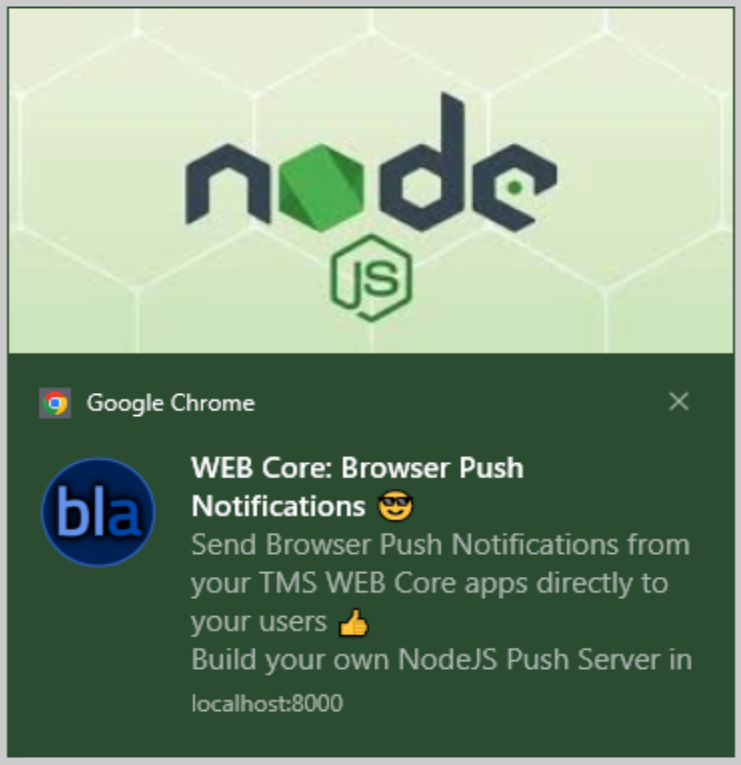
Which in turn will generate an immediate notification as a confirmation.
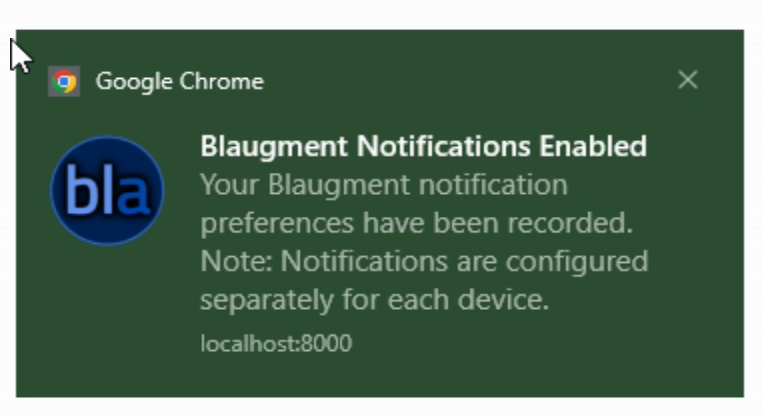
Subscription Notification.
Note that in this case, the contents of the notification we've received are defined entirely by our Push
Notification Server. The icon, the title, and the body of the message are all fixed there, hard-coded directly in the server.js script.
The notification itself shows that it is coming from Chrome (as we're using Chrome to run the test) but otherwise, it works as planned. If
it is not dismissed, it will also end up in the Windows notification area, if this is being run on Windows,
naturally.
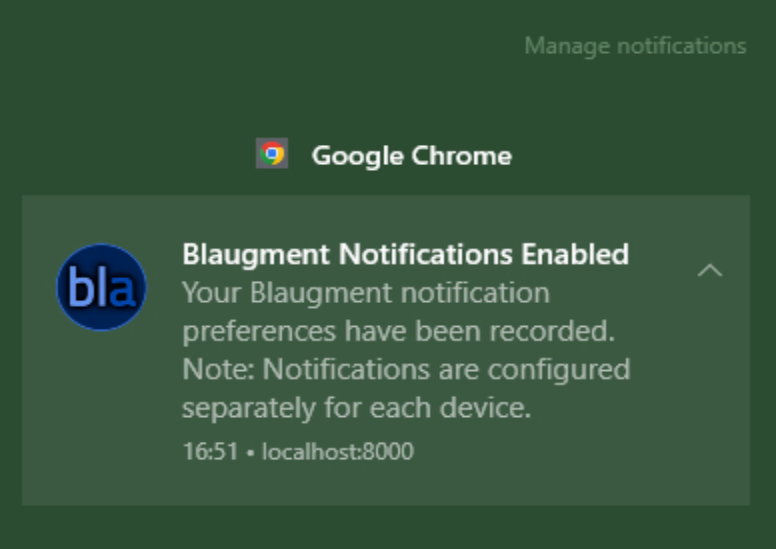
Notifications in Windows.
Once deployed, if we were to run this from a separate system, say Firefox running on Fedora, we'd also get a
similar notification, using that system's desktop notification system (KDE in this case).
Notifications in Linux.
Still obvious that it is coming from Firefox, and we've still got our logo. Looks pretty good. How about an
iPad? The trick here is that we'll first need to have added the PWA to the home screen. In this case, we are going to end
up with the icon that is in the PWA as our home screen icon, which is the default TMS WEB Core icon.
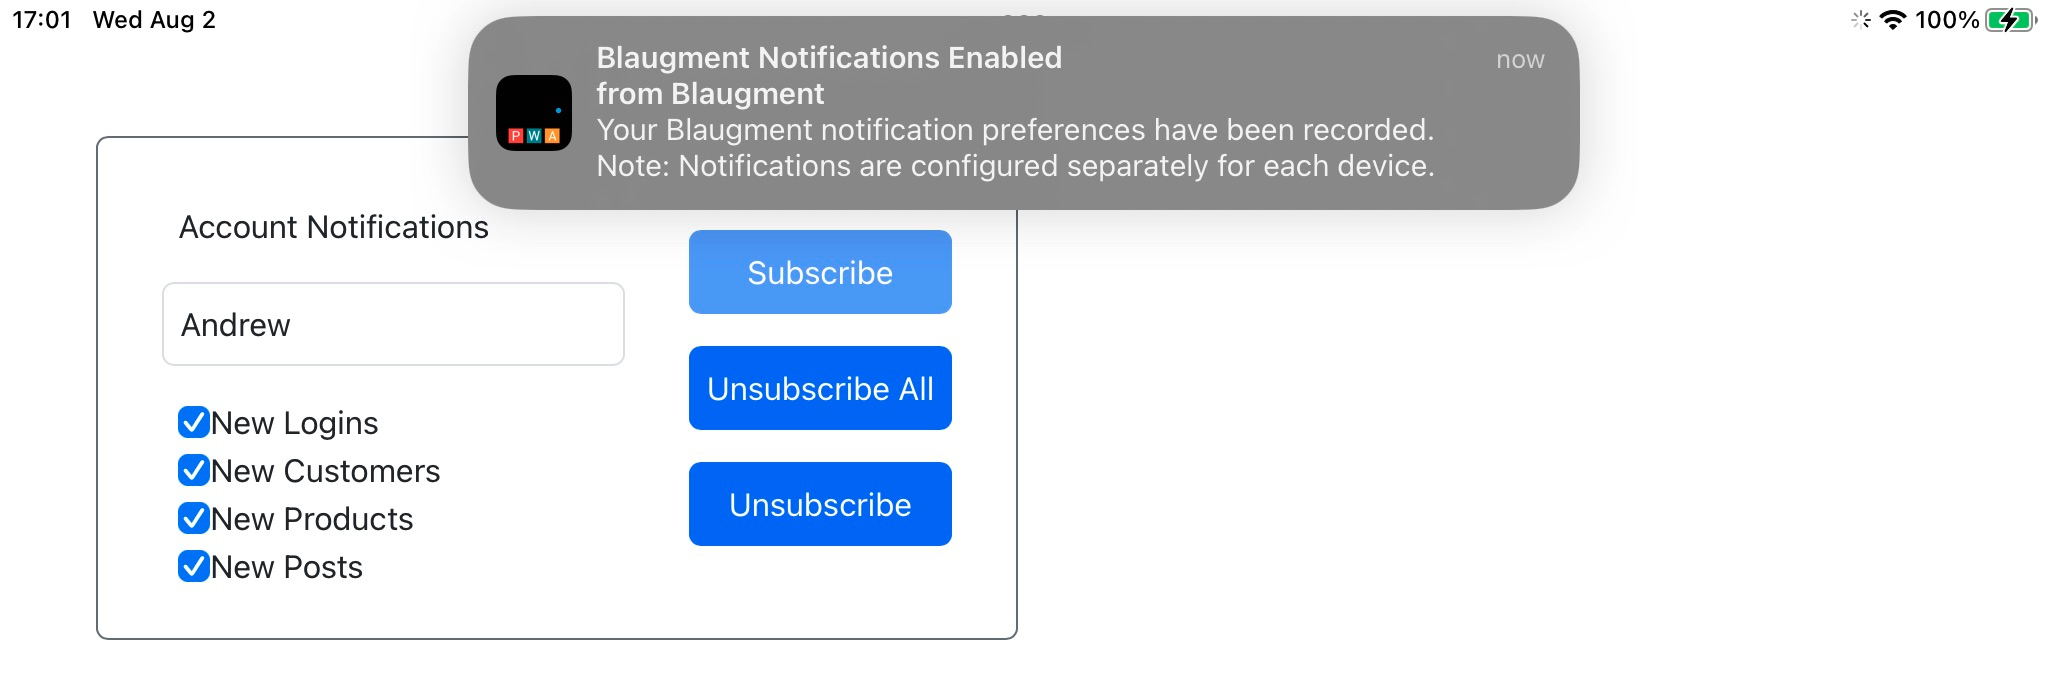
Notifications in iOS.
Our personalized icon is nowhere to be found - which isn't surprising as it was just being provided by the server.js script. When deploying a TMS WEB Core PWA app, this icon would be replaced with something specific to our project, so not really a problem.
Also note that iOS reports the name of the app generating the notification, which happens to be whatever name we gave it when creating the home screen icon. Our PWA even shows up as an app within iOS settings, where the notification options can be adjusted (Banners, Sounds, Badges, and so on). This is the same consistently across iOS, iPadOS, and macOS. More on that a bit later.
If we go back to our server, we can run the same SQLite query we ran previously and see that our subscriptions are
active.
Blaugment/Andrew|35d1e0cd|;100;200;300;400;
Blaugment/Andrew|cc30f869|;100;200;300;400;
Blaugment/Andrew|e598557b|;100;200;300;400;
Each record corresponds to a different browser. If we also include the "subscription" column, we can see the
internal endpoint used to manage the push notifications that correspond to each of the browser vendors.
Blaugment/Andrew|35d1e0cd|;100;200;300;400;|{"endpoint":"https://fcm.googleapis.com/fcm/send/ckv9PJnn_tg:APA91bEzV0ieL9tTPYHiJspwl0r1EIoTl_PZ5ydxzDSrSJOj15mwl3YWDucjeUlxqAahrmpjJdNeOEy5pujiAVPD2lvDKpRouREaLp5Vbuv1lfTQA2tByThW2vrzdRo9E_7YkZgFoYdu","expirationTime":null,"keys":{"p256dh":"BH6eIuFhp6z1aJphtnNmFxAjOTySetb3-NSUEOWH8-EMQaQQTWmOSBgDzkbNB_dWVTlaanKyrxneYYB2wKaJ4Os","auth":"5Dbn-_gTy6rgybHWXz2Ulw"}}
Blaugment/Andrew|cc30f869|;100;200;300;400;|{"endpoint":"https://updates.push.services.mozilla.com/wpush/v2/gAAAAABkycqTTeA8fYYeiFhhOpAX6ee6ZykJETkDcXZ7WWXmh-hz_SZWTRB24vTyIwyPtobuKaD2bU7pfBGX_dqwmHD8ZP5HSA6cml9NJQR9y32REYnhGwcAoaL2k5C7woX5Tz9xOeHt4NbQU-gW58Qhs4H7gJjnc3rjAFvan8NMtpHRHDsvt0k","expirationTime":null,"keys":{"auth":"X-kpusDYWDVO0xClF0eafA","p256dh":"BCpGghV2UpfdmtcURYvBD7At4akJDYp4jP4Jk4ON4sJRTin7nCykrm4hRr5KjkSZb-oqQ-VkuIDnaVAq8OD1QhQ"}}
Blaugment/Andrew|e598557b|;100;200;300;400;|{"endpoint":"https://web.push.apple.com/QNuYIbKTTYl0CrR-_AvNWu0u7cPG35wl8u4dJtsKYwW0T95sAJWSdvAJXvaPaGMSAFP_2y7raZVh9TW0BvbCBMtkNYUPkXpc4yFNZjcgrM8-AsQjeM7vFkObrDuiD6cTZCAhQbAqA72J74lg03a3cztfN9PWDLfDOvAcgMi79Ks","keys":{"p256dh":"BNi94iqlhG9I1Dssx59J9mGQtPQyRVtXB_VHHDS5iz61DWJbmJCJLOzzFW-vG-7stMDtKwKKVV2HrB6ICcsf9BA","auth":"9eEHpNrOyoavizx7G7ZQhw"}}
We can use the same query to confirm that the other aspects of our UI are working as expected. Like selecting a different set of
preferences or adding different usernames. The project name prefix is added in the GetAccountName function as a way to
help separate different projects if they use the same push notification server.
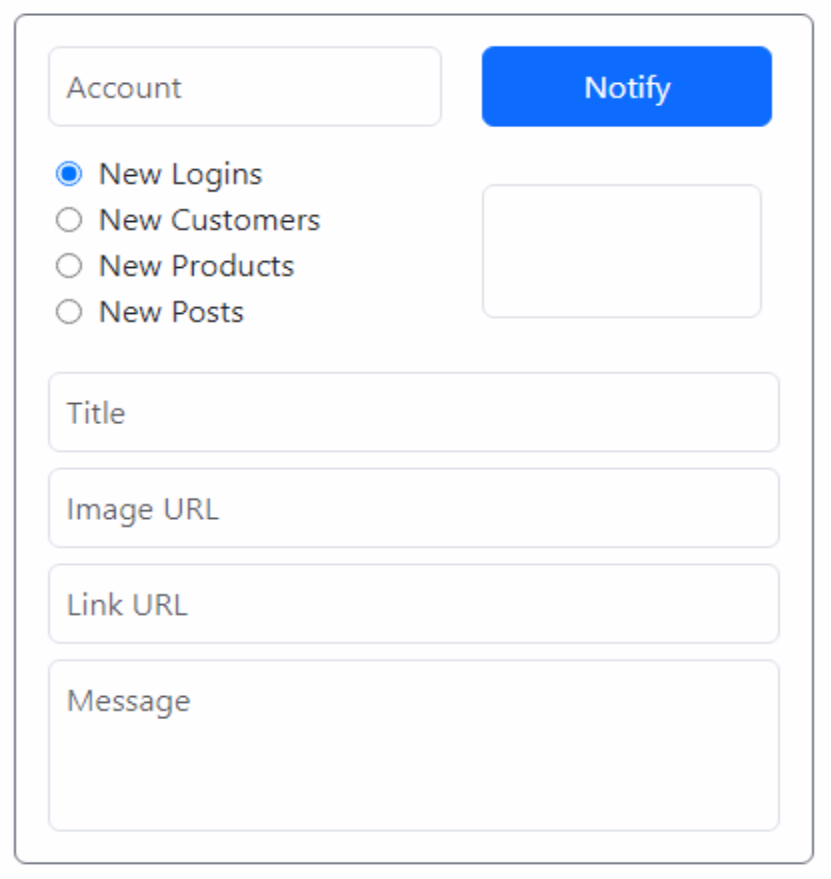
Sending Notifications.
All that's left then is to send out a notification of some kind, which should magically appear on all of the devices we've subscribed with. Everything is all in place on the server side, we just need an interface for it.
Here, we've added another section to our sample TMS WEB Core app, but as discussed previously, this really should be either in a properly secured section of the app or in another app entirely, like an XData app or an app that isn't publicly available. Most of the time, hopefully, notifications will be sent automatically, so the interface here is primarily for testing. However, there's nothing really stopping anyone from having a more human-driven notification system.
In this interface, our list of preferences consists of radio buttons, as we only want to pick one at a time for each notification we send. This is an arbitrary choice, similar to how the TMS demo was arranged. We could have a far more complex arrangement for preferences, but keep in mind we might still have to sort through it in the server when it comes time to determine whether the notification needs to be sent or not.
In this case, we're just checking if the selected account has opted to receive notifications of one of these types, which is a very simple query.
A different approach would be to do the work to determine whether a notification is to be sent before we get to this point. For example, the preferences might be stored in our own app, and the "subscribe" functionality we're working with here is just the final step. Our own app might decide ahead of time what the conditions are (with user input of course), using whatever complex rules we like, and then just send the required notifications to the push notifications server without it having to make any decisions about sending them out.
The rest of the interface involves just filling in the Account, Title, Body, Image URL, and Link URL fields. If an Image URL is provided, a preview is shown.
Send Notifications UI.
For the Title and Body, plain text is all that's supported - no HTML allowed. However, you can
insert emoji and other characters. And if you're looking to add a line break in the message, the line break
provided in the TWebMemo component works perfectly well.
The Image URL can be used to display larger images, like product photos or that kind of thing. Each platform has different optimal image sizes, but a general rule of thumb might be to go with 1000px x 500px images, using either PNG or JPG formats. That seems to be the workable aspect ratio, though there can also be limits on the overall size of the image - 200 KB might be a good maximum target. Note that Just the URL can be provided here, and things like CORS come into play, so treading too far from a normal image link is likely to not work. Note also that it is only Chrome notifications that include this extra image.
For the Link URL, this is what the browser page will open when clicking on the link. It isn't supported on all
platforms either, but as usual, Chrome seems to be the one that supports it best. This is how you might tie a
notification to a product page for example, or a route into your app rather than just the home page. In our curl example previously, we provided a link to Actorious that it uses to show the page for the person featured in the notification.
Here's what a potential notification about this very blog post could potentially look like, with all the options filled in.
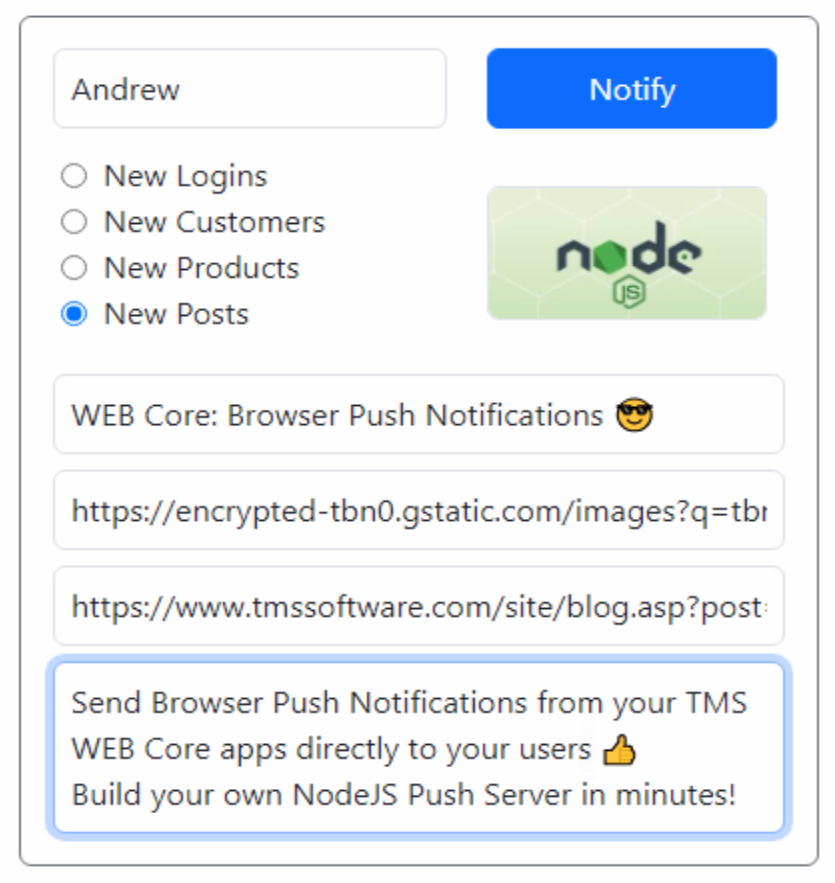
Send a Notification with all the Trimmings.
Using Chrome in Windows, this appears with the image, and clicking on the notification launches a web page
showing the post that is mentioned in the notification. Fancy!
Rich Browser Notifications.
The code to send the notification is as follows. We've covered most of this
already. To help simplify handling the data being sent, a JSON object is created. It is what is expected anyway, and
this is easier than trying to format a string as JSON.
procedure TForm1.WebButton4Click(Sender: TObject);
var
  AuthKey: String;
  PostData: TJSONObject;
  Preference: String;
  Response: TJSXMLHttpRequest;
begin

  // This should be setup as an input value to be entered
  // each time rather than including it here.
  AuthKey := 'blablablabla';

  // Preference is just the type of notification we're sending;
  Preference := 'None';
  if WebRadioButton1.Checked then Preference := ';100;';
  if WebRadioButton2.Checked then Preference := ';100;';
  if WebRadioButton3.Checked then Preference := ';100;';
  if WebRadioButton4.Checked then Preference := ';100;';

  // Compose the data for the request
  PostData := TJSONObject.Create;
  PostData.AddPair('auth', AuthKey);
  PostData.AddPair('account', 'Blaugment/' + encodeURIComponent(WebEdit2.Text));
  PostData.AddPair('preferences', Preference);
  PostData.AddPair('title', WebEdit3.Text);
  PostData.AddPair('body', WebMemo1.Lines.Text);
  PostData.AddPair('image', WebEdit4.Text);
  PostData.AddPair('url', WebEdit5.Text);

  // Prepare the request
  WebHttpRequest1.URL := 'https://www.blaugment.com:28293/notify';
  WebHttpRequest1.Headers.Clear;
  WebHttpRequest1.Headers.AddPair('content-type','application/json');
  WebHttpRequest1.Command := httpPOST;
  WebHttpRequest1.PostData := PostData.ToString;

  // Execute
  Response := await(TJSXMLHttpRequest, WebHTTPRequest1.Perform);

  //  // Show results (how many were sent?)
  ShowMessage(String(Response.ResponseText));

  // Reset interface for next request
  WebEdit3.Text := '';
  WebEdit4.Text := '';
  WebEdit5.Text := '';
  WebMemo1.Text := '';
  WebHTMLDiv8.ElementHandle.innerHTML := '';

end;
Beyond the simple title and body of the notification, browsers start to differ in their support for the larger image and the link to a custom web page. Firefox supports links. Safari supports neither. Opera running on macOS supports the Link URL but doesn't display the image. They all display the icon for the web app though.
Emoji support is great on macOS and iOS. Windows emoji always seem to look a little odd, but they work fine.
Linux on the other hand tends to be a little less stylish when it comes to emoji. They're there - and you can
easily tell what they are, but their choice of emoji character set for display is just rather anemic in comparison.
Almost There.
The last thing to cover is this issue with iOS and the need to add the PWA web app to the home screen. There isn't really any way around it, that's just how they've set it up. PWA apps have always been treated as second-class citizens in iOS, so support for browser push notifications is a welcome step in the right direction. But there is still a long way to go before this is anything close to parity with native apps.
Still, we can try and help things along a little. One way is to
present the user with a suggestion to add our app to the home screen, rather than assume they'll come up with the
idea all on their own. For non-iOS devices, we can actually proactively trigger this interface directly. To wire up a button for this, we can add a bit of JavaScript to our WebFormCreate method (attribution).
  asm
    window.addEventListener('beforeinstallprompt', function(event) {
      event.preventDefault();
      window.deferredPrompt = event;
      return false;
    });

    function addToHomeScreen() {
      if (window.navigator.standalone === true) {
        return false;
      } else if (window.matchMedia('(display-mode: standalone)').matches) {
        return false;
      }

      const prompt = window.deferredPrompt;

      if (prompt) {
        prompt.prompt();

        prompt.userChoice.then(function(choiceResult) {
          if (choiceResult.outcome === 'accepted') {
            console.log('User accepted the A2HS prompt');
          } else {
            console.log('User dismissed the A2HS prompt');
          }
          window.deferredPrompt = null;
        });
      }

      return true;
    }
    window.addToHomeScreen = addToHomeScreen;
  end;
With that in place, we can display a button that will trigger the "Add to Home Screen" functionality for whatever platform it is running on. Where you display this button, and how often, will depend on many factors, but for heavy users of your app, this is something that should be encouraged. Perhaps including it on a login page, or having it pop up as a covering page occasionally, might help nudge them in this direction. For now, we can just add it to a button in our interface so we can try it out.
procedure TForm1.WebButton5Click(Sender: TObject);
begin
  asm
    addToHomeScreen()
  end;
end;
Looking at the code above, it should also be apparent that we can check and see if the app is already
installed on the user's home screen by virtue of the "window.navigator.standalone === true" condition. We might use this to determine
whether to even show the option to add browser push notifications - if they're running on iOS and this condition
isn't met, then the notifications won't work anyway, so it might be best to not show the "subscribe" button.
Sadly, iOS doesn't currently support the underlying 'beforeinstallprompt' event that we've used above. A common alternative is to create a prompt that describes how to add the app to the user's home screen (click on the share button, scroll to find the Add
to Home Screen option) and then present that with varying degrees of urgency, perhaps with a bit more
information about why this would be of benefit to them.
You've Been Notified!
That about covers this method of sending notifications. As usual, please leave any questions or comments
below. What kinds of browser notifications do you currently subscribe to? What kinds of browser notifications would your users appreciate? Lots of options here.
Related Posts
Notifications via E-Mail with XData/Indy
Notifications via Browser Push Notifications
Notifications via SMS with Twilio
Follow Andrew on 𝕏 at @WebCoreAndMore or join our 𝕏 Web Core and More Community.
Andrew Simard
Bookmarks:

This blog post has received 2 comments.
 2. Friday, August 18, 2023 at 8:58:28 PM
The send-auth.key file is just intended to contain a secret of some kind, perhaps a UUID or some random string. This is then compared to the value that is passed in using the auth parameter when sending out notifications. A rudimentary attempt at blocking unauthorized users from sending notifications. Reasonably secure in that this would only be used by a presumably separate app or system that is generating the notifications - not something normally included in the same TMS WEB Core app, as I tried to explain.
2. Friday, August 18, 2023 at 8:58:28 PM
The send-auth.key file is just intended to contain a secret of some kind, perhaps a UUID or some random string. This is then compared to the value that is passed in using the auth parameter when sending out notifications. A rudimentary attempt at blocking unauthorized users from sending notifications. Reasonably secure in that this would only be used by a presumably separate app or system that is generating the notifications - not something normally included in the same TMS WEB Core app, as I tried to explain.From our perspective, there is nothing here related to Google Cloud Messaging that we need to be aware of. Internally, web push notifications are handled by each browser having its own unique endpoint that communicates with the browser vendor''s systems. In the case of Chrome, it looks like this endpoint is handled by Google FCM, but we don''t control that or interact with that directly in any way. Similarly, Firefox and Safari have different endpoints in their systems, where the underlying system isn''t readily apparent.
Andrew Simard
All Blog Posts | Next Post | Previous Post
* send-auth.key: what shoulod this file contain ? and what exactly is its purpose ?
* further on I see a reference to Google Cloud Messaging ? Is it using Google FCM ?
Thanks
Wim