Blog
All Blog Posts | Next Post | Previous Post

 Use Tailwind and the Tailwind workflow with TMS WEB Core
Bookmarks:
Wednesday, August 2, 2023
Tailwind is a rapidly growing and popular open-source CSS framework. Different from Bootstrap and many other CSS frameworks, it does not come with a fixed list of classes for the various HTML elements but it is rather a huge library of fine-grained classes that users mix and match for HTML elements. As it contains so many fine-grained classes, the full Tailwind CSS file is huge. At this moment the latest version v3.3.3 full CSS file is 354kb. To reduce this overhead, Tailwind employs the technique of an engine that parses all your HTML files to scan for all possible Tailwind CSS classes and builds an on-demand (small) Tailwind CSS file containing only the classes in use.
TMS WEB Core was from the first day designed to be fully open to web technologies, so using Tailwind CSS with TMS WEB Core is also possible.
The easy & straightforward approach
The first easy approach to use Tailwind with TMS WEB Core is to simply include the full Tailwind CSS library from its CDN by specifying it in the HEAD section of the TMS WEB Core project HTML file:
    <!-- Tailwind CSS Play CDN -->
    <script src="https://cdn.tailwindcss.com"></script>
When this is included, you can start using the Tailwind CSS classes for all controls in TMS WEB Core by specifying these class names for the control.ElementClassName property.
For a TWebEdit control (which wraps a HTML INPUT element), this could be:
ElementClassName = 'bg-gray-50 border border-gray-300 text-gray-900 text-sm rounded-lg
focus:ring-blue-500 focus:border-blue-500 block w-full p-2.5 dark:bg-gray-700 dark:border-gray-600
dark:placeholder-gray-400 dark:text-white dark:focus:ring-blue-500 dark:focus:border-blue-500'
This gives the input element a rounded border, grayish background and a blue focus border:

The smarter and more performant approach
Pro Tailwind users will want to use the JIT engine to create the on-demand optimized Tailwind CSS library file that includes only the CSS classes effectively used in your web application. So, how can we do that for a TMS WEB Core project in a convenient way? The solution lies in the build options avaialable in the Delphi IDE and the Windows Tailwind engine.
The first thing to do is to download the Tailwind engine for Windows. It can be downloaded from: https://github.com/tailwindlabs/tailwindcss/releases
Download tailwindcss-windows-x64.exe and put this in a Windows system path so it can be invoked from everywhere.
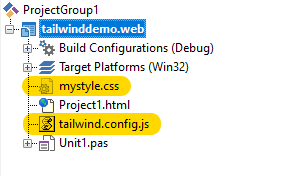
The Tailwind engine uses a configuration file named tailwind.config.js and an instruction CSS file. So, we add a file tailwind.config.js to the TMS WEB Core project folder and add this file also to the project itself.
This tailwind.config.js file contains:
/** @type {import('tailwindcss').Config} */
module.exports = {
  content: ["*.{html,js}"],
  prefix: 'tw-',
  theme: {
    extend: {},
  },
  plugins: [],
}
This basically instructs the Tailwind engine that all CSS classes throughout the project to scan for have the 'tw-' prefix and that the engine should scan the project HTML and JavaScript files.
In addition, we add a CSS file to the project folder and this CSS file contains instructions for what CSS classes to scan.
To scan for all classes, this CSS file contains:
@tailwind base;
@tailwind components;
@tailwind utilities;
Now, we add to the post build command to run the Tailwind engine in the output folder taking the input from input CSS file and generating the new output CSS file. In this case, the command-line to run the Tailwind engine is:
tailwindcss-windows-x64 -i mystyle.css -o ./output.css
The engine will create a new CSS file containing only the Tailwind CSS classes effectively used in the application, so obviously , we need to make our TMS WEB Core app use this generated CSS file by adding a reference to it in the project HTML file:
<link rel="stylesheet" href="output.css">
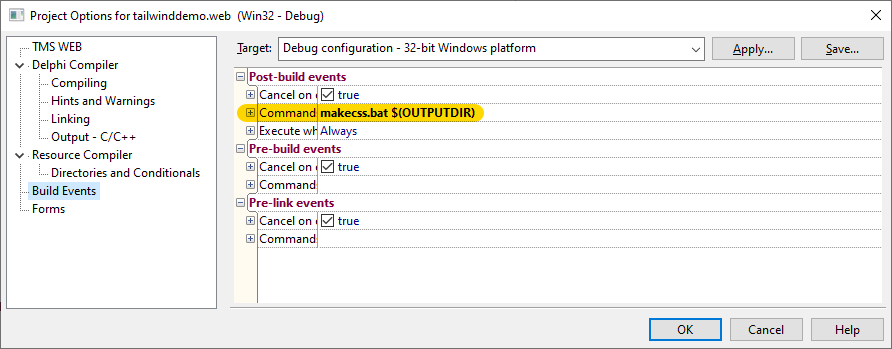
To let the Tailwind engine run every time we build the TMS WEB Core app, we create a .BAT file that we specify as a POST BUILD command.
This .BAT file (makecss.bat) contains:
echo %1
cd %1
tailwindcss-windows-x64 -i mystyle.css -o ./output.css
In the POST BUILD command, we specify the output folder as first argument allowing to set the folder where tailwindcss-windows-x64 is executed to the output folder and where the input CSS file is and where as such the output CSS file will be generated.
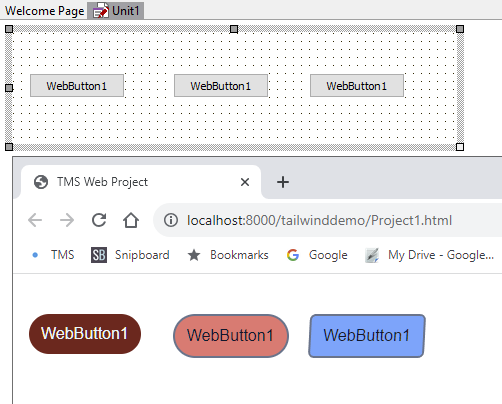
As such, when we build the project, the Tailwind engine is executed and for this particular example where a series of Tailwind CSS classes was used to style buttons, the resulting generated Tailwind CSS file was only 11kb.
Freedom of choice
As you learned from this blog article, TMS WEB Core is totally flexible to also offer a good workflow for working with Tailwind CSS. Some people will prefer Bootstrap, others might like Tailwind better and who knows one of many other CSS frameworks. In any case, TMS WEB Core is all about freedom of choice. If you found a good (free) HTML template using Tailwind, like from tailwindawesome.com, apply the workflow highlighted here and you should be up & running quickly. Get started. We can't wait to see your impressive results realized with Tailwind & TMS WEB Core!
Bruno Fierens
Bookmarks:

This blog post has received 2 comments.
 2. Tuesday, August 29, 2023 at 10:07:17 AM
Thanks, we fixed it.
2. Tuesday, August 29, 2023 at 10:07:17 AM
Thanks, we fixed it.
Bruno Fierens
All Blog Posts | Next Post | Previous Post
Thanks for your recent blog on Tailwind and TMS Web Core. Very interesting and powerful use of these tools and how open is TMS Web Core.
Please note that the second to last line of this blog entry contains tailwindansome dot com instead of tailwindawesome dot com
Thanks.
Jaime De La Pava