Blog
All Blog Posts | Next Post | Previous Post

 Extend TMS WEB Core with JS Libraries with Andrew:
Tabulator Part 7: Performance
Bookmarks:
Tuesday, July 5, 2022

In our final outing in this miniseries about using Tabulator in your TMS WEB Core projects, we're going to focus primarily on one area - performance. While Tabulator in its simplest form is amazingly quick, there is a lot more to the performance equation than just Tabulator itself. We'll also look at one way to implement image lazy loading, potentially applicable to any TMS WEB Core project. And we'll even explore one way to monitor the progress of downloading data from an XData server. By the time we're done, you should be well-equipped to build not only functional projects but highly performant projects as well.
Motivation.
One of the defining characteristics of any application, whether it is a web app, a phone app, a Windows desktop app, or any other app, is how much time the user spends waiting. Waiting for the app to load. Waiting for the app to display data. Waiting for the app to respond to some kind of interaction.
For example, clicking a button should ideally provide some kind of feedback, even if the action being triggered cannot be completed immediately. Scrolling should also be as fast as possible. "Buttery smooth" as one famous person in our field liked to describe it.
There are plenty of statistics to be found (naturally, with varying degrees of applicability) that relate app performance to user retention. If an app is slow, they'll quickly move on to something else, if they can. So we owe it to our users (and ourselves!) to make things as absolutely performant as we can. There's almost always something that can be done to make an app faster. But is it worth it?
Tabulator. Just How Fast Is It?
One of the first questions to address, then, is about Tabulator itself. There are many JS grid libraries around. Which one is the fastest? Well, we're not the first to come up with that question. In fact, there's a GitHub project focused on exactly this - JavaScript Data Grid Performance Comprarison. Unfortunately, the Tabulator figures are not yet included in their results, though a PR is pending. You can read more about it here, though. The news is good - the current version of Tabulator is easily among the top performers in this comparison in every respect. So we're already starting out strong in the performance department.
While using Tabulator with all its defaults is great, one of the benefits when using many of these JS grid libraries is the ability to customize what it is doing, as we've been seeing over these last several posts. And sometimes, that customization can come at a cost if we're not paying close attention.
As an example of this, in a previous outing, we made some changes to include the row count in the column header of our tables. We implemented this using Tabulator's own updateColumnDefinition() function, which did exactly what we wanted. However, it turns out that this function essentially drops and recreates the entire column (so it can be sure that all the column definition parameters are accounted for). When doing this with a column filled with images, this ended up being enormously expensive. And it also triggers a table refresh, which interferes with the live filtering function. This particular issue is something that is being addressed by the Tabulator team and will be improved in the near future. But what about today? Some of us are impatient, after all.
An alternative was needed, particularly as the only change was cosmetic - changing an element on the page. And we actually want to change the value more often, such as when filtering data in the table. And we'd also like to change the color when the data is filtered. So what to do?
Tabulator has the ability to add classes to its elements, like column headers, so we can find the element on the page that we want to change easily enough. Then we can just, well, change it by assigning a new value using a well-crafted innerHTML property. We can do this whenever we want, such as after the table has been loaded, or after it has been filtered. We can also be a bit clever to make sure it catches the scenario where a table is filtered even before it is loaded.
Our Name filter function has also been augmented to include both names and locations. Here's what it looks like now. Note that we're able to filter on multiple columns with one filter, and everything is live - the table contents show the results as you type.
 asm
    var headerNameFilter = function(e, column, onRendered){
      var container = document.createElement("div");
      container.classList.add("rounded", "border-2", "bg-dark", "mt-2");

      var label = document.createElement("label");
      label.innerHTML = "Filter By Person";
      label.style.display = "block";
      label.classList.add("text-white", "mb-2", "ms-1", "d-flex", "flex-fill", "align-items-center", "justify-content-between");
      label.style.height = "18px";

      var input = document.createElement("input");
      input.placeholder = "Person...";
      input.value = column.getHeaderFilterValue() || "";
      input.classList.add("rounded-1", "border-0", "ps-2");
      input.autocomplete = "off";
      input.setAttribute('spellcheck', 'false');
      input.addEventListener("keyup", (e) => {
          column.setHeaderFilterValue(input.value);
          if (input.value.length > 0) { column.getElement().classList.add("FilterActive");}
          else {column.getElement().classList.remove("FilterActive");}
          if (event.keyCode === 13) { // key code of the keybord key
            container.classList.add("d-none");
          }
      });

      var label2 = document.createElement("label");
      label2.innerHTML = "Filter By Location";
      label2.style.display = "block";
      label2.classList.add("text-white","mt-2", "mb-2", "ms-1", "d-flex", "flex-fill", "align-items-center", "justify-content-between");
      label2.style.height = "18px";

      var input2 = document.createElement("input");
      input2.placeholder = "City/Region/Country...";
      input2.value = column.getTable().getColumn('BPL').getHeaderFilterValue() || "";
      input2.classList.add("rounded-1", "border-0", "ps-2");
      input2.autocomplete = "off";
      input2.setAttribute('spellcheck', 'false');
      input2.addEventListener("keyup", (e) => {
          column.getTable().getColumn('BPL').setHeaderFilterValue(input2.value);
          if (input2.value.length > 0) { column.getElement().classList.add("FilterActive");}
          else {column.getElement().classList.remove("FilterActive");}
          if (event.keyCode === 13) { // key code of the keybord key
            container.classList.add("d-none");
          }
      });

      var button = document.createElement("button");
      button.classList.add("btn", "pe-1", "btn-link");
      button.innerHTML = '<i class="fa-solid fa-xmark text-white text-decoration-none"></i>';
      button.addEventListener("click", (e) => {
        column.setHeaderFilterValue('');
        column.getTable().getColumn('BPL').setHeaderFilterValue('');
        column.getElement().classList.remove("FilterActive");
        input.value = '';
        input2.value = '';
        container.classList.add("d-none");
        var actorrowcount = document.getElementsByClassName('ActorRowCount')[0].firstElementChild.firstElementChild.firstElementChild;
        table.redraw(true);
      });

      label.appendChild(button);
      container.appendChild(label);
      container.appendChild(input);
      container.appendChild(label2);
      container.appendChild(input2);
      setTimeout(function (){
        input.focus();
        input.select();
      },50);

      return container;
    }

    // After filtering the records, update the column header to show the new count
    pas.Main.MainForm.ActorTabulator.on("dataFiltered", function(filters, rows){
      var actorrowcount = document.getElementsByClassName('ActorRowCount')[0].firstElementChild.firstElementChild.firstElementChild;
      if (pas.Main.MainForm.ActorTabulator.getDataCount() !== rows.length) {
        actorrowcount.innerHTML = '<span style="color: var(--bs-warning);">'+rows.length+'</span>';
      }
      else {
        actorrowcount.innerHTML = rows.length;
      }
    });

  end;
To try it out, visit https://ww.actorious.com and then click the "TMDb Top 1,000 People" button. In the Person column, click the filter and start typing a location, like your country, for example. As you type, the records in the table, and the count, change. Here's a clip of what it looks like for the current day, filtering the location results for Canada.
Images.
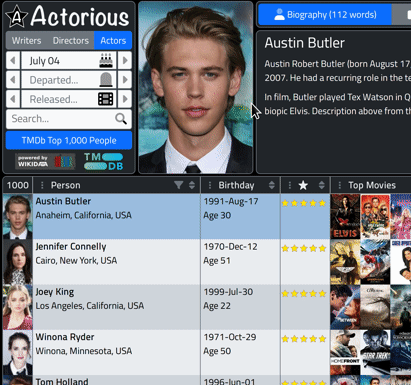
I've gone back and forth more than once about the images that are displayed in Tabulator, with respect to their size. The source data, which in this case is the TMDb database, offers images in different formats (resolutions). Currently, we're back to displaying the People using the smallest thumbnail available, which is 45x68. This is convenient as it sets the height of our table rows and is large enough to recognize the person. The Movie and TV Show images are larger - 92x135, but there isn't anything smaller available, so not much can be done there. These are still quite small. There are more of them (on a given row, 10 Movie and TV Show images for each Person image) but there's also the likelihood that they'll be accessed from the cache more frequently. Not sure if it balances out exactly, but it hasn't presented any problems so far.
When we want to display hints, though, we'd like to display the Movie and TV Shows in their larger format, so that conveniently gives us a good size and has the benefit that we don't need to retrieve another image - we can just use the same one - when displaying the tooltip. This works great for the Movie and TV Show images, but increasing the size of the People images from 45x68 to 92x135 might not seem like a big deal, but they do indeed look terrible. So in the tooltip code, the image is replaced. Unfortunately, 92x135 isn't one of the available sizes. The next size up is 185x278 which is more than we need, but no middle size is available.
There is a delay, however, between showing the tooltip and then showing the image, as this image has to be retrieved at that time. I had originally just changed the table version to use this higher-resolution version all the time to get around this delay (so it would already be cached as the other images are) but then decided that it would be better to use the original images. Not just for performance, but because it makes more sense - the extra data wouldn't be useful the vast majority of the time.
The delay is kind of annoying, particularly as it isn't seen with the other images in the table - just the People images. When clicking on any of these images, the image is displayed full-screen. The top image is also replaced with an even higher-resolution version of the photo. And here again, we encounter the same problem - a delay introduced while these higher-resolution images are loaded. It would sure be nice if we could set a second parameter on the image to tell it to use a placeholder that we already have available, while waiting for the new image to load. Well, this is not a new idea of course, and one way to address it uses a technique generically called "lazy loading".
The main intent behind lazy loading is actually the reverse - to not load any images we're not using for as long as possible, and only when we're absolutely sure we need it, go and get it. Over the years, there have been many ways to implement this kind of behavior. More recently, browsers have supported the attribute loading="lazy" which can be added to <img> tags (or other tags for other lazy loading behaviors). Lazy loading in general has been crucial to enable loading pages with many images. But there's another problem lurking here. When lazy loading an image, browsers have often inserted some kind of placeholder while the image is loading, or even a broken image if the load fails. And really, we don't want any part of that as we already have a placeholder image.
Many, many people have encountered this problem. So many in fact that there are numerous JavaScript libraries available to help. For our purposes, we're going to use vanilla-lazyload which is apparently rather popular - "vanilla-lazyload is the 17th most popular package on jsDelivr, with 1 084 905 330 CDN hits in the last month."
And while there are many, many aspects of this JavaScript library that are interesting and useful, we're only after one thing - the ability to set a lower resolution image as the default to display while a higher resolution image is retrieved. It does this through the use of a second attribute. The regular src attribute is used for the small image and a new data-src attribute is used for the large image. And we have to add the class "lazyload" to the image to tell it which images to keep an eye out for.
To add it to our project, we have the usual Project.html/Manage JavaScript Libraries link to deal with. No CSS in this case, as this is a pure JavaScript situation.
<script src="https://cdn.jsdelivr.net/npm/vanilla-lazyload@17/dist/lazyload.min.js"></script>
Now comes the fun part! What to add to our project to get this to work the way we'd like. We'll talk about Tabulator specifically in a moment, but what we're really after is to have the lazy loading mechanism work automatically throughout our project, whenever images are added or changed. We don't really want to have to write anything special each time we come up with a new way to use images.
One way to do this is to have vanilla-lazyload simply monitor our page and look for changes that include an image that we've set up with the appropriate attributes. It uses something called a "mutation observer" which essentially runs a function every time something on the page changes. There are numerous options and performance tips to get this kind of thing to work efficiently when dealing with changing content, but for our purposes, we can narrow things down and only use this for our images, and of those, only those we've set up specifically for this purpose.
To do this, we can use this block of code inserted in our WebFormCreate procedure. This initializes vanilla-lazyload so that it is available right away and can deal with even the very first images we have.
    // This sets up our image lazy loading system.  Just need to add "lazy" as
    // a class to an <img> tag and, oddly, to make sure that when adding it via
    // innerHTML, that it is enclosed in a <div> tag
    var lazyLoadInstance = new LazyLoad({});
    var observer = new MutationObserver(function(mutations) {
      var image_count = 0;
      mutations.forEach(
        function(mutation) {
          for (var i = 0; i < mutation.addedNodes.length; i++) {
                if (typeof mutation.addedNodes[i].getElementsByClassName !== 'function') {return;}
                    image_count += mutation.addedNodes[i].getElementsByClassName('lazy').length;
      }});
      if (image_count > 0) {
        lazyLoadInstance.update();
    }});
    var config = { childList: true, subtree: true };
    observer.observe(document.documentElement, config);
The comments explain what is required - an <img> element with a specific class. We'll also need to set the src and data-src attributes to give it something to work with. For example, when changing the photo at the top of the page, which happens when selecting a new person, the image is updated like this.
  asm
    divPhoto.innerHTML = '<div><img alt="Photo of '+row.getCell('NAM').getValue()+'" width=172 height=258 class="lazy" src='+row.getCell('PIC').getValue()+' data-src='+row.getCell('PIC').getValue().replace('/w45/','/h632/')+' /></div>';
  end;
Basically, we add the class and the two image references. For reasons that I don't quite grasp, this whole thing needs to be wrapped in a <div> to get picked up properly by the mutationObserver code. Could be I've overlooked something, but not the end of the world - this works just fine and isn't difficult. Couldn't even tell you how I discovered that, honestly. But in any event, it works wonderfully and images are lazy loaded all over the place. Well, wherever we want them. Including the tooltip thumbnails for the Person images. All without changing anything but the above link definition. Pretty handy.
Images and Tabulator and Lazy Loading.
Why doesn't Tabulator do this itself? Well, it doesn't need to, really. Tabulator displays records using what is known as a "VirtualDOM". This means that if you had 1,000 records in a table, but are only showing 20, the web page itself only has 20 records rendered within it, and the browser will then only know about those records and retrieve images for them alone. This is in effect lazy loading already. The browser doesn't even know about the images until you scroll down the table, at which point it goes and gets them. The same goes for the rest of the data in the table. This is a key to Tabulator's performance (and other grids that work the same way). The browser is only typically dealing with a small fraction of the data that Tabulator has available to it.
This is also a consideration if you're doing something extraordinary, like having hundreds of columns or millions of rows. There are circumstances where the VirtualDOM approach isn't sufficient to keep up with what you're doing or needs to be augmented with more information to be more efficient at what it is already doing. There are options for this in Tabulator should such a need arise. But for the most part, its defaults work as well as one can expect.
About That Data.
The next thing, perhaps the most important thing, that factors into performance, is really about how much data there is to begin with. In our Actorious example, we've actually got quite a lot of data that goes into each record. When I designed it, the thinking was that when we get data, we should get enough that we can interact with the table fully without needing to go back for more data. And the XData server was built expressly for this purpose - to aggressively cache these requests so that visitors get everything as quickly as possible.
In fact, when we get the data for a person, their entire work history (the right table) is stored as a field in their data. So clicking on a person triggers the load of the second table without having to get more data. And thus we achieve our goal - you can click on anything in either table and we don't go back to XData at all. More images might be retrieved, but not more data. This makes the entire user experience particularly quick.
The tradeoff is that we have to cache all this ahead of time and, importantly, the data being requested at the outset is substantial. One alternative would be to retrieve just a list of people and then retrieve their roles when clicking on them. This would likely initiate a second XData request immediately as the table loads, to load up the work history for the first person selected.
I've opted against that approach, but it may be better in different circumstances, particularly if everything can't be cached in advance. To put things in perspective, the data for Mark Hamill (aka Luke Skywalker) coming from TMDb is about 250k worth of JSON. Extracting what we want out of it brings it down to about 150k. There are quite a few elements we're not using currently, such as alternate names and various language-related items. So using XData as a cache is already drastically reducing the cost of the data. The largest portion of the data is the work history. So without doing anything else, we'd expect to incur something like a 100 KB hit every time we click on a row. Not fun.
Filtering Data.
For a typical day, there are somewhere between 300 and 500 people with birthdays. Some of these people have a lot of data available and some have very little. But on average, the combined JSON for everyone on a given day averages out to a little less than 4 MB, and the entire cache for the year takes up a little over 1.4 GB. What can we do about that? That's a big chunk of data to load at one time, something that would take a while on a slower network.
One approach is to limit the data. So in Actorious, under Settings, there's now a switch. By default, only the first 50 people are returned for a given day. If you turn off the switch, you'll get the full 300-500 people. The number of recognizable celebrities on a given day falls pretty fast as you scroll down the list, so 50 was chosen as a cut-off based on browsing around the data. This drastically reduces the data to an average of just over 1 MB per day, with a cache for that, for the entire year, at a bit under 400 MB. This is much better, of course, in terms of usability. But we can do much, much better still.
Compressing Data.
Naturally, if we're just passing around uncompressed JSON then we have an obvious improvement available - compression. XData has compression middleware ready to go in the form of GZip compression, supported by all browsers. It works really well, is efficient on the server side (both in terms of time taken to compress the data and the CPU resources needed), and largely goes unnoticed in the overall transaction. Except for, of course, the fact that the data being transmitted is now less than half the size.
There are no application changes needed at either end - the XData service compresses and then sends along the data without doing anything differently, and the browser decompresses it and hands it off to TMS WEB Core, with nobody in the transaction being any the wiser. So if you're not using this in your projects already, it's likely worth looking into. The compression that I was seeing for this data was typically better than 50% - daily requests were around 400 KB. So that's a huge boost with very little effort.
But we can do better still. Our case is a bit niche in that we can cache everything, first off, but also that we can cache everything well in advance, and we can also compress the results. The trick though is picking a compression algorithm that doesn't cost a lot to decode. And as luck would have it, there's another compression algorithm that is now part of nearly every browser - Brotli. One of its main benefits is that it is really efficient at decompressing text files and, optionally, can compress them really well given enough time. So it makes some sense to replace the compression generally with Brotli if you've got a lot of text data going back and forth, as is the case with JSON. In our case, we're actually after that second bit - maximum compression possible.
While decompressing Brotli can be done by the browser at the client end, getting data compressed into Brotli at the server end isn't quite automatic (yet!). So to do this, we'll use a separate Delphi product (there are several that offer this). I've been using YuBrotli with great success, setting it up to simply convert a .json file on disk to a .json.br file on disk. The code looks something like this.
    ResponseFile := TMemoryStream.Create;
    ResponseFile.LoadFromFile(CacheFile+'.json');
    ResponseFile.Seek(0, soFromBeginning);

    // Compress the stream with Brotli
    Brotli := TMemoryStream.Create;
    BrotliCompressStream(ResponseFile, Brotli, bcMax);
    Brotli.Seek(0, soFromBeginning);

    // Save the Brotli-compressed response to disk
    Brotli.SaveToFile(CacheFile+'.json.br');
    ResponseFile.Free;
    Brotli.Free;
Here, we're just loading up a file, compressing it with "bcMax" for maximum compression, and writing it out to disk again. The average file size when using Brotli is now around 300 KB, so a big improvement over the 400 KB and a huge improvement over the uncompressed data. The only other thing to note here is that we have to tell XData (and the browser, ultimately) that we're giving it a Brotli-encoded file. This is done with a simple header addition. And while we're at it, we'll add something to say that it is JSON as well, so that we can get all the pretty formatting when using Swagger.
  TXDataOperationContext.Current.Response.Headers.SetValue('content-type', 'application/json');
  TXDataOperationContext.Current.Response.Headers.SetValue('content-encoding', 'br');
If you've already got compression turned on in the XData middleware, no problem, it will use that for other resources as it normally does, and won't try and mess with what is going on here. Note however, this isn't implementing Brotli compression middleware for the XData server generally - it is just serving up Brotli-compressed files specifically from a service endpoint. The more general approach of setting up Brotli as a compression middleware is perhaps something to write another blog post about, should such support not materialize in XData directly in an upcoming release. All the pieces are here.
Communicating Progress.
So things are looking pretty good. Our entire full non-cached page load is a little bit under 2MB, including our 300KB of data, all images, JavaScript libraries, and the rest of it. Not too bad. Switching days incurs about 1 MB. 300 KB or so for the data and then 700 KB or so for the initial images. Sure, those images are tiny, less than 10 KB each, but there are maybe 200 loaded initially. This all adds up, but overall things work well, and the bulk of the images would get quickly cached by the browser after the first visit, so moving around doesn't always have such a high cost. And the images are loaded separately, so if they take a little longer, it doesn't disrupt the flow of the application too much. Mostly, the images just trickle in a little less quickly or more quickly depending on the connection speed.
But if you're on a slower connection, even that 300 KB can be a bit of a chore, and the 6 MB for the Top 1000 list might take some time. Not much time, but enough time to warrant doing something about it. This brings us to the dreaded topic of progress indicators. I say dreaded because, well, I dread them, but more to the point, it is difficult to get them right and not raise too many eyebrows along the way.
Is anyone old enough to remember copying folders in Windows? I'm sure everyone by now has seen progress bars that languish around at some low percentage, only to eventually zip along. Spinners have become popular, and are less susceptible to this problem, but only because they convey less information. Anything else might be unfamiliar, so it would be wise to tread carefully. We want to convey that something is going on, and some details that describe how long it might take, but nothing too distracting.
Spinner.
The spinner approach is easy enough, and with Font Awesome on the job, it is almost trivial. The trick really is in coming up with a fun display. What we've gone with for Actorious is a spinner that is overlaid on the top photo. Its transparency, size, and position are all customizable, naturally, and even the speed of the spinner can be customized with CSS.
To implement it, all we're doing is putting a transparent button on the page, and then changing its contents before and after we do whatever it is we're doing. In the ElementClassName property, we can also add 'pe-none' (CSS equivalent is pointer-events: none) which disables any kind of pointer events, so we can't click on it or have it interfere in any way.
MainForm.btnProgressSpinner.Caption := '<i class="fa-regular fa-loader fa-spin align-top text-danger opacity-75" style="font-size:12em;" ></i>';
To adjust the speed, some extra CSS is used. The default is much too fast.
/* FontAwesome Spinner speed */
.fa-spin {
  -webkit-animation: fa-spin 5s infinite linear;
  animation: fa-spin 5s infinite linear;
}
The result is a nice overlay (text-danger = red) of the main image when switching between days or loading other content.

What Progress?
Spinners are nice, but what about the actual progress of the data transfer? Well, this is considerably more tricky. But solvable. What we're really after is data that we normally don't have. When we normally request data in our TMS WEB Core project, whether from XData or elsewhere, we can very happily make use of our async/await functionality to patiently wait for the data or otherwise go about our business in the interim. And this works great but doesn't convey anything about the process. The browser knows what is what, though, and we can have a peek at what it is doing to get more information.
The mechanism is found embedded in something called an XHR object. XHR = XML HTML Request object, and is what JavaScript uses when communicating between the client and the server. And this is something that we can attach events to. In particular, we're after a "progress" event and a "loaded" event. The "progress" events are triggered at irregular intervals when a file is being transferred. The "loaded" event is triggered when the XHR request is complete. We'll need both.
This is one of those situations where Chrome, Firefox, and Safari are absolutely not on the same page. Part of the progress event includes, conveniently, the total bytes to be transferred, as well as the current bytes that have already been transferred. So you'd think we'd be done! But alas, we all read specs differently, and there are always conditions to everything. The drama we're dealing with here relates to whether the total bytes to be transferred even has a value, and if it does, does it relate to the compressed or uncompressed size of the data? Likewise with the data that has been transferred.
We can work around that. And we can also pass in data to be unambiguous about the size of the content being transferred. We can do this by setting a custom header. But if we send a custom header, we also have to send something to say that the custom header is allowed. I'm sure there are really good reasons for all of these things, and I am absolutely the kind of person to take sides, but in this case, I don't even know who to blame. And it doesn't really matter because we can get it all to work regardless.
The key bits then are that we need to send a bit more information when we return data via XData. We're already setting the encoding type and content type, so we'll just add a few more for good measure. As we have the compressed and uncompressed files on disk already, we can just look up those numbers and pass them along. In the XData service endpoint, when we return the data, we just add a few more headers.
    TXDataOperationContext.Current.Response.Headers.SetValue('content-length', IntToStr(FileSizeByName(CacheFile+'.json.br')));
    TXDataOperationContext.Current.Response.Headers.SetValue('x-uncompressed-content-length', IntToStr(FileSizeByName(CacheFile+'.json')));
    TXDataOperationContext.Current.Response.Headers.SetValue('Access-Control-Expose-Headers','x-uncompressed-content-length');
In the client then, where can we see this and what can we do with it? Lots of options but what I've done here is add a block of code at the end of the <body> in the Project.html file. This ensures that it gets run right away without any confusion. I've also defined the function in such a way as to only get progress updates from XHR requests to the relevant XData service that is being used. And, on top of that, the function call directly modifies a page element to show the progress. This means that there is no other coding required elsewhere to make this work and that it will update the progress for any data transferred by this mechanism. It doesn't matter if we're changing birthdays or loading the Top1000 data or anything else - it just does its thing when needed.
    <script type="text/javascript">
      (function() {
        var origOpen = XMLHttpRequest.prototype.open;
        XMLHttpRequest.prototype.open = function() {
          this.addEventListener('progress', function(e) {
            if (e.srcElement.responseURL.indexOf('ActorInfoService') > 0) {
              if (e.srcElement.getResponseHeader('x-uncompressed-content-length') !== null) {
                var progress = document.getElementById('divProgress');
                var total = e.total ||  e.srcElement.getResponseHeader('x-uncompressed-content-length');
                var percent = Math.min((e.loaded / total)+0.05, 1.0);
                progress.style.height = (percent * 260) +'px';
                progress.style.top = ((1-percent) * 260) +'px';
              }}});
          this.addEventListener('loadend', function(e) {
            if (e.srcElement.responseURL.indexOf('ActorInfoService') > 0) {
              var progress = document.getElementById('divProgress');
              progress.style.height = 0 + 'px';
          }});
          origOpen.apply(this, arguments);
      }})();
    </script>
What is it actually doing? It is modifying the default XHR object with new functionality to deal with progress and loaded events. If such an event is triggered, it checks to see whether the request object is related to our ActorInfoService. If it is, then it updates the height of a progress bar (a TWebHTMLDiv component in our project).
The extra math helps with the conditions stated earlier, about whether the total number is available and whether the browser is using uncompressed or compressed numbers in its calculations. This seems to work on Chrome, Firefox, and Safari, so a good chance it will work elsewhere as well. On Chrome, you can get away with just the progress event as it will trigger far more frequently, and at its conclusion. In Firefox, the progress events are far less frequent and not guaranteed to be issued at the end. The loaded event is then necessary to turn off the progress indicator.
So what does it look like? Testing progress bars is a tricky business but both Chrome and Firefox allow you to test network speeds by artificially throttling the connection. Would be hard to see otherwise. But here's what it looks like.

Tabulator Progress.
So far, our discussion about progress hasn't really had anything at all to do with Tabulator. It can introduce delays as it goes about its business as well. There's an internal event bus that can be monitored to see what it is doing under the covers, and various hooks into that are available. However, from the point of view of the user, the details aren't important. Just what is going on currently.
One approach is to get Tabulator's placeholder property to do a little more work. This is normally what is used to display something when the table is empty - essentially the "no data" placeholder. But we can be sneaky here (I like to refer to it as CSS shenanigans as I'm sure you've noticed by now!) and use it for other purposes as well. For example, we can set a class on the table in such a way that when there is no data, the block of text changes to something else corresponding to that class. Then, when we work with the table, we can change these classes to reflect what is going on. I've created five distinct table "states" here. The first one is displayed by default, which is what we'll see if there is no data. Then we have different kinds of loading stages, such as searching for data, preparing the received data, loading the data, and an error state. The Tabulator definition looks like this, set as a default for all Tabulator tables.
    Tabulator.defaultOptions.placeholder = '<span>No Records Found.</small></span>'+
                                           '<span><i class="fa-duotone fa-star-sharp fa-xl me-3"></i>Searching.... Please Wait.</span>'+
                                           '<span><i class="fa-duotone fa-star-sharp fa-xl me-3"></i>Preparing.... Please Wait.</span>'+
                                           '<span><i class="fa-duotone fa-star-sharp fa-xl me-3 fa-spin fa-spin-reverse"></i>Loading.... Please Wait.</span>'+
                                           '<span><i class="fa-duotone fa-cloud-exclamation fa-xl me-3"></i>Error.... Please retry later.</span>';
In the CSS, we then use the class names to selectively hide or show one of those variations. Could probably tighten up the CSS here as that's a lot of text, but the concept is the same regardless.
/* More CSS Shenanigans with Tabulator Placeholder. Here, we've got a set of
** spans (5 of them) and we hide all but one of them, switching them by changing
** the parent class as we encounter different table states through the
** progression of making requests.
**
** States: <default>, Searching, Preparing, Loading, ReqError
*/

/* Default - shows "No Data Found" when appropriate */
div.tabulator-tableholder > div.tabulator-placeholder > div > span:nth-child(1) {
  display: inherit !important;
}
div.tabulator-tableholder > div.tabulator-placeholder > div > span:nth-child(2),
div.tabulator-tableholder > div.tabulator-placeholder > div > span:nth-child(3),
div.tabulator-tableholder > div.tabulator-placeholder > div > span:nth-child(4),
div.tabulator-tableholder > div.tabulator-placeholder > div > span:nth-child(5) {
 display: none !important;
}

/* Searching */
.Searching div.tabulator-tableholder > div.tabulator-placeholder > div > span:nth-child(1),
.Searching div.tabulator-tableholder > div.tabulator-placeholder > div > span:nth-child(3),
.Searching div.tabulator-tableholder > div.tabulator-placeholder > div > span:nth-child(4),
.Searching div.tabulator-tableholder > div.tabulator-placeholder > div > span:nth-child(5) {
 display: none !important;
}
div.Searching > .tabulator-tableholder > div.tabulator-placeholder > div > span:nth-child(2) {
  display: inherit !important;
}

/* Preparing */
.Preparing div.tabulator-tableholder > div.tabulator-placeholder > div > span:nth-child(1),
.Preparing div.tabulator-tableholder > div.tabulator-placeholder > div > span:nth-child(2),
.Preparing div.tabulator-tableholder > div.tabulator-placeholder > div > span:nth-child(4),
.Preparing div.tabulator-tableholder > div.tabulator-placeholder > div > span:nth-child(5) {
  display: none !important;
}
.Preparing div.tabulator-tableholder > div.tabulator-placeholder > div > span:nth-child(3) {
  display: inherit !important;
}

/* Loading */
.Loading div.tabulator-tableholder > div.tabulator-placeholder > div > span:nth-child(1),
.Loading div.tabulator-tableholder > div.tabulator-placeholder > div > span:nth-child(2),
.Loading div.tabulator-tableholder > div.tabulator-placeholder > div > span:nth-child(3),
.Loading div.tabulator-tableholder > div.tabulator-placeholder > div > span:nth-child(5) {
  display: none !important;
}
.Loading div.tabulator-tableholder > div.tabulator-placeholder > div > span:nth-child(4) {
  display: inherit !important;
}

/* ReqError */
.ReqError div.tabulator-tableholder > div.tabulator-placeholder > div > span:nth-child(1),
.ReqError div.tabulator-tableholder > div.tabulator-placeholder > div > span:nth-child(2),
.ReqError div.tabulator-tableholder > div.tabulator-placeholder > div > span:nth-child(3),
.ReqError div.tabulator-tableholder > div.tabulator-placeholder > div > span:nth-child(4) {
  display: none !important;
}
.ReqError div.tabulator-tableholder > div.tabulator-placeholder > div > span:nth-child(5) {
  display: inherit !important;
}
Then, in the application, when we're loading data, we just switch the CSS selectors like this to start loading.
  // Progress: Loading Actors
  MainForm.divActorTabulatorHolder.ElementHandle.classList.add('Loading');
  MainForm.divActorTabulatorHolder.ElementHandle.classList.remove('Searching', 'Preparing', 'ReqError');
And then do this when we're done loading.
  // Progress: Ready Actors
  MainForm.divActorTabulatorHolder.ElementHandle.classList.remove('Searching', 'Preparing', 'Loading', 'ReqError');
If there was no data loaded, then the first span we defined will be used. Other customizations could show various images or other elements in the table. We could even incorporate that XHR progress into this if desired, or whatever else comes to mind. Nothing but options here.
Other Performance Items.
That about covers what we can easily do with Tabulator and the rest of the pipeline that is feeding data to it. So what else needs to be done? There are a few little things that can bring about the need for more improvements, but these become increasingly difficult and often are cosmetic in nature.
For example, using Font Awesome is great. Using their SVG+JS kits is great too, as everything is converted to SVG and only the icons you're using are downloaded. This is very performant, looks great, etc. But there is a super-annoying delay when text is first displayed, but when the icons have not yet loaded. They have terms for this kind of thing (flash of unstyled content and its kin) but the problem is difficult generally. The browser is racing to display content as fast as possible, which we want, and it is trying to display information using all available resources (which we want) and then it changes what is displayed when new resources arrive (which we may or may not like very much, but generally do want).
In the case of these icons, there is a solution in some cases. The SVG can be used directly, so there is zero delay. No libraries need to be loaded up in advance. But it is less friendly, certainly. For the icons in the top-left of the Actorious interface, the icons can be loaded using this approach. For the birthday cake, for example, the code was originally in a TWebHTMLDiv. We can instead just set it in code.
asm
divBirthDay.innerHTML = `
<div id="divFlatPickr" class="d-flex align-items-center overflow-hidden" style="width: 100%; height:100%; border:none;">
  <input type="text" class="bg-light boder border-0" data-input  placeholder="Birthday...">
  <a class="input-button bg-none"
        style="margin: 0px 0px 0px -25px;"
        title="Toggle Birthday Calendar"
        data-toggle
        data-bs-toggle="tooltip"
        data-bs-placement="top"
        data-bs-delay={"show":1000,"hide":100}>
        <div class="icon" style="width: 1.4em; height: 1.4em; display: flex;">
          <svg
            xmlns="http://www.w3.org/2000/svg"
            viewBox="0 0 448 512">
            <!--! Font Awesome Pro 6.1.1 by @fontawesome - https://fontawesome.com License - https://fontawesome.com/license (Commercial License) Copyright 2022 Fonticons, Inc. -->
            <defs>
              <style>
                .fa-secondary{opacity:.4}
              </style>
            </defs>
            <path class="fa-primary" d="M416 399.1c-25.97 0-50.25-15.7-64-26.66c-13.75 10.95-38.03 26.66-64 26.66s-50.25-15.7-64-26.66c-13.75 10.95-38.03 26.66-64 26.66s-50.25-15.7-64-26.66c-13.75 10.95-38.03 26.66-64 26.66c-11.27 0-22.09-3.121-32-7.377v87.38C0 497.7 14.33 512 32 512h384c17.67 0 32-14.33 32-32v-87.38C438.1 396.9 427.3 399.1 416 399.1zM256 160c0-8.836-7.164-16-16-16h-32C199.2 144 192 151.2 192 160v64h64V160zM384 160c0-8.836-7.164-16-16-16h-32C327.2 144 320 151.2 320 160v64l63.1-.0307L384 160zM128 160c0-8.836-7.164-16-16-16h-32C71.16 144 64 151.2 64 160v63.97L128 224V160z"/>
            <path class="fa-secondary" d="M383.1 223.1H64c-35.35 0-64 28.65-64 63.1v68.7c9.814 6.102 21.39 11.33 32 11.33c20.64 0 45.05-19.73 52.7-27.33c6.25-6.219 16.34-6.219 22.59 0C114.1 348.3 139.4 367.1 160 367.1s45.05-19.73 52.7-27.33c6.25-6.219 16.34-6.219 22.59 0C242.1 348.3 267.4 367.1 288 367.1s45.05-19.73 52.7-27.33c6.25-6.219 16.34-6.219 22.59 0C370.1 348.3 395.4 367.1 416 367.1c10.61 0 22.19-5.227 32-11.33V287.1C448 252.6 419.3 223.1 383.1 223.1zM96 111.1c22.09 0 40-17.88 40-39.97S96 0 96 0S56 49.91 56 72S73.91 111.1 96 111.1zM224 111.1c22.09 0 40-17.88 40-39.97S224 0 224 0S184 49.91 184 72S201.9 111.1 224 111.1zM352 111.1c22.09 0 40-17.88 40-39.97S352 0 352 0s-40 49.91-40 72S329.9 111.1 352 111.1z"/>
           </svg>
        </div>
  </a>
</div>`;
end;
Not pretty, but it sure is fast. Taking the same approach for other icons may work well if that initial display was critically important and you want to get rid of that intermediate stage. And if you don't have too many icons to deal with as it is admittedly a bit of a pain.
However, it might be all for nothing if you have this other problem - Google Fonts. Same issue here where you can display text, but it will change when the font eventually gets loaded. There is also the option to not display the text until the font is loaded. The "&display=swap" option in the declaration is what determines this behavior. The Cairo font being used looks different enough that the change is quite noticeable.
    <!-- Google Fonts -->
    <link rel="preconnect" href="https://fonts.googleapis.com">
    <link rel="preconnect" href="https://fonts.gstatic.com" crossorigin>
    <link href="https://fonts.googleapis.com/css2?family=Cairo&display=swap" rel="stylesheet">
Not sure if there is a way around it. The fonts could be put in a different location, hosted locally for example, but it is unlikely to be any faster than Google's CDN of choice. Elements of the page could be hidden entirely, briefly, giving the browser a bit of a chance to get itself sorted first. Or we could bail on the whole thing entirely. And just not display the page for a second or two, which has the added benefit of getting everything else sorted as well.
Adding something like this to the Project.html at the start of the <head> section will ensure that a blank (black) page is displayed and then a quick fade-in transition after a brief delay. This might seem terrible, maybe it actually is terrible, but the user couldn't interact with anything during that time anyway, so hard to say what is best. This at least gives the impression that everything is snappy, even if it isn't always the case.
    <title>Actorious</title>

    <!-- Fade in for the initial page load -->
    <style type="text/css">
      body {
        background-color: #000 !imoprtant;
        animation: fadeInAnimation ease 1.5s;
        animation-iteration-count: 1;
        animation-fill-mode: forwards;
      }
      @keyframes fadeInAnimation {
        0%   { opacity: 0; }
        85%  { opacity: 0; }
        100% { opacity: 1; }
      }
    </style>
And We're Done !!
Related Posts:
Tabulator Part 2: Getting Data Into Tabulator
Tabulator Part 3: Viewing Data In Tabulator
Tabulator Part 4: Interacting With Tabulator
Tabulator Part 5: Editing Data In Tabulator
Tabulator Part 6: Getting Data Out Of Tabulator
Tabulator Part 7: Performance
Follow Andrew on 𝕏 at @WebCoreAndMore or join our 𝕏 Web Core and More Community.
Andrew Simard
Bookmarks:

This blog post has received 2 comments.
 2. Monday, August 22, 2022 at 12:57:38 AM
Sorry to hear you''re struggling! And apologies for the late response, didn''t see your comment until just now. There'' s another post in the TMS Support Center that covers a more basic intro to Tabulator, which may help: https://support.tmssoftware.com/t/web-core-and-tabulator/15524
2. Monday, August 22, 2022 at 12:57:38 AM
Sorry to hear you''re struggling! And apologies for the late response, didn''t see your comment until just now. There'' s another post in the TMS Support Center that covers a more basic intro to Tabulator, which may help: https://support.tmssoftware.com/t/web-core-and-tabulator/15524That would also be a good place to post questions (or the TMS Support Center WEB Core section generally) as we''ve got more tools available there when writing posts.
Andrew Simard
All Blog Posts | Next Post | Previous Post
I have to admit, I have tried a number of things with Tabulator, and I am struggling, this should not reflect on anything you have done, but I am still struggling.
I tried to load a JSON straight from a Webhttprequest and had a lot of trouble getting the data in because if was different then how you got the data from SPARQL, but I finally got it to work using your GetBirthday example. I next tried to get the Column Headers to change and struggled with where to put the code because the data would not load without the ''autoColumns: true,'' in the creation, but managed to get that done by using your example of modifying the appearance, but struggle to get the syntax correct. Now I am attempting to make something happen when clicking the record in the Tabulator or searching the tablulator. I guess my real issue here is I am struggling with the syntax of Javascript and trying to interact with Delphi through Javascript. I have been spoiled by Delphi!
Thanks for your tremendous amount of information on Tabulator and all the other plug-ins you have demoed.
Unfortunately I fail to have enough hair left to make Tabulator work for me, but I appreciate all your hard work!
Green Lawrence n. Green