Blog
All Blog Posts | Next Post | Previous Post

 Extend TMS WEB Core with JS Libraries with Andrew:
Tabulator Part 6: Getting Data Out Of Tabulator
Bookmarks:
Thursday, June 30, 2022

Last time, we took a look at some of the ways that we can edit data in Tabulator in our TMS WEB Core projects. And that was just the most basic introduction to a very large and complex topic overall. This time out, in our penultimate stop in this Tabulator miniseries, we're going to look at how to get those changes out of Tabulator and back into our databases or wherever else we need to send them. We'll also augment our example from last time with a proper navigator and clean up a couple of the editing options. And then we'll look at how to create PDF, XLS, and CSV files directly from Tabulator.
Motivation.
Having any comprehensive JavaScript grid control is great, and Tabulator is just one of many such controls. Having a grid control that can do almost everything all by itself is also great. But there may come a time, specifically if your grid supports editing, when it has to give up its data, or at least its changes, so you can send them elsewhere. And giving the user some degree of control over that process, or at the very least, some level of confirmation, becomes very beneficial. The plan for this post is to offer up some ideas, both on how to implement the actual data transfer-type mechanisms and on how to keep the user informed.
Navigator.
When doing database work in a traditional Delphi application, there's a handy little DBNavigator component that can link to a TDataSource that provides a consistent set of buttons for things like next/previous or save/cancel operations. In TMS WEB Core, there's also a TWebNavigator that can be linked to a TWebDataSource in the same way. But a Tabulator table isn't really a TWebDataSource, so they can't easily be linked in that way.
Let's start out by making our own navigator for Tabulator. The underlying purpose is to help become more familiar with how Tabulator tells us what is going on in the UI, via events and so on, so that we'll be better able to understand how it does the same thing when data is changing. As a bonus, we'll have a handy place to put some of the other things that we'll need a spot for as well.
We're going to continue with our example from last time and add a placeholder for the navigator. We've covered some of these design items previously, so I'll just list them here for reference purposes. But by all means, please post a comment if you'd like a bit more information on any of them.
- Bit of styling for the whole Tabulator - rounded corners, new font, darker column headers.
- Added a CSS file to hold the styling rules that we don't handle in code.
- Put Tabulator inside another <div>, with some additional styling for the outer <div>.
- Added Interact.js so the <div> can be moved around and resized. Drag from the navigator.
- Added a 'selectable' option, so we can visually see what record is currently active.
- Added a placeholder <div> below the table where the navigator will be
- Adjusted columns and layouts to be more 'responsive' - give it a try!
- Numerous adjustments to the individual columns and editors. Check the code for details.
Our starting point for today is just a slightly more styled version of where we ended up last time. So much better than the defaults I think, but if the styling doesn't suit you, naturally there's no limit to what you can do to fit it into your own theme.
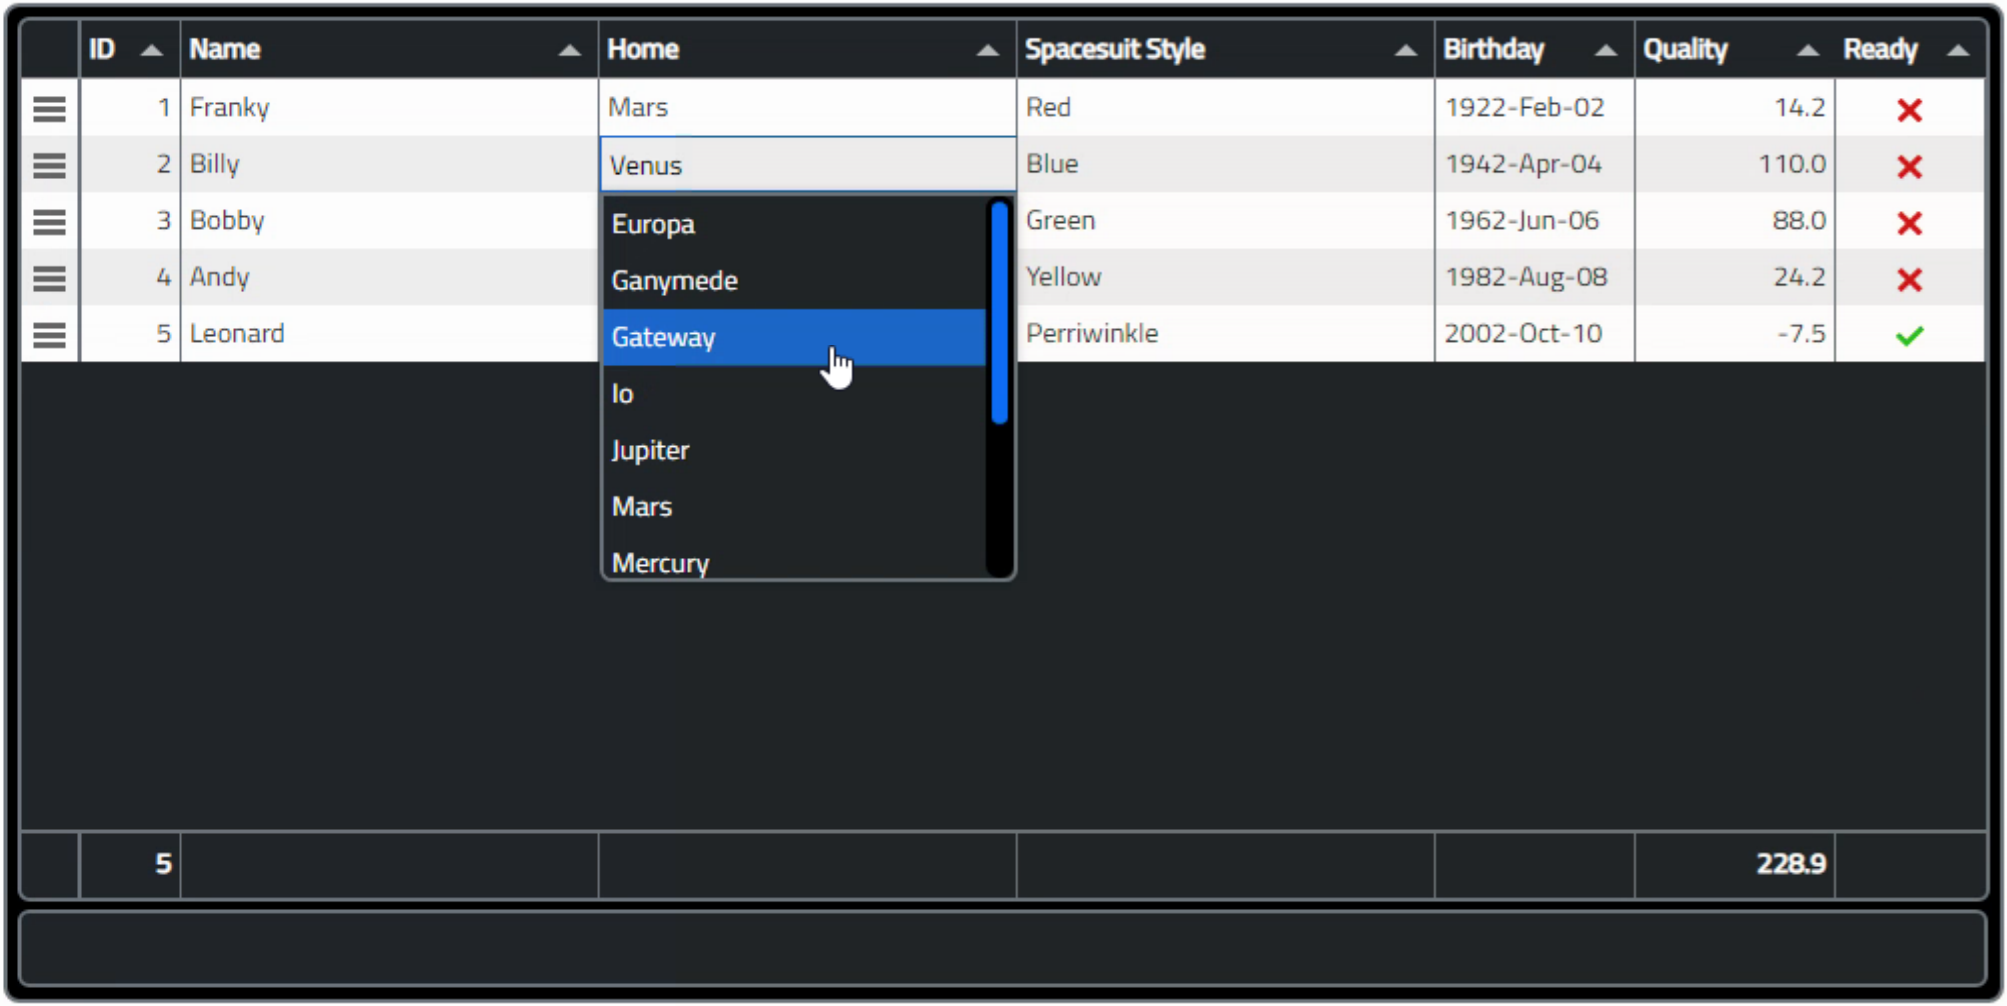 Tabulator List Editor.
The code is also more or less the same, with the bulk of the changes happening in CSS. The Interact.js code has also been added, with the extra bit of excluding Tabulator itself so that you can still drag columns around within Tabulator.
unit Unit1;
interface
uses
System.SysUtils, System.Classes, JS, Web, WEBLib.Graphics, WEBLib.Controls,
WEBLib.Forms, WEBLib.Dialogs, Vcl.Controls, WEBLib.WebCtrls;
type
TForm1 = class(TWebForm)
divTabulatorHolder: TWebHTMLDiv;
WebHTMLDiv1: TWebHTMLDiv;
divTabulator: TWebHTMLDiv;
procedure WebFormCreate(Sender: TObject);
procedure NameChange(ID:Integer; OldName: String; NewName: String);
procedure ResizeDrag(ElementID: String);
private
{ Private declarations }
public
{ Public declarations }
end;
var
Form1: TForm1;
tabEdit: JSValue;
implementation
{$R *.dfm}
procedure TForm1.WebFormCreate(Sender: TObject);
begin
asm
// Initialize interact.js
// Just add 'resize-drag' as a class to the objects you want to interact with
function dragMoveListener (event) {
var target = event.target
var x = (parseFloat(target.getAttribute('data-x')) || 0) + event.dx
var y = (parseFloat(target.getAttribute('data-y')) || 0) + event.dy
target.style.transform = 'translate(' + x + 'px, ' + y + 'px)'
target.setAttribute('data-x', x)
target.setAttribute('data-y', y)
};
window.dragMoveListener = dragMoveListener;
interact('.resize-drag')
.resizable({
ignoreFrom: '#divTabulator',
edges: { left: true, right: true, bottom: true, top: true },
margin:20, // size of resizing boundary interaction area
listeners: {
move (event) {
var target = event.target
var x = (parseFloat(target.getAttribute('data-x')) || 0)
var y = (parseFloat(target.getAttribute('data-y')) || 0)
target.style.width = event.rect.width + 'px'
target.style.height = event.rect.height + 'px'
x += event.deltaRect.left
y += event.deltaRect.top
target.style.transform = 'translate(' + x + 'px,' + y + 'px)'
target.setAttribute('data-x', x)
target.setAttribute('data-y', y)
pas.Unit1.Form1.ResizeDrag(target.id);
}
}
})
.draggable({
ignoreFrom: '#divTabulator',
listeners: { move: window.dragMoveListener }
});
// This is so we can use NameChange() later without having to worry about scope and context and all that fun stuff
var NameChange = this.NameChange;
var dateEditor = (cell, onRendered, success, cancel, editorParams) => {
var editor = document.createElement("input");
editor.value = cell.getValue();
var date = new Date();
var minDate = new Date("1920-01-01");
var datepicker = flatpickr(editor, {
minDate: minDate,
weekNumbers: true,
onClose: (selectedDates, dateStr, instance) => {
success(dateStr);
instance.destroy();
},
});
onRendered(() => {
editor.focus();
});
return editor;
};
var data = [{"ID":1, "NAME":"Franky", "PLANET":"Mars", "COLOR":"Red", "DOB":"1922-02-02", "QUALITY":14.2, "PROCESSED":false },
{"ID":2, "NAME":"Billy", "PLANET":"Venus", "COLOR":"Blue", "DOB":"1942-04-04", "QUALITY":110.0, "PROCESSED":false },
{"ID":3, "NAME":"Bobby", "PLANET":"Mars", "COLOR":"Green", "DOB":"1962-06-06", "QUALITY":88, "PROCESSED":false },
{"ID":4, "NAME":"Andy", "PLANET":"Jupiter", "COLOR":"Yellow", "DOB":"1982-08-08", "QUALITY":24.22222, "PROCESSED":false },
{"ID":5, "NAME":"Leonard", "PLANET":"Pluto", "COLOR":"Perriwinkle", "DOB":"2002-10-10", "QUALITY":-7.5, "PROCESSED":true }];
this.tabEdit = new Tabulator("#divTabulator", {
data: data,
layout: "fitColumns",
responsiveLayout:"hide",
validationMode:"highlight",
movableColumns: true,
movableRows: true,
selectable: 1,
columns: [
// This is used to reorder the rows. Ddon't want to resize it or really allow any other interaction
{ rowHandle: true, formatter:"handle", headerSort:false, frozen:true, resizable: false, width: 30, minWidth: 30, maxWidth: 30 },
// Fixed size.
{ title: "ID", field: "ID", bottomCalc: "count", minWidth: 50, maxWidth: 50, width: 50, resizable: false, hozAlign: "right" },
// Basic editing allowed
{ title: "Name", field: "NAME", minWidth: 150,
editor: true, editorParams: {
elementAttributes:{
maxlength:"20"}},
cellEdited: function(cell){
NameChange(cell.getRow().getCell('ID').getValue(), cell.getInitialValue(), cell.getValue());
}},
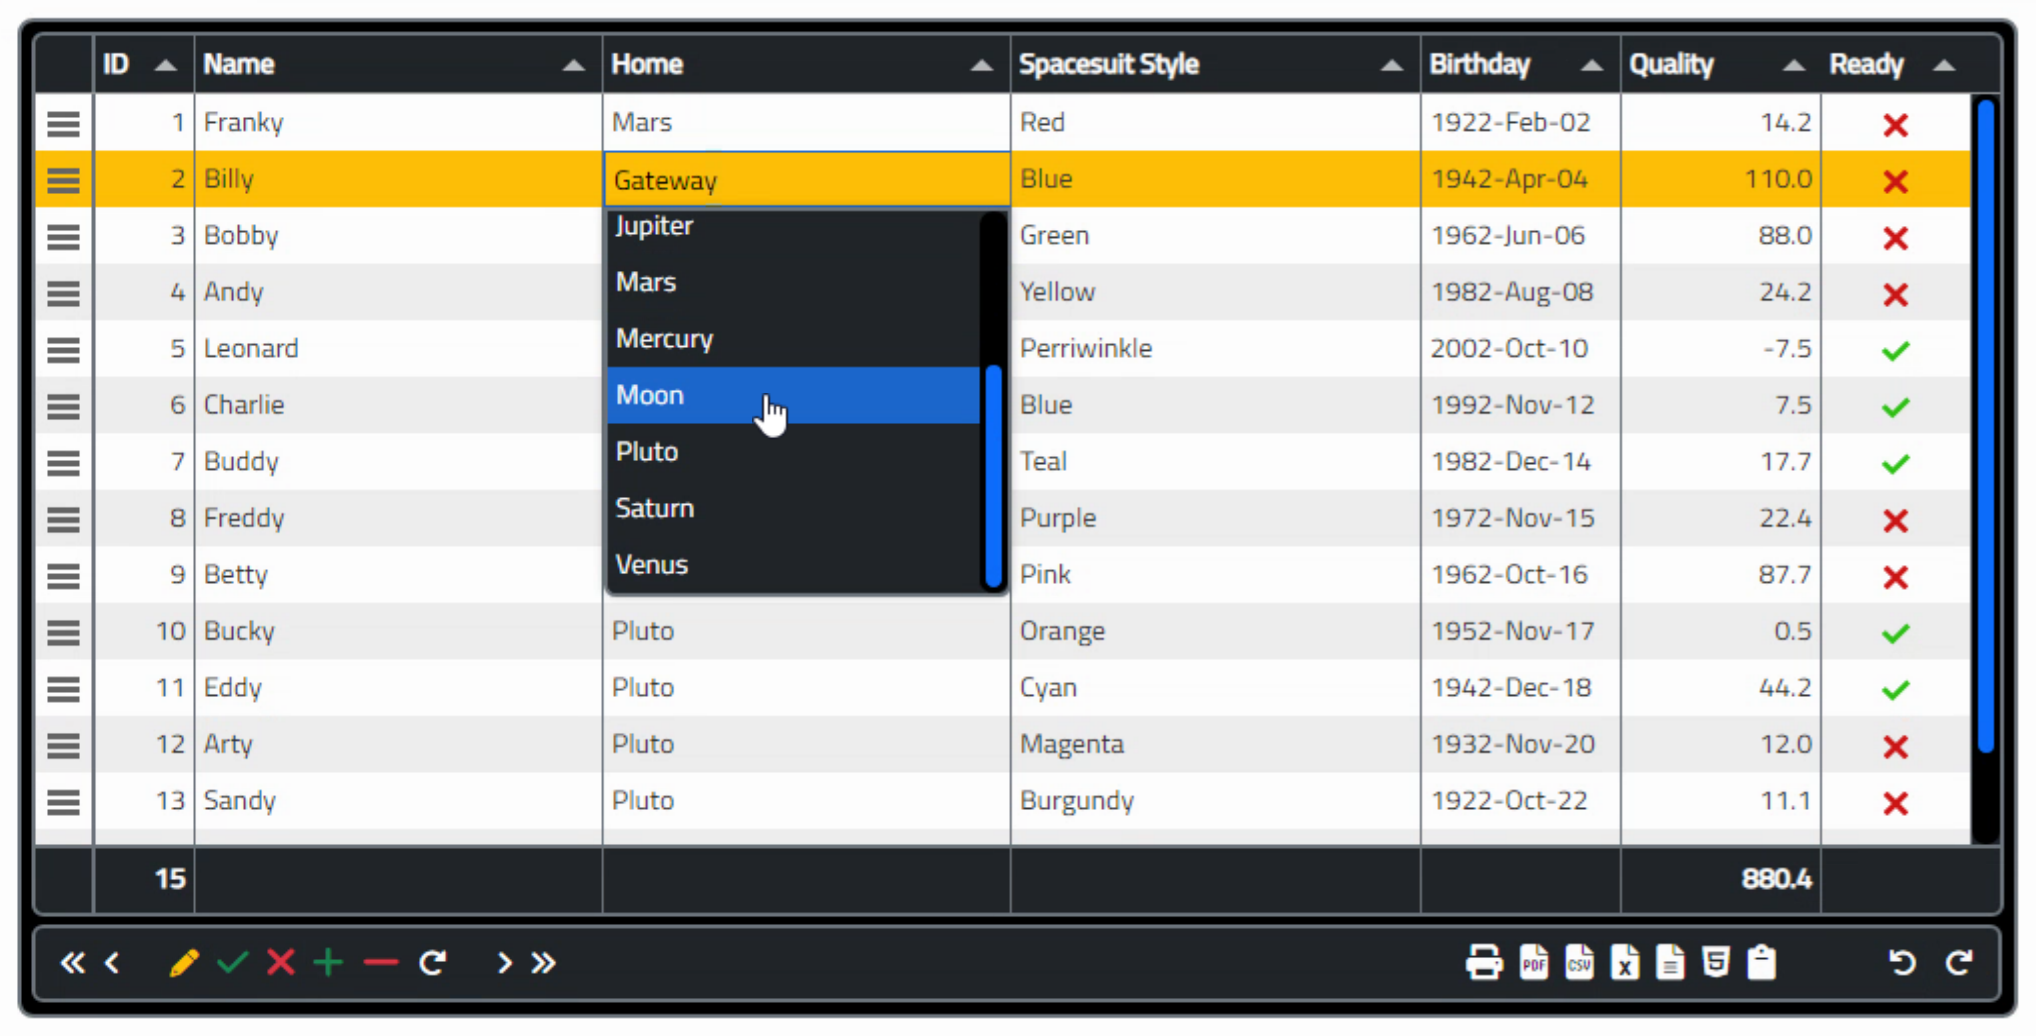
{ title: "Home", field: "PLANET", minWidth: 150,
editor: "list", editorParams: {
values: ['Mars', 'Venus', 'Jupiter', 'Mercury', 'Pluto', 'Saturn', 'Gateway', 'Io', 'Moon', 'Ganymede', 'Europa'],
sort: 'asc'
}},
{ title: "Spacesuit Style", field: "COLOR", minWidth: 150 },
{ title: "Birthday", field: "DOB", editor: dateEditor, minWidth: 100, maxWidth: 100, width: 100, resizable: false,
formatter:"datetime", formatterParams:{
inputFormat:"yyyy-MM-dd",
outputFormat:"yyyy-MMM-dd",
}},
{ title: "Quality", field: "QUALITY", validator:"float", editor:true, hozAlign: "right", bottomCalc: "sum", minWidth: 100, maxWidth: 100, width: 100, resizable: false,
validator:"float",
formatter: "money", formatterParams:{
decimal: ".",
thousand: ",",
precision: 1},
bottomCalcFormatter: "money", bottomCalcFormatterParams:{
decimal: ".",
thousand: ",",
precision: 1
}},
{ title: "Ready", field: "PROCESSED", formatter:"tickCross", hozAlign:"center", minWidth: 75, maxWidth: 75, width: 75, resizable: false,
cellClick:function(e,cell){
cell.setValue(!cell.getValue());
}}
]
});
end;
end;
procedure TForm1.NameChange(ID:Integer; OldName: String; NewName: String);
begin
console.log('ID#'+IntToStr(ID)+' Name changed from '+OldName+' to '+NewName);
end;
procedure TForm1.ResizeDrag(ElementID: String);
procedure DashResizePanel(pnl: TWebHTMLDiv);
var
panel: String;
dashwidth: Integer;
dashheight: Integer;
dashtop: Integer;
dashleft: Integer;
begin
panel := pnl.ElementID;
dashwidth := -1;
dashheight := -1;
dashtop := -1;
dashleft := -1;
asm
dashwidth = document.getElementById(panel).offsetWidth;
dashheight = document.getElementById(panel).offsetHeight;
dashtop = document.getElementById(panel).offsetTop;
dashleft = document.getElementById(panel).offsetLeft;
end;
pnl.width := dashwidth;
pnl.height := dashheight;
pnl.top := dashtop;
pnl.left := dashleft;
if panel=panel then panel:=panel;
end;
begin
if (ElementID = 'divTabulatorHolder') then DashResizePanel(divTabulatorHolder);
end;
end.The bottom area is where we're going to add navigator buttons. We'll start with the usual suspects, First/Prev, Edit/Save/Cancel, Insert/Delete, and Next/Last, and we'll set them up as regular buttons using Bootstrap and Font Awesome to provide the look and feel. Depending on how the styling fits in with the rest of a given project, this may work well, or using a button group may provide a better-looking UI. Doesn't really matter for our purposes - a button is a button - it is mostly the code behind the button, and whether the button is active or otherwise even available, that matters here.
For some navigators, some of the buttons we'll be adding wouldn't be needed. When connecting such a Navigator to a table that doesn't have any editing functions, hiding the Save/Cancel buttons would make sense. For this article, though, we'll wire up everything we can. Much easier to take away unused elements than to add them in where they didn't exist already. Here's what our navigator looks like with a few buttons added.

The choice of icons is somewhat limited with the Font Awesome 6 Free set, but workable all the same. Any other icon sets would work just as well, naturally. Icons are a tricky business though. Here, there are different sizes used as some icons use up the entire vertical space, while some seem minuscule in comparison. Finding a balance isn't too difficult, just something to keep in mind. Bootstrap flex classes are used to arrange the spacing for the icons, including vertically. Colors may or may not help, depending on your situation, and should never be used exclusively to indicate anything, for the rather large numbers of people who don't have great color vision to begin with. Hints (tooltips) are also a good idea.
Which buttons should be enabled, though? Some buttons will need to be enabled or disabled based on the currently selected record. And some might be enabled or disabled based on the contents of the selected record. Say, for example, we don't want anyone editing any record that has "Ready" checked. To help simplify this, we'll make an UpdateButton function that we can then call when needed to update the buttons, enabling or disabling them as required. Note also that we've got a tiny bit of CSS to ensure that we're not confused about which buttons are disabled.
/* Make disabled buttons appear even more disabled */
button:disabled {
  opacity:0.1 !important;
}
To deal with the navigation buttons, we get a count for the number of records in the table as well as the currently selected record (if either exists) and then update them based on whether the current record is not selected, or if it is the first, the last, or only record.
Note that we're invoking the UpdateButtons from a JavaScript function, so it seems to have forgotten about the scope it is in. This just means that for the Delphi code, we have to add the class name. And for the JavaScript code, we'll have to add in the full path (pas.Form1.Unit1.identifier). Not sure how else to handle it, but this seems to work. Likewise with the Tabulator identifier. Just as easy to look it up as it is to fiddle with that full-path business. The easy part of our UpdateButtons then looks like this.
procedure TForm1.UpdateButtons;
var
  recordcount: integer;
  currentrow: integer;
  tabEdit: JSValue;
begin

  asm
    tabEdit = Tabulator.findTable('#divTabulator')[0];
    recordcount = tabEdit.getDataCount();
    if (tabEdit.getSelectedRows().length == 0) {
      currentrow = -1;
    }
    else {
      currentrow = 1 + tabEdit.getRowPosition(tabEdit.getSelectedRows()[0]);
    }
  end;
  console.log('Updating Buttons: '+IntToStr(recordcount)+' record(s) in table, currently selected: '+IntToStr(currentrow));

  // if we have no records, then everything but "insert" and "referesh" are disabled
  // and we don't have to really think about anything else
  if (recordcount = 0) then
  begin
    Form1.navbtnFirst.Enabled := False;
    Form1.navbtnPrev.Enabled := False;
    Form1.navbtnEdit.Enabled := False;
    Form1.navbtnSave.Enabled := False;
    Form1.navbtnCancel.Enabled := False;
    Form1.navbtnInsert.Enabled := True;
    Form1.navbtnDelete.Enabled := False;
    Form1.navbtnRefresh.Enabled := True;
    Form1.navbtnNext.Enabled := False;
    Form1.navbtnLast.Enabled := False;
    exit;
  end;

  // if we have exatcly one record, then the navigation buttons are kind of useless
  if (recordcount = 1) then
  begin
    Form1.navbtnFirst.Enabled := False;
    Form1.navbtnPrev.Enabled := False;
    Form1.navbtnNext.Enabled := False;
    Form1.navbtnLast.Enabled := False;
  end
  // If it is the first record, and there is more than one record, then some work
  else if (currentrow = 1) then
  begin
    Form1.navbtnFirst.Enabled := False;
    Form1.navbtnPrev.Enabled := False;
    Form1.navbtnNext.Enabled := True;
    Form1.navbtnLast.Enabled := True;
  end
  // if it is the last record, then the others work
  else if (currentrow = recordcount) then
  begin
    Form1.navbtnFirst.Enabled := True;
    Form1.navbtnPrev.Enabled := True;
    Form1.navbtnNext.Enabled := False;
    Form1.navbtnLast.Enabled := False;
  end
  // No record selected, so we can only directly go to the first or last record
  else if (currentrow = -1)  then
  begin
    Form1.navbtnFirst.Enabled := True;
    Form1.navbtnPrev.Enabled := False;
    Form1.navbtnNext.Enabled := False;
    Form1.navbtnLast.Enabled := True;
  end
  // otherwise we're somewhere in the middle and they should all work
  else
  begin
    Form1.navbtnFirst.Enabled := True;
    Form1.navbtnPrev.Enabled := True;
    Form1.navbtnNext.Enabled := True;
    Form1.navbtnLast.Enabled := True;
  end;

  // Refresh Button is generally always available unles you're actually
  // in the middle of refreshing.  In which case it should be spinning or
  // something so it is obvious why it is not available
  Form1.navbtnRefresh.Enabled := True;

end;
The Refresh button and the Insert button are likely to be always available unless you're in the middle of an actual Refresh or Insert operation. But let's say for the Edit and Delete buttons, that these operations are only allowed if the last column is not checked. Say, for example, this is a trip planner or something, and the last column represents having the trip booked and paid for - no changes allowed sort of situation. Of course, in our demo, you can just uncheck it and edit it.
To implement this, we'll get the value for that column in our UpdateButtons function and then update the Edit and Delete buttons accordingly. The UI I'm going for here is that in order to edit or delete records, there's a two-step approach. First, you have to select a row that is editable by virtue of that last column. And second, you need to click the "edit" button to actually enable editing. This might be different for different apps of course, kind of a preference of sorts. Usually just clicking a field in the table allows editing, but if everything in the table is editable it can be a bit annoying. Having an explicit edit button makes that less annoying, but then it is annoying to have to click the edit button. Choose your poison I suppose, but options either way. Our code for this part then is as follows.
  ...
   canedit = !(tabEdit.getSelectedRows()[0].getCell('PROCESSED').getValue());
   ...
  // So let's make up some stuff.  Let's say we can't edit or delete rows
  // that have a Ready = Checked (true) condition.  But we can if it is false.
  if canedit then
  begin
    Form1.navbtnDelete.Enabled := True;
    Form1.navbtnEdit.Enabled := True;
  end
  else
  begin
    Form1.navbtnDelete.Enabled := False;
    Form1.navbtnEdit.Enabled := False;
  end;

  // Insert button is also generally always available
  Form1.navbtnInsert.Enabled := True;
The last two buttons will be set by the Tabulator editors when actually editing the cells. But first, let's add the code for the buttons we have so far. We're operating under the assumption that these will only get called when they are enabled. Which makes sense from a UI perspective. But nothing stops you from calling them at any other time, so just be sure that the conditions for enabling them in the UI are met before calling them in code. For example, don't call "Previous" if you haven't first checked that there's a row currently selected.
Refresh. This is the easiest one, so we'll start there. In our example code, we're just going to reload the data from the static dataset we originally started with. Thus, if any changes are made to the table, this will effectively reset them. This is just a placeholder for whatever is needed to re-fetch the data for the table. So if you're using an XData server, for example, feeding data to Tabulator from a service endpoint, this would be a good place to re-run whatever code you're using to get the data originally. The fancy little JSON tidbit is one of a handful of ways to copy an array. The original array copied into Tabulator is actually updated by Tabulator, so reloading it doesn't exactly have the desired effect. We also now do the same to make a copy when loading the data initially, just so that the data we've originally defined remains as-is.
procedure TForm1.navbtnRefreshClick(Sender: TObject);
begin
  // Here, we're just reloading the original data again which will
  // reset any changes because we're not actually writing back anything
  // to this original dataset.
  asm
    console.log('Resetting Data');
    var newcopy = JSON.parse(JSON.stringify(this.data));
    this.tabEdit.setData(newcopy);
  end;
end;First. Here, we want to select the first row in the Tabulator table. This is perhaps a little bit tricky in that the first row isn't always the first record in the data. If the data is sorted, or particularly if it is filtered, the first row displayed can be very different things. There's an extra parameter that helps with this. After selecting the row, we also want to be sure that we can see it. The scrollToRow function deals with this, with parameters that determine how the scrolling is done and whether any scrolling is done if the row is currently visible.
procedure TForm1.navbtnFirstClick(Sender: TObject);
begin
  asm
    var tabEdit = Tabulator.findTable("#divTabulator")[0];
    if (tabEdit.getDataCount() > 0) {
      tabEdit.deselectRow();
      tabEdit.selectRow(tabEdit.getRowFromPosition(0,true));
      tabEdit.scrollToRow(tabEdit.getRowFromPosition(0,true), "top", false);
    }
  end;
end;
Previous. Works similarly but we're finding a row number based on the current selection. Be careful to do all the row selection math before deselecting the current row ;-)
procedure TForm1.navbtnPrevClick(Sender: TObject);
begin
  asm
    var tabEdit = Tabulator.findTable("#divTabulator")[0];
    if (tabEdit.getDataCount() > 0) {
      var currentrow = tabEdit.getRowPosition(tabEdit.getSelectedRows()[0]) - 1;
      tabEdit.deselectRow();
      tabEdit.selectRow(tabEdit.getRowFromPosition(currentrow));
      tabEdit.scrollToRow(tabEdit.getRowFromPosition(currentrow), "top", false);
    }
  end;
end;
Next. The same approach is used here. Just adding one instead of subtracting one. And we switch from scrolling so that the row is at the top, to scrolling so that the row is at the bottom.
procedure TForm1.navbtnNextClick(Sender: TObject);
begin
  asm
    var tabEdit = Tabulator.findTable("#divTabulator")[0];
    if (tabEdit.getDataCount() > 0) {
      var currentrow = tabEdit.getRowPosition(tabEdit.getSelectedRows()[0]) + 1;
      tabEdit.deselectRow();
      tabEdit.selectRow(tabEdit.getRowFromPosition(currentrow));
      tabEdit.scrollToRow(tabEdit.getRowFromPosition(currentrow), "bottom", false);
    }
  end;
end;
Last. Same deal again. But a little caveat here. In the other three related functions, we're calling Tabulator functions that can deal potentially with the records being filtered. In this last case, we're ignoring the filter and just selecting the last record and scrolling to it. This will work mostly, but perhaps won't select the last record if the data is filtered and if the last record is not part of the filtered set. Diminishing returns perhaps, or an exercise for another day. Works fine for our demo, which conveniently doesn't have filters at the moment.
procedure TForm1.navbtnLastClick(Sender: TObject);
begin
  asm
    var tabEdit = Tabulator.findTable("#divTabulator")[0];
    if (tabEdit.getDataCount() > 0) {
      tabEdit.deselectRow();
      tabEdit.selectRow(tabEdit.getRowFromPosition(tabEdit.getDataCount()-1,false));
      tabEdit.scrollToRow(tabEdit.getRowFromPosition(tabEdit.getDataCount()-1,false), "bottom", false);
    }
  end;
end;Delete. Nothing special about this, just deleting the record that is currently selected. We'll get to undo/redo in a little bit, not to worry. We also want a row to be selected, if possible, when we're done. Let's select the following row if available, or the prior row only if it is not. Also, a reminder that we're not checking whether we're allowed to delete the row. We're assuming if this is being called, then the conditions are met.
procedure TForm1.navbtnDeleteClick(Sender: TObject);
begin
  asm
    var tabEdit = Tabulator.findTable("#divTabulator")[0];
    if (tabEdit.getDataCount() > 0) {
      var deleterow = tabEdit.getSelectedRows()[0];
      var currentrow = tabEdit.getRowPosition(tabEdit.getSelectedRows()[0]) + 1;
      if (currentrow > (tabEdit.getDataCount() -1)) {
        currentrow = tabEdit.getRowPosition(tabEdit.getSelectedRows()[0]) - 1;
      }
      tabEdit.deselectRow();
      if (currentrow >= 0) {
        tabEdit.selectRow(tabEdit.getRowFromPosition(currentrow));
        tabEdit.scrollToRow(tabEdit.getRowFromPosition(currentrow), "bottom", false);
      }
      tabEdit.deleteRow(deleterow);
    }
  end;
end;Edit. Here we're setting a flag that we can then use to determine whether a cell is editable. The flag is a class, Editable, added to the row being edited. We can then pick this up in the various table events and determine whether to allow editing. We're also using this same flag when double-clicking on a row, another shortcut to get at the editing part more easily.
asm
    var tabEdit = Tabulator.findTable("#divTabulator")[0];
    if (tabEdit.getDataCount() > 0) {
      var editrow = tabEdit.getSelectedRows()[0];
      if (editrow.getElement().classList.contains('Editable')) {
        editrow.getElement().classList.remove('Editable');
      }
      else {
        editrow.getElement().classList.add('Editable');
      }
    }
  end;
Insert. This is always a bit of a curiosity. How to handle inserts? Adding a row is easy enough, but what to set for defaults? And when this gets back to a database, are those defaults acceptable? In our example here, we have an ID column which is just a small number. Naturally, if two people were creating records in Tabulator, it is highly likely that they'd end up with the same IDs when the data makes its way back to the server. This is where things like GUIDs come in handy. Pretty much guaranteed to be unique, to solve exactly this problem. But for now, we'll just add a new record with some values from the current record, and make sure it is selected.
procedure TForm1.navbtnInsertClick(Sender: TObject);
begin
  asm
    var tabEdit = Tabulator.findTable("#divTabulator")[0];
    if (tabEdit.getDataCount() > 0) {
      var newid = tabEdit.getDataCount()+1;
      var currentrow = tabEdit.getSelectedRows()[0];
      tabEdit.deselectRow();
      tabEdit.addRow({
        ID:newid,
        NAME:'Copy of '+currentrow.getCell('NAME').getValue(),
        PLANET:currentrow.getCell('PLANET').getValue(),
        COLOR:currentrow.getCell('COLOR').getValue(),
        DOB:null,
        QUALITY:0.0,
        PROCESSED:false
      }).then(function(row){
        tabEdit.selectRow(row);
        tabEdit.scrollToRow(row, "center", false);
      });
    }
  end;
end;
With those in place, we can then turn to the Tabulator events. The basic idea here is that the fields that we can edit will be set up with the appropriate editors (no change from last time) but the 'editable' flag is set to false. This means none of the editors are accessible, but they're all "ready". We just need to call cell.edit(true) to begin editing. But whether we do that or not depends on whether the Editable option is available. The Edit button toggles this, but we're going to set it up so double-clicking on a row does as well.
We can define all of these as individual cell callbacks in the column definitions of the cells we're editing. Or we can just do it once for all the cells (as the code is the same in each case) by defining "on" events at the Tabulator table level, where it passes in the cell in question. Here's what they look like.
   var navbtnEnableEdit = this.navbtnEnableEdit;;
    var navbtnDisableEdit = this.navbtnDisableEdit;

    // Here are all the fields we want to be able to edit
    // Tabulator will try (and fail) to edit non-editable fields
    // which may generate an error, so we'll just use this to check first.
    // We only need to do this for the click events.
    var editablefields = ['NAME', 'PLANET', 'DOB', 'QUALITY'];

    // Clicking on a cell.  If the conditions are right, then edit it.
    // Conditions are that the Editable class has been added to the row.
    this.tabEdit.on('cellClick', function(e,cell){
      if (editablefields.includes(cell.getField())) {
        if (cell.getRow().getElement().classList.contains('Editable')) {
          cell.edit(true);
          navbtnEnableEdit(cell);
    }}});

    // Double-Clicking on a cell. If the row is editable, then the
    // 'Editable' flag is added and we jump directly to editing the
    // cell, being sure to also update the Save/Cancel buttons
    this.tabEdit.on('cellDblClick', function(e,cell){
      if (editablefields.includes(cell.getField())) {
        if (cell.getRow().getCell('PROCESSED').getValue() == false) {
          if (!(cell.getRow().getElement().classList.contains('Editable'))) {
            cell.getRow().getElement().classList.add('Editable');
            cell.edit(true);
            navbtnEnableEdit(cell);
    }}}});

    // Cell is being edited.  So we want to enable the Save/Cancel buttons
    // and ensure that the editable flag for the row is present (probably already is anyway)
    this.tabEdit.on('cellEditing', function(cell){
      cell.getRow().getElement().classList.add('Editable');
      navbtnEnableEdit(cell);
    });

    // Editing has been cancelled, so we want to disable the Save/Cancel buttons
    // and remove the editable flag for the row
    this.tabEdit.on('cellEditCancelled', function(cell){
      cell.getRow().getElement().classList.remove('Editable');
      navbtnDisableEdit(cell);
    });

    // Editing is complete, so record the data chagned, disable the Save/Cancel buttons
    // and remove the editable flag for the row
    this.tabEdit.on('cellEdited', function(cell){
      cell.getRow().getElement().classList.remove('Editable');
      DataChange(cell.getRow().getCell('ID').getValue(), cell.getField(), JSON.stringify(cell.getInitialValue()), JSON.stringify(cell.getValue()));
      navbtnEnableEdit(cell);
    });
Those are then combined with a few more Delphi functions to handle enabling/disabling the Save/Cancel buttons, as well as implementing the Cancel function - restoring the field to its previous value. Note that clicking on one of those buttons essentially causes the editor to lose focus, which in turn saves the change. So the "save" button actually doesn't have to do much as just getting the focus saves the change. Tricky business keeping up with these little details. A new form value, EditingField, is used to keep track of which field is being edited so it can be directly canceled if needed. Here are the extra Delphi functions.
procedure TForm1.DataChange(ID:Integer; DataField: String; OldData: String; NewData: String);
begin
  console.log('ID#'+IntToStr(ID)+' Data for '+DataField+' changed from '+OldData+' to '+NewData);
end;

procedure TForm1.navbtnCancelClick(Sender: TObject);
var
  cancelthis: JSValue;
begin
  cancelthis := Form1.EditingField;
  asm
    if (cancelthis !== null) {
      cancelthis.setValue(cancelthis.getInitialValue());
    }
  end;
  navbtnDisableEdit('');
end;

procedure TForm1.navbtnDisableEdit(DataField:String);
begin
  Form1.EditingField := DataField;
  Form1.navbtnSave.Enabled := False;
  Form1.navbtnCancel.Enabled := False;;
end;

procedure TForm1.navbtnEnableEdit(DataField: String);
begin
  Form1.EditingField := DataField;
  Form1.navbtnSave.Enabled := True;
  Form1.navbtnCancel.Enabled := True;
end;

procedure TForm1.navbtnSaveClick(Sender: TObject);
begin
  navbtnDisableEdit('');
end;
Looks a lot more complicated than it really is, and the good thing is that this works for as many columns as needed. To help reduce the potential for console errors, the list of fields is checked first before any attempts are made to edit non-editable fields. The goal with all this is to sort of replicate the overall experience of a Delphi DBNavigator that we're all familiar with.
Whether that's what you're after or not, hopefully, this will help illustrate how to maintain a solid handle on everything to do with how Tabulator works in terms of its event-handling systems, and how to manage every minute detail from within Delphi. There are many more events that can be used to refine things further. For example, different options for touch events or monitoring other changes in how the user is interacting with Tabulator.
Undo and Redo.
Tabulator (optionally) maintains a running history of changes that have been made to the data. And these changes can be rolled back if needed, all the way back to the original data for the table. There are more details in the documentation, but for our purposes, we're just looking to add a pair of undo/redo buttons to the navigator. We'll put them over on the right so as to not confuse them with the other buttons.
A check for whether any available undo/redo actions is done whenever data changes, or whenever one of the undo/redo buttons is clicked. Nothing too dramatic here, just need to make sure that UpdateButtons is called to try and keep things consistent. As a quick test, just click a bunch of the X's in the table. Undo and Redo should revert or reapply the changes. Works pretty well. Here are the functions that implement the feature.
procedure TForm1.DataChange(ID:Integer; DataField: String; OldData: String; NewData: String);
var
  redoCount: Integer;
  undoCount: Integer;
begin
  console.log('ID#'+IntToStr(ID)+' Data for '+DataField+' changed from '+OldData+' to '+NewData);

  asm
    var tabEdit = Tabulator.findTable("#divTabulator")[0];
    redoCount = tabEdit.getHistoryRedoSize();
    undoCount = tabEdit.getHistoryUndoSize();
  end;

  if undoCount > 0
  then Form1.navbtnUndo.Enabled := True
  else Form1.navbtnUndo.Enabled := False;

  if redoCount > 0
  then Form1.navbtnRedo.Enabled := True
  else Form1.navbtnRedo.Enabled := False;
end;

procedure TForm1.navbtnUndoClick(Sender: TObject);
var
  redoCount: Integer;
  undoCount: Integer;
begin
  asm
    var tabEdit = Tabulator.findTable("#divTabulator")[0];
    tabEdit.undo();
    redoCount = tabEdit.getHistoryRedoSize();
    undoCount = tabEdit.getHistoryUndoSize();
  end;

  if undoCount > 0
  then Form1.navbtnUndo.Enabled := True
  else Form1.navbtnUndo.Enabled := False;

  if redoCount > 0
  then Form1.navbtnRedo.Enabled := True
  else Form1.navbtnRedo.Enabled := False;

  UpdateButtons;
end;

procedure TForm1.navbtnRedoClick(Sender: TObject);
var
  redoCount: Integer;
  undoCount: Integer;
begin
  asm
    var tabEdit = Tabulator.findTable("#divTabulator")[0];
    tabEdit.redo();
    redoCount = tabEdit.getHistoryRedoSize();
    undoCount = tabEdit.getHistoryUndoSize();
  end;

  if undoCount > 0
  then Form1.navbtnUndo.Enabled := True
  else Form1.navbtnUndo.Enabled := False;

  if redoCount > 0
  then Form1.navbtnRedo.Enabled := True
  else Form1.navbtnRedo.Enabled := False;

  UpdateButtons;
end;
All That Data.
And what that, we've covered how to get data out of Tabulator. Well, part of it anyway. The DataChange function can be used to pick up when the data changes, obviously. Which is a solid start. When deciding how to implement storing the changes back in a database or other data store, there are numerous considerations. Are you wanting to write back to, say, an XData server, every time there is a change in a field? Or do you want to work at a row level? Or even a table level? Does the data require any kind of server validation? What kind of network performance is acceptable? What to do about errors? Many of these are outside the scope of Tabulator - it has done its job and given you the data. Up to you to decide what to do with it.
When you eventually write the data back to the database (whether immediately or ten minutes later), confirmation of that transaction should then lead to a clearing of the history buffer, to prevent reverting back to values that predate the transaction. If the transaction fails, some notification should be provided. The options at that point could involve undoing the changes so the user sees something consistent with what is in the database currently. Or perhaps they might be given the option to retry the transaction if the error was transitory in some way. Or perhaps corrections could be recommended if the error was related to some kind of business logic. If you're working with a PWA app, maybe the database transaction has to wait until an internet connection is re-established. There may well be some time that passes between edits and database transactions.
Exporting Data.
But what if there is no database transaction - the user just wants the data that is in front of them? Tabulator supports exporting data into a variety of formats, including PDF, CSV, XLS, JSON, HTML, and the system clipboard, as well as printing. Some require extra JavaScript libraries to work, however. And there are additional considerations related to whether the columns being exported are the same as the columns that are visible. And when exporting data, depending on its intended use, it may be desirable to have the same data as it is formatted in the table, or it may be necessary to export data with the underlying data, before it is formatted, showing lookup values and data that hasn't been sanitized in any fashion. It all depends on what the purpose of the export file is.
Most of my real-world experiences with this kind of thing have involved exporting Excel spreadsheets for people who may not be particularly technically inclined. They're usually looking for a file that looks like whatever the original table happens to look like. But whether that is what they are really after is usually a mystery until they've got the file in their hands. So while it is often not too difficult to tick off a project feature called "Supports Excel Export", whether it is actually useful may well be a different matter entirely.
For our demonstration, let's add some buttons for all of them and at least have something workable to start with. We can just keep adding buttons on the right, one for each of our export formats. What might work better is to have a menu with the various options. Better still would be both - show the icons on a wide screen and then collapse to a popup menu when space is more limited. We'll get more into that in the last Tabulator article. For now, let's just go with the icons. Our final, fully loaded navigator now looks like this.

Print.
procedure TForm1.navbtnPrintClick(Sender: TObject);
begin
  asm
    var tabEdit = Tabulator.findTable("#divTabulator")[0];
    tabEdit.print();
  end;
end;
HTML Export.
As printing relies on HTML, exporting Tabulator as an HTML file has many of the same options and can be configured in much the same way. Why would you want to export as HTML in the first place? Well, perhaps there's a set of data that you want to publish on another website, so getting the data already formatted as HTML can be handy. Also, HTML tables are sometimes used by other programs as a form of structured data. Not as structured as JSON or XML or XLS, but structured enough. So it has its uses. Getting the HTML in code is possible using the getHtml() function. Getting the HTML as a file is possible using the download() function. Why not both?
procedure TForm1.navbtnHTMLClick(Sender: TObject);
var
  html: string;
begin
  asm
    var tabEdit = Tabulator.findTable("#divTabulator")[0];
    html = tabEdit.getHtml();
    tabEdit.download("html","tabulator.html");
  end;
  console.log(html);
end;CSV Export.
procedure TForm1.navbtnCSVClick(Sender: TObject);
begin
asm
var tabEdit = Tabulator.findTable("#divTabulator")[0];
tabEdit.download("csv","tabulator.csv");
end;
end;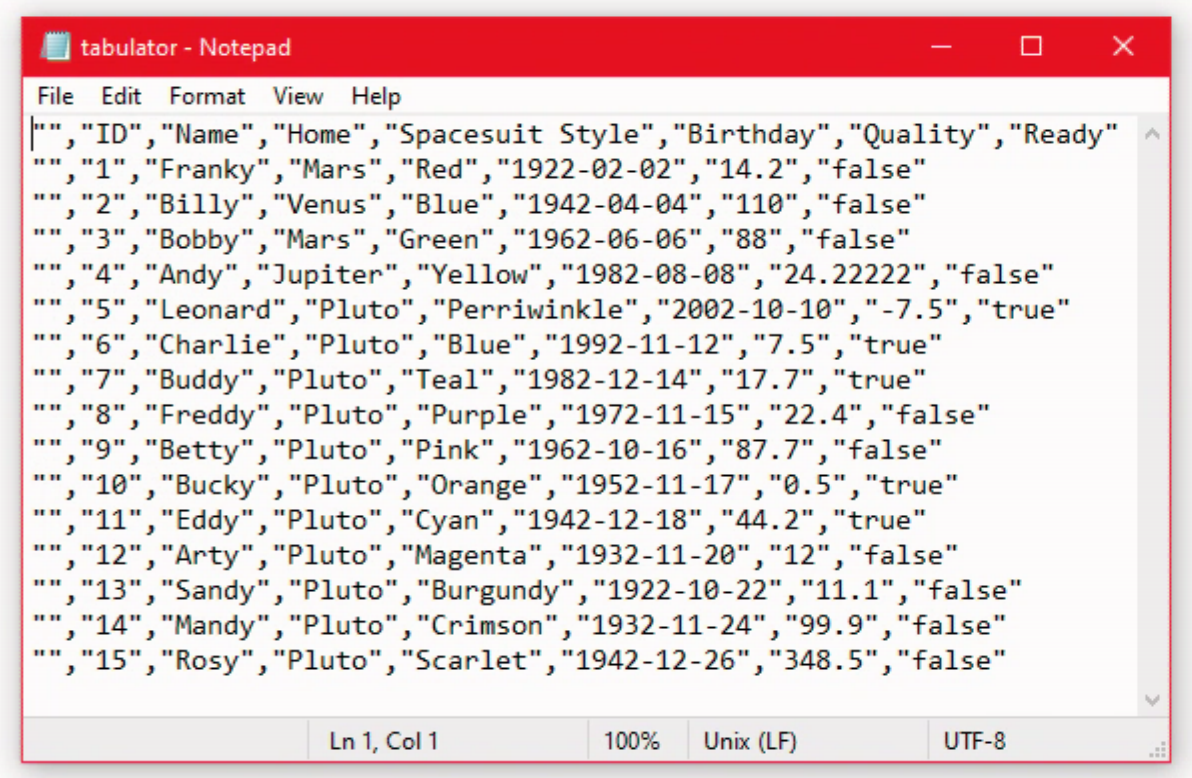 Tabulator Exported to CSV.
PDF Export.
This works the same way but requires an extra library to be loaded, which handles the conversion. Another entry for the Project.html file (or alternatively via the Manage JavaScript Libraries interface). Note that this was taken directly from the example documentation on the Tabulator website.
<script src="https://cdnjs.cloudflare.com/ajax/libs/jspdf/2.4.0/jspdf.umd.min.js"></script>
<script src="https://cdnjs.cloudflare.com/ajax/libs/jspdf-autotable/3.5.20/jspdf.plugin.autotable.min.js"></script>
The code is the same.
procedure TForm1.navbtnPDFClick(Sender: TObject);
begin
  asm
    var tabEdit = Tabulator.findTable("#divTabulator")[0];
    tabEdit.download("pdf","tabulator.pdf");
  end;
end;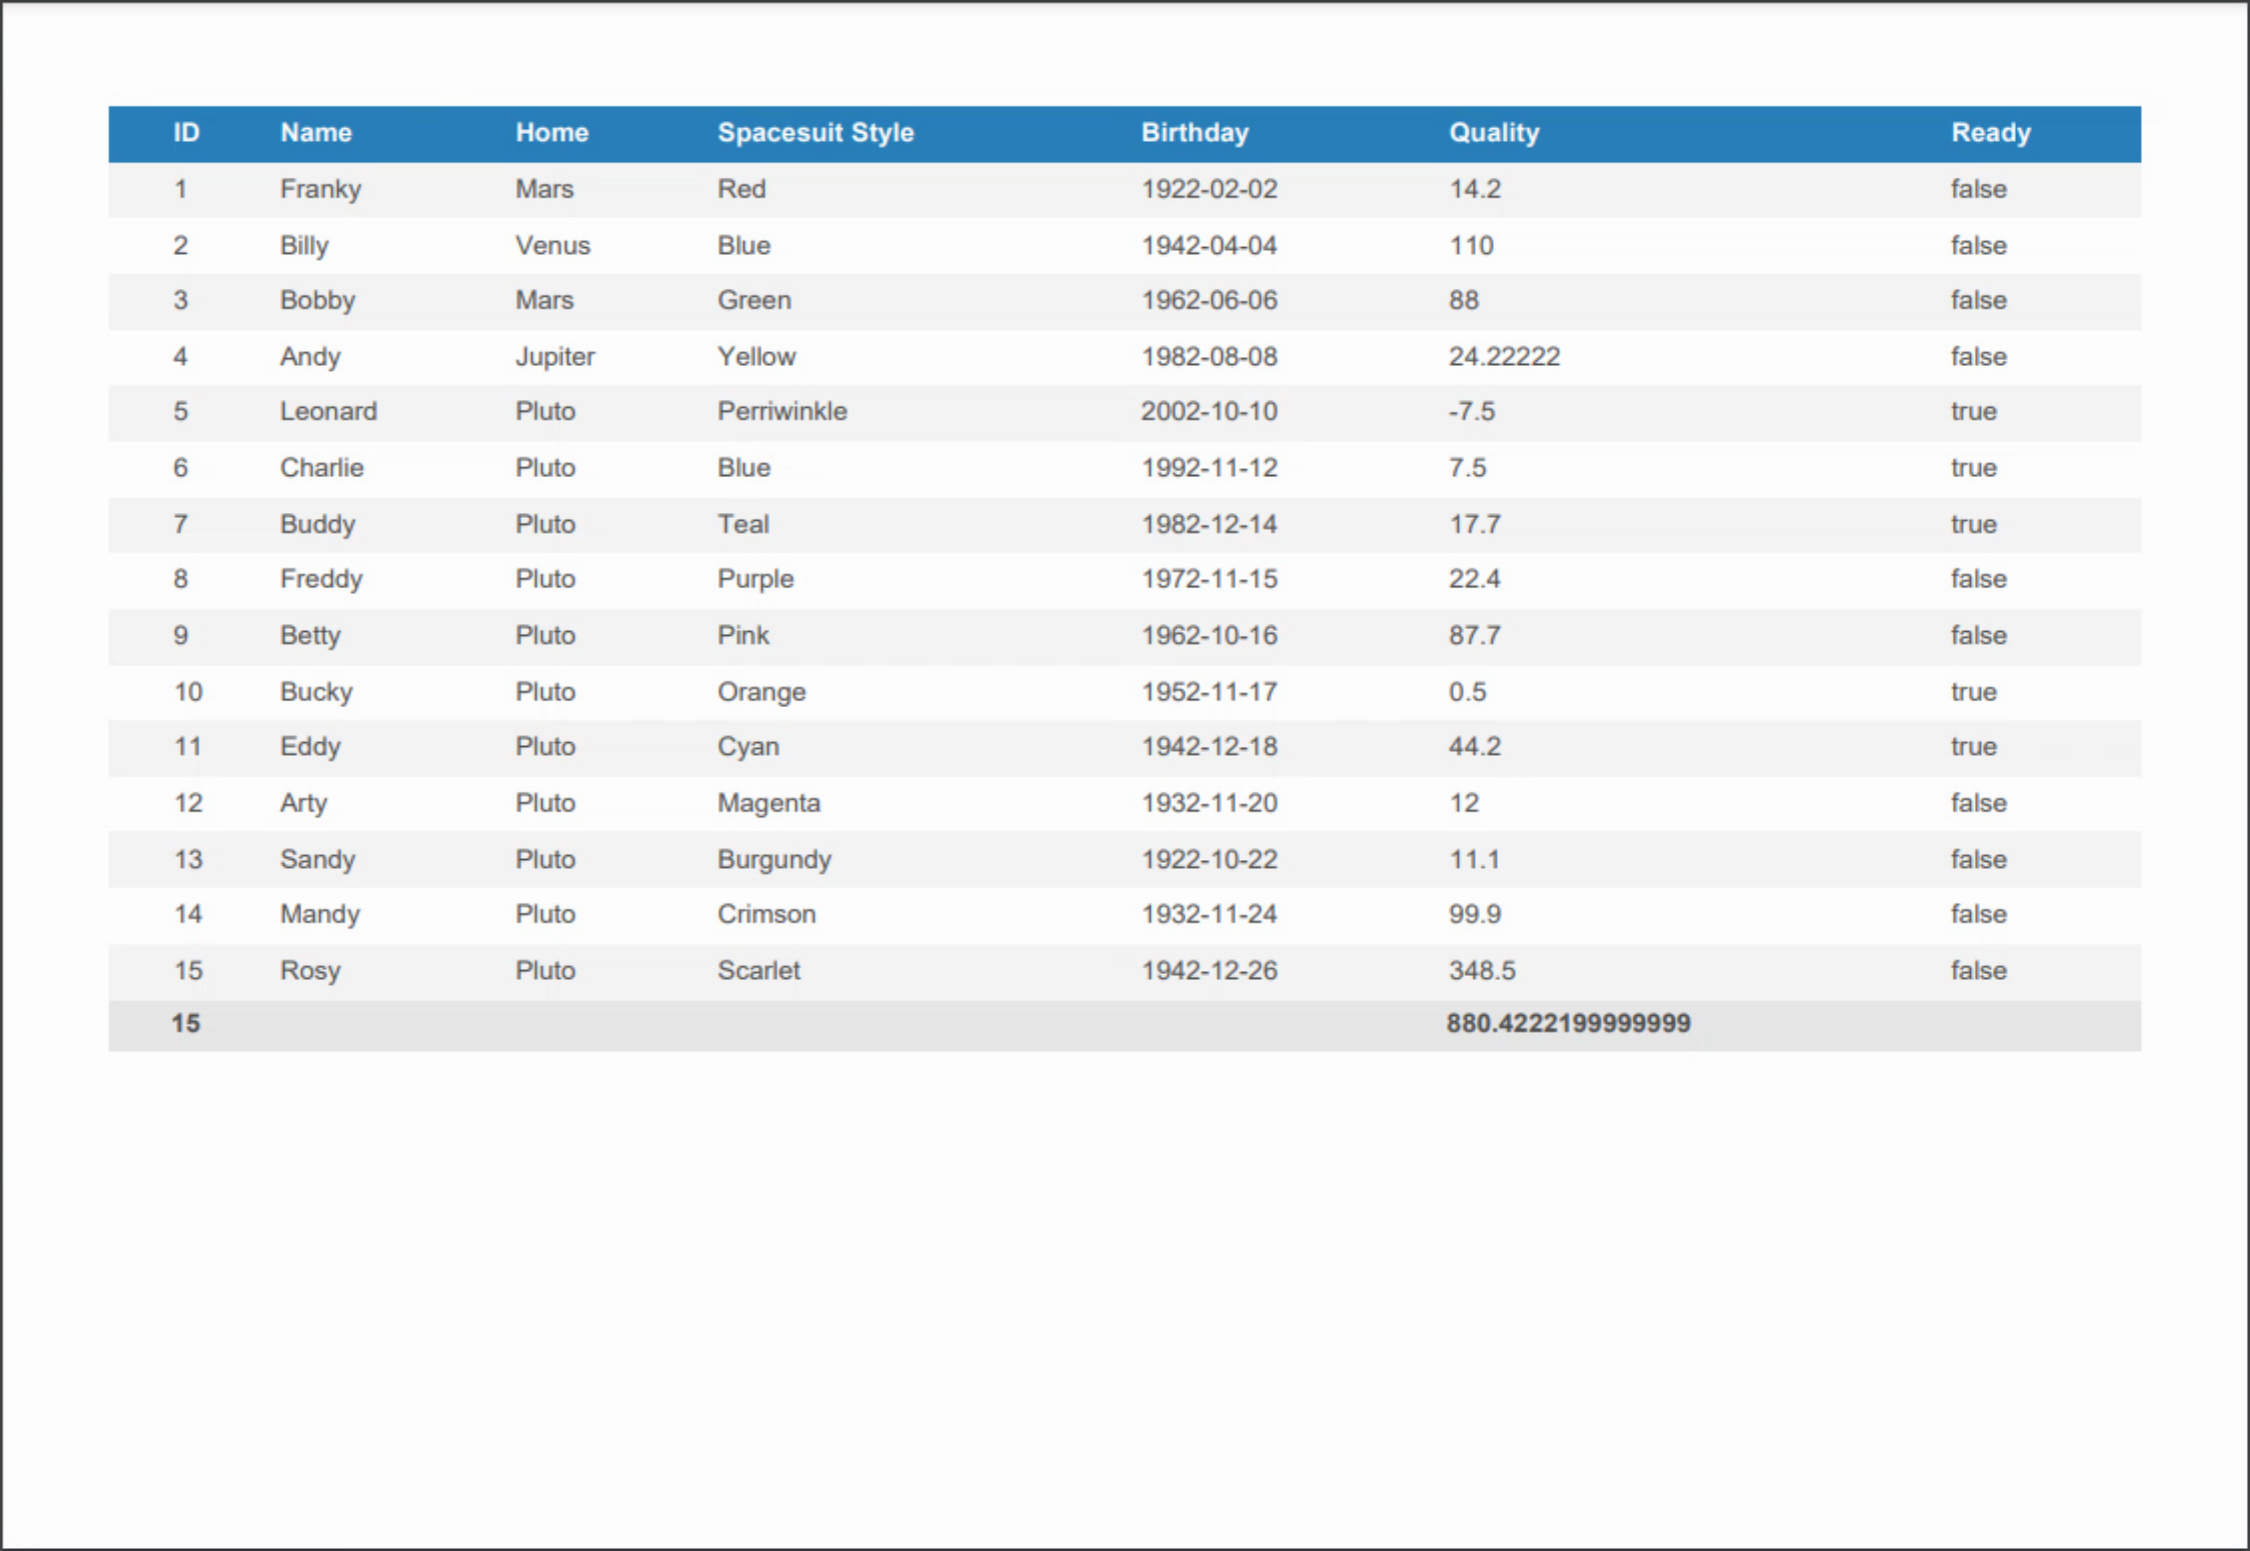
Excel Export.
<script type="text/javascript" src="https://oss.sheetjs.com/sheetjs/xlsx.full.min.js"></script>
And then it's back to business as usual.
procedure TForm1.navbtnXLSClick(Sender: TObject);
begin
asm
var tabEdit = Tabulator.findTable("#divTabulator")[0];
tabEdit.download("xlsx","tabulator.xlsx");
end;
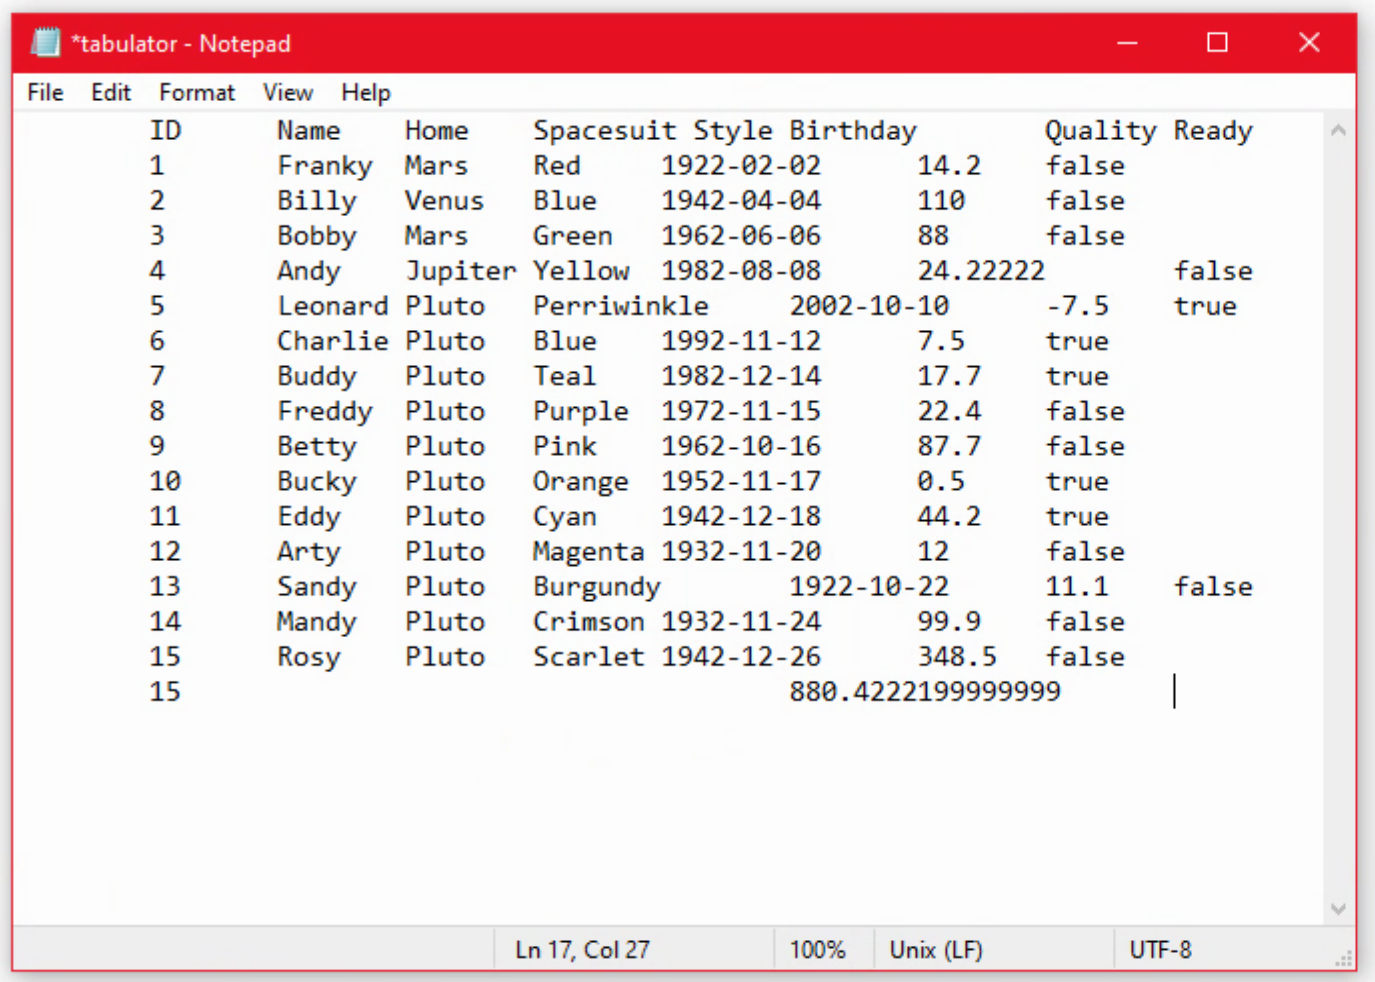
end;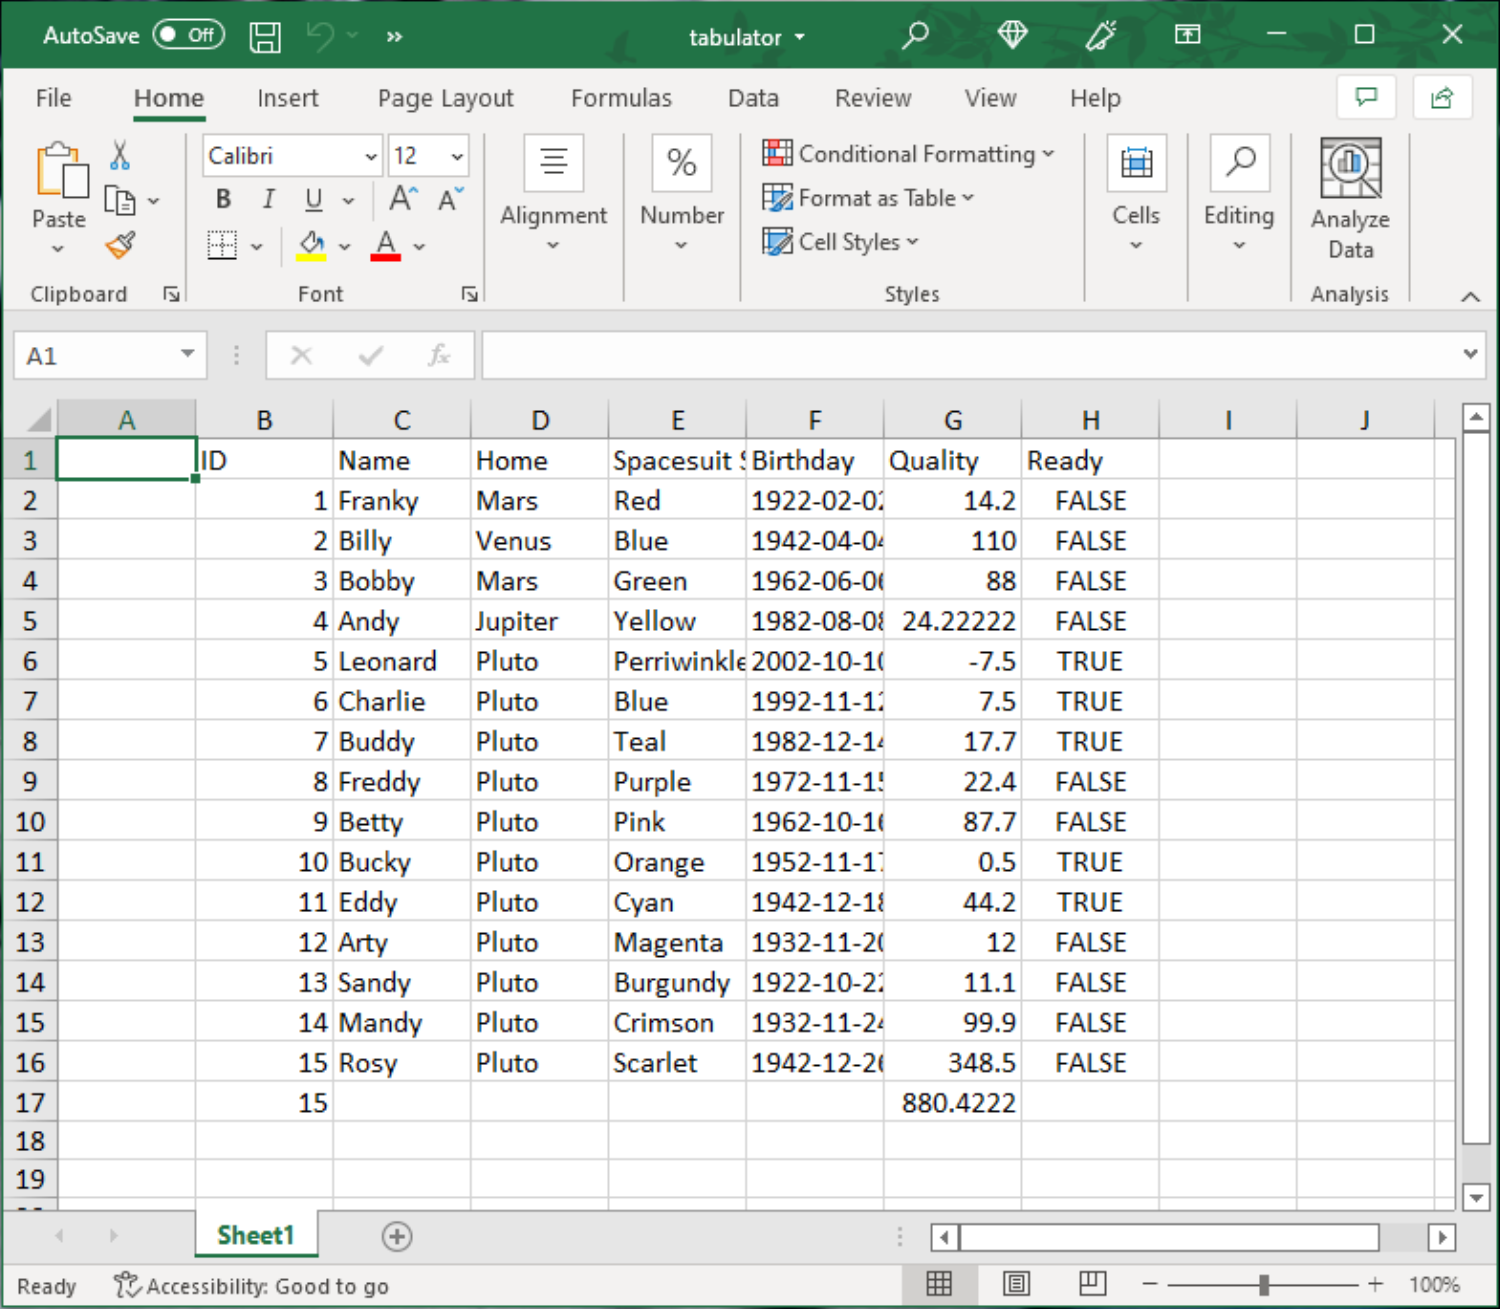 Tabulator Exported to Excel.
JSON Export.
This one is more just for the convenience of having a download option. Naturally, everything we've been doing is in JSON, so getting at the JSON itself isn't that difficult. Having a quick way to download it is just handy. No special libraries are needed here. Just for a change of pace, using downloadToTab (as I don't have any particularly good JSON viewer) looks like the following (Google Chrome).
procedure TForm1.navbtnJSONClick(Sender: TObject);
begin
asm
var tabEdit = Tabulator.findTable("#divTabulator")[0];
tabEdit.downloadToTab("json","tabulator.json");
end;
end;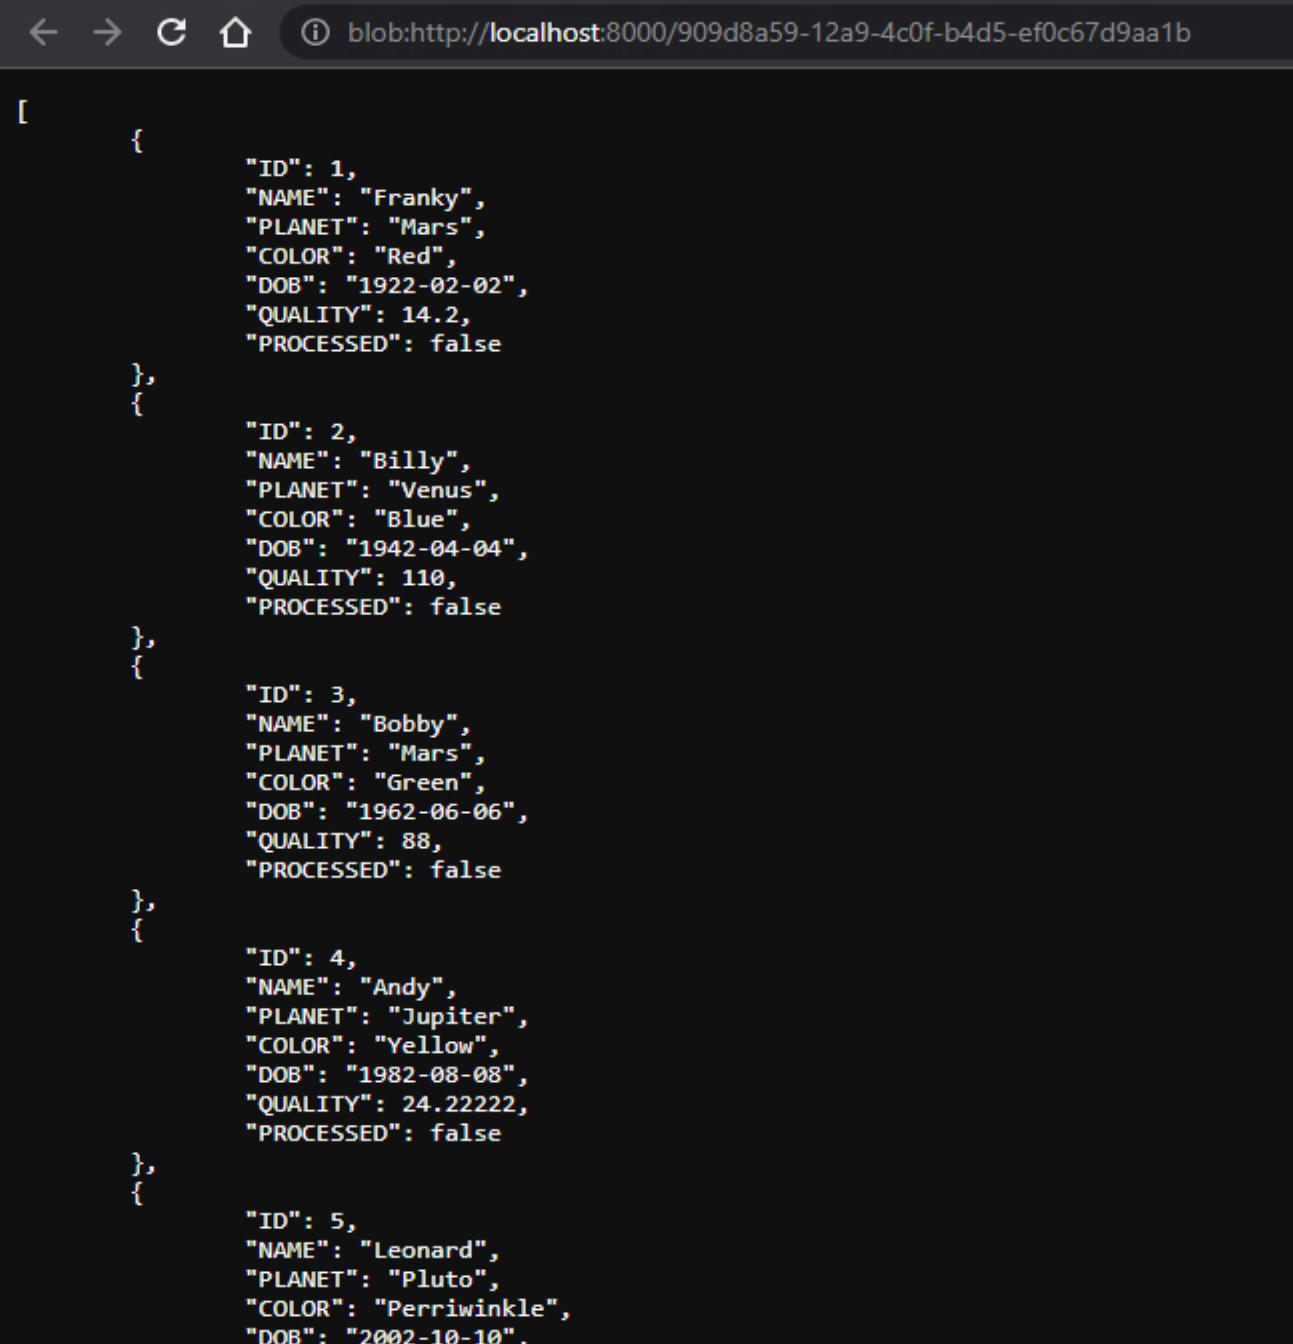 Tabulator Exported to JSON.
Clipboard.
And for our last export, we're looking at the system clipboard. Here, there are a few new concepts. One is that you can enable the ability to paste data directly into Tabulator. A scary thought! But potentially useful in carefully controlled environments. You can also specify that only copying from Tabulator into the clipboard is supported. Let's go with that. All that is needed is to add clipboard: "copy" to the table definition. That's it. Then hit CTRL+C or your OS equivalent, and the contents of the Tabulator are ready to be pasted elsewhere.
 Tabulator Data Pasted from Clipboard.
That's a Wrap !!!
So that's almost everything about Tabulator. If you made it this far, congratulations. You should be able to make use of Tabulator in your TMS WEB Core projects and be immediately productive with it. Next time we're going to clean up some loose ends and revisit a few topics with some additional refinements. And get back to the Actorious app and see how things have been evolving.
Related Posts:
Tabulator Part 2: Getting Data Into Tabulator
Tabulator Part 3: Viewing Data In Tabulator
Tabulator Part 4: Interacting With Tabulator
Tabulator Part 5: Editing Data In Tabulator
Tabulator Part 6: Getting Data Out Of Tabulator
Tabulator Part 7: Performance
Follow Andrew on 𝕏 at @WebCoreAndMore or join our 𝕏 Web Core and More Community.
Andrew Simard
Bookmarks:

This blog post has not received any comments yet.
All Blog Posts | Next Post | Previous Post