Blog
All Blog Posts | Next Post | Previous Post

 TMS WEB Core and More with Andrew:
Working with Home Assistant - Part 5: Time
Bookmarks:
Tuesday, February 14, 2023

Catheedral Home Page.
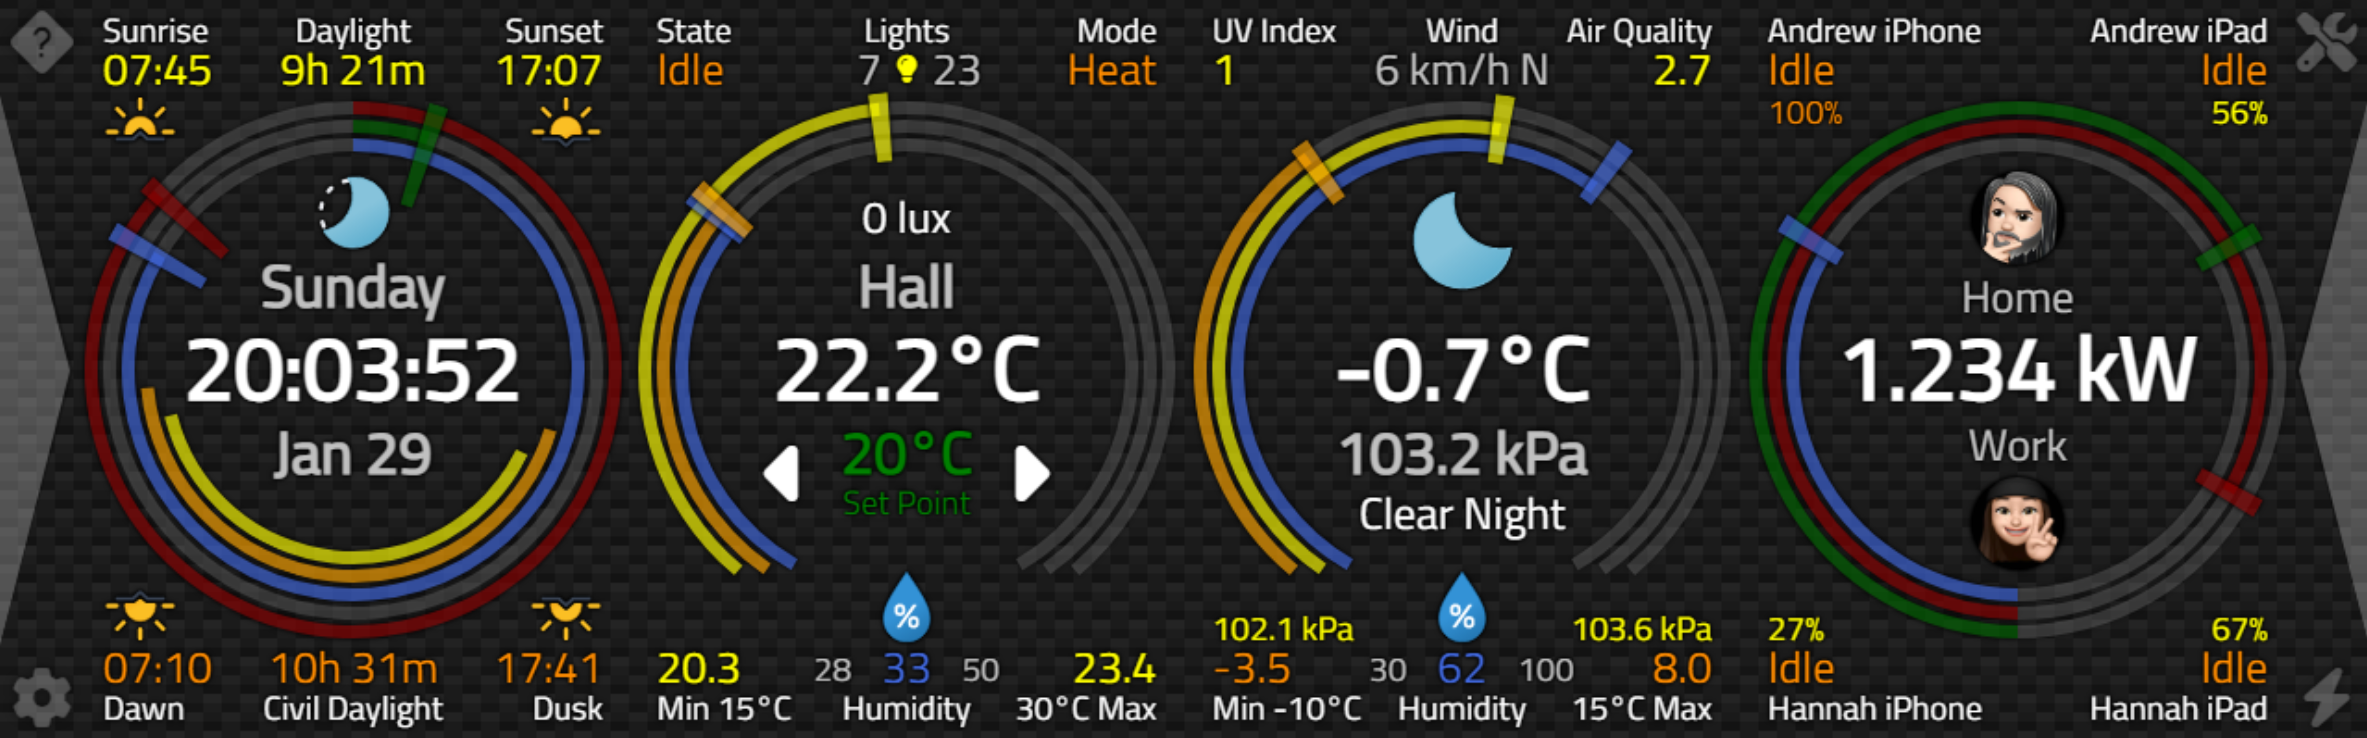
Going in Circles.
We've already used a few JavaScript libraries in this project, including the familiar Bootstrap, Tabulator, Font Awesome, and Luxon libraries. For this post, we're going to draw a handful of rings as part of our clock display. Let's use the Piety Vanilla JavaScript charting library that we covered previously in another blog post, here.
<script src="https://cdn.jsdelivr.net/npm/peity-vanilla@0.0.8/dist/peity-vanilla.min.js"></script>
As we'll need to draw just the "donut" charts that we covered in that post, we'll need our bit of Delphi code that we used for this purpose. This is mostly unchanged, but extra parameters were added to make it a little easier to size and position the chart on the page at the same time that we're setting up the rest of the chart.
procedure TForm1.Sparkline_Donut(CTop, CLeft, CWidth, CHeight: Integer; Chart: TWebHTMLDiv; ChartData: String; Fill: String; Rotation: String; InnerRadius: Double; DisplayText: String);
var
  Element: TJSElement;
begin
  // Set Dimensions of Chart
  Chart.Top := CTop;
  Chart.Left := CLeft;
  Chart.Width := CWidth;
  Chart.Height := CHeight;

  // Create a place to attach the Sparkline
  Chart.ElementHandle.innerHTML := '<span></span>';

  // Add data to this place
  Element := Chart.ElementHandle.firstElementChild;
  Element.innerHTML := ChartData;

  asm
    peity(Element, "pie", {
      width: CWidth,
      height: CHeight,
      fill: JSON.parse(Fill),
      innerRadius: InnerRadius
    });

    Element.parentElement.lastElementChild.style.transform = ' rotate('+Rotation+')';

    if (DisplayText !== '') {
      const newdiv = document.createElement("div");
      const newtxt = document.createTextNode(DisplayText);
      newdiv.appendChild(newtxt);
      newdiv.style.cssText = 'position:absolute; display:flex; align-items:center; justify-content:center; width:100%; height:100%; top:0px; left:0px; color:#fff; font-size:10px;';
      Element.parentElement.appendChild(newdiv);
    }
  end;
end;
As we're going to be drawing many such donut charts on our Home page, it is worth pausing for a moment to consider which library to use. We've gone with this one mostly because it is extremely small and efficient at what it does. In addition, it creates an SVG file which will be handy for a few reasons we'll get to. Another library could be swapped in and may make sense if we end up needing to draw more complex charts. But for a UI such as this, where simplicity and performance are more important than having an array of charting types, hopefully, we'll be able to get by with just this one library.
We'll essentially be drawing at least two charts every second as part of our UI (the "second hand" of our clock), so performance is critical. Particularly when it comes to running Catheedral on less capable devices. Fortunately, the Peity Vanilla JS library works very well in this situation. The execution time for calculations for a single ring is only a few milliseconds (generating the SVG) on a desktop system. Rendering might very well take longer, but that's another story for later.
Clock Data.
There are a few components to the clock. Naturally, there is the time displayed, as well as the weekday and month/day being displayed, all as text. We can get those easily enough using the Delphi FormatDateTime function, and we even created a few format options on the Configuration page to control how these should be displayed.Last time out, we also had a brief look at how we can retrieve bits of data from Home Assistant related to the "sun" sensor. We'll want those values, but we'd also like to get the moon phase in the same way. This is another "Integration" that is available in Home Assistant but not installed by default. There's not really anything to configure for it - its calculations are based on the latitude and longitude that are already available elsewhere in Home Assistant. To summarize, then, we're after a few values from Home Assistant that we'll assign to Delphi Form variables.
  var
    SunRise: TTime;
    SunSet: TTime;
    SunDawn: TTime;
    SunDusk: TTime;
    MoonStatus: String;
    MoonIcon: String;
    MoonTitle: String;
In the case of the moon data, all we really get from Home Assistant is the phase, either as a name or as an icon, where the icon name includes values like "waning gibbous" and that sort of thing. Fortunately, these values seem to be reasonably standard - there are only eight of them, after all. And we can use the values without having to worry about anything else. A future blog post will take a different approach when dealing with astronomical data, but for now, this is workable.
We extract all these values as we covered before, from either the "get_states" or the "subscribe_events" calls to the Home Assistant WebSocket API. We also use the Configuration values for the names of the objects in Home Assistant, in case they happen to be different from the default installations for these Integrations.
Regardless of how the data has arrived, we use the same Delphi "StateChanged" function to update our Delphi Form
variables. We covered the sun code previously, but here it is again along with the moon code.
  if (Entity = SunSensor) then
  begin
    asm
      var timestr = luxon.DateTime.fromISO(State.attributes.next_rising).toFormat('HH:mm:ss');
      this.SunRise = (parseInt(timestr.substr(0,2))*3600 + parseInt(timestr.substr(3,2))*60 + parseInt(timestr.substr(6,2)))/86400;

      timestr = luxon.DateTime.fromISO(State.attributes.next_setting).toFormat('HH:mm:ss');
      this.SunSet = (parseInt(timestr.substr(0,2))*3600 + parseInt(timestr.substr(3,2))*60 + parseInt(timestr.substr(6,2)))/86400;

      timestr = luxon.DateTime.fromISO(State.attributes.next_dawn).toFormat('HH:mm:ss');
      this.SunDawn = (parseInt(timestr.substr(0,2))*3600 + parseInt(timestr.substr(3,2))*60 + parseInt(timestr.substr(6,2)))/86400;

      timestr = luxon.DateTime.fromISO(State.attributes.next_dusk).toFormat('HH:mm:ss');
      this.SunDusk = (parseInt(timestr.substr(0,2))*3600 + parseInt(timestr.substr(3,2))*60 + parseInt(timestr.substr(6,2)))/86400;
    end;
  end;

  if (Entity = MoonSensor) then
  begin
    asm
      this.MoonState = State.attributes.icon;
    end;
    MoonIcon := '<img width="70" height="70" src="weather-icons-dev/production/fill/svg-static/moon'+StringReplace(StringReplace(StringReplace(MoonState,'_','-',[rfReplaceAll]),'mdi:moon','',[]),'-moon','',[])+'.svg">';
    MoonTitle := Trim(StringReplace(StringReplace(StringReplace(MoonState,'_',' ',[rfReplaceAll]),'mdi:moon','',[]),'-',' ',[rfReplaceAll]));
    asm
      this.MoonTitle = window.CapWords(this.MoonTitle);
    end;
  end;
These are all the values that we'll need in order to draw everything for our Time panel.
Fun with Timers.
Before we get to the layout, let's first take a moment to consider how we want to handle updates to the Home page. The idea behind setting the Form variables as we've done is to make updates to the display easier and hopefully more efficient. Whenever an update comes along, we don't need to calculate what the Form variables are. We just display them. Or use them in calculations.
If they change between updates, perhaps several times, no problem, we just use whatever their state is at the time we're doing an update. The idea here is that updating the elements on the page is expensive (a new render is generally required) versus just tracking and updating Delphi Form variables. Ideally, this means that we're only updating elements on the page as infrequently as possible.
Some elements, like the time (specifically, the seconds display), need to be updated every second. Other elements, like sunrise/sunset, most certainly do not. Even when they change, it is perfectly reasonable to update them a minute later without issue. It would also be good if there wasn't a time when a lot of updates happened simultaneously, as that might introduce a bit of a hiccup in our display.
To help get this all sorted, we're just going to use a simple TWebTimer, set to an interval of 1s (1000ms), called tmrSeconds. In the event handler for this timer, we're going to update whatever needs to be updated anywhere in our UI, hopefully before the next time that the timer fires, 1s later.
Complicating matters, we'd also like to use the same code to initiate an update immediately. This need arises when switching between pages, or when new data arrives that is more timely in nature, like a light switch, where even a one-second delay should be avoided if possible.
For example, if we're currently viewing the Home page and then switch to a
Configuration page, we'd like to not update the time on the Home page while we're making Configuration page
changes. But if we switch back to the Home page, it would be ideal if it was already updated with the current time as soon as it is displayed. It can be visually jarring to see the time change dramatically, or big changes in any of the other values (or rings), when the
page isn't updated until after it is displayed.
This is helped a bit by taking advantage of our page transitions. A bit of time passes between fading out the Configuration
page and fading in the Home page, which gives us a small window to work in. We'll use the "tag" property of
tmrSeconds to indicate whether an immediate redraw is required for the incoming page, where the value will correspond to a given page
index (0 = Configuration, 1 = Home, etc.). This will make it possible to call the tmrSecondsTimer event
directly to get our update to happen in between page transitions without having to wait for the 1s timer.
Within the tmrSeconds event, then, we'll need to decide what page we're on, and based on the current second,
decide whether we want to draw more or less information. For example, the seconds will need to be updated
every second, but the other elements of the clock can be updated when the current second is :00, implemented as
"(the current second of the day) mod 60 = 0". For the Home page, we'll perform any major update of the clock at
:00, and then each major update of the other three panels at :15, :30, and :45 respectively, as they aren't as
sensitive to the time.
Once the timer has executed all of its functions, it then looks at what time is left in the current second and sets itself to be triggered again shortly after the next second boundary. This might seem a little curious. I spent decades writing Delphi VCL code while using maybe a handful of timers over that period of time. And here we're fiddling about with millisecond accuracy.
On the other hand, I've done some work using the Unity 3D graphics engine, where this kind of thing is the norm. In fact, in that environment, you're writing a pile of code that is expected to execute in a single frame - 1/60th of a second or so. So perhaps not so curious.
The
goal is that we want the clock time to tick consistently. Not flip over after a delay of 1.5s at one point and
after a delay of 0.5s at another point, or (gasp!) completely miss a second here or there. That's just
irritating to look at!
The Easy Bits.
Drawing the text parts of the Time is simple enough. We just call FormatDateTime with "Now" and one of the
date/time formats from the Configuration we've previously covered. A little extra care is used to check for
invalid date/time formats, and to only update the page if a value has changed.
  /////////////////////////////////////////////////////////////////////////////////////////////////
  // Entries on the Home Page
  /////////////////////////////////////////////////////////////////////////////////////////////////

  if (pages.TabIndex = 1) or (tmrSeconds.Tag = 1) then
  begin

   // Time Panel //////////////////////////////////////////////////////////////////////////////////

    try
      display := FormatDateTime(editConfigSHORTDATE.Text, Now);
      if labelDate.Caption <> display
      then labelDate.Caption := display;
    except on E: Exception do
      labelDate.Caption := 'Invalid Format';
    end;
    try
      display := FormatDateTime(editConfigLONGTIME.Text, Now);
      if labelTime.Caption <> display
      then labelTime.Caption := display;
    except on E: Exception do
      labelTime.Caption := 'Invalid Format';
    end;

    display := FormatDateTime('dddd',Now);
    if labelDay.Caption <> display
    then labelDay.Caption := display;

  end;
The idea is that we're only pushing changes to the page when something has changed. At the very least, it
makes viewing the elements of the page using the browser developer tools a little less jumpy as not everything is changing
all the time.
Not Your Average Clock.
Next up, then, are the rings around the displayed time. The idea here, generally, is to have a 24-hour clock
with hands (markers) to indicate the hours (blue), minutes (green), and seconds (red). By displaying 24 hours
instead of the traditional 12 hours, it makes it a little more clear when displaying two additional partial
rings - one for Sunrise/Sunset (yellow) and one for Dawn/Dusk (orange). All of the rings are, naturally, 360-degree circles, and are drawn as some fraction of one day, or 86400 seconds. So to start with, we'll define a
bunch of values to help make the subsequent calculations a little easier.
  // Some easy calculations
  current_seconds := SecondOfTheDay(Now);
  current_seconds_15 := current_seconds mod 15;      // Zero every 15 seconds
  current_seconds_60 := current_seconds mod 60;      // Zero every minute
  current_seconds_3600 := current_seconds mod 3600;  // Zero every hour
The first ring will be for the "second hand" of our clock. Here, we want the outermost ring to start at the top and fill to the spot corresponding to the current second. And we'd like a "marker" positioned at the end of that arc. For the ring, this is just a standard "donut" where we're filling it with a ratio of the number of seconds so far this minute, out of 60s.
    // Seconds (Ring 1)
    segment := IntToStr(current_seconds_60);
    Sparkline_Donut(
      55, 5, 290, 290,                           // T, L, W, H
      ringSeconds,                               // TWebHTMLDiv
      segment+'/60',                             // Data
      '["var(--TxRing1)","var(--TxRingB)"]',     // Fill
      '0deg',                                    // Rotation
      138,                                       // Inner Radius
      ''                                         // Text
    );
For sizing, we're starting with a circle with a diameter of 300px. This comes from our page width of 1280px, minus the two Navigation Controls, 40px each, divided into four panels on the Home page. We'd like a bit of margin, say 5px, which gets us our 290px diameter for the outermost circle. Because our page is 400px high (taller than 300px wide), we end up with top and left values of 55px and 5px, respectively. The inner radius is then used to set the width of the ring. As we have a radius of 145px (290 div 2), this means that with an inner radius of 138px, we've got a ring width of 7px.
The ring colors are
defined in our CSS file and just passed into the function here. In our CSS file, they are defined using CSS
variables at the top of the file.
:root {

/* Ring Colors - at most 5 rings (usually 3) and a background color */
/* Ring Filter - applied to each set of rings */

  --TxRing1: darkred;
  --TxRing2: darkgreen;
  --TxRing3: royalblue;
  --TxRing4: orange;
  --TxRing5: yellow;
  --TxRingB: #FFFFFF40;
  --TxRingF: drop-shadow(0px 0px 1px black) drop-shadow(0px 0px 1px black);
}
We'll end up with a set of similar CSS variables for each of the sets of rings - Climate (Cx), Weather (Wx), and
Energy (Ex). The background color (--TxRingB) in this case refers to the part of the ring that is not filled. Tthe filter (--TxRingF) is the same drop-shadow that we've been using elsewhere, which draws a nice little
outline around the ring, given that the ring itself is rendered as SVG.
For the second-hand marker, we're doing much the same thing, drawing a circle, but in this case, we're only
going to display a small fraction of it, 4deg to be specific. And we're going to position it at the end of the
"second hand" arc that we've just drawn. The length of the marker needs to extend slightly beyond the outer ring, and
also within the innermost ring.
    // Seconds Marker (Ring 1)
    rotation := IntToStr((current_seconds_60 * 6) - 2);
    Sparkline_Donut(
      50, 0, 300, 300,                           // T, L, W, H
      ringSecondsMarker,                         // TWebHTMLDiv
      '4/360',                                   // Data
      '["var(--TxRing1)","transparent"]',        // Fill
      rotation+'deg',                            // Rotation
      93,                                        // Inner Radius
      ''                                         // Text
    );
The outer edge of the marker traces a circle that is at the outer 300px diameter of our available space, which
is 5px beyond the outer ring. The inner edge of the marker traces a circle that is inside the innermost ring,
by the same 5px. And the width is set at 4 degrees. The "-2" in the rotation is used to center this marker
directly over the end of the leading edge of the first circle (2deg being half of 4deg). And as we don't want
the rest of the donut to show when drawing the marker, we just set the alternate color to "transparent".
For the minute and hour rings, we're going to do pretty much the same thing, just with different units of time
involved. Each ring is the same width, with the same offset from the ring that encloses it. These are only
updated once per minute. Note that the markers are all the same size.
    // Every minute we update the Minute and Hour rings
    if (current_seconds_60 = 0) or (tmrSeconds.Tag = 1) then
    begin

      // Minutes (Ring 2)
      segment := IntToStr(current_seconds_3600);
      Sparkline_Donut(
        65, 15, 270, 270,                        // T, L, W, H
        ringMinutes,                             // TWebHTMLDiv
        segment+'/3600',                         // Data
        '["var(--TxRing2)","var(--TxRingB)"]',   // Fill
        '0deg',                                  // Rotation
        128,                                     // Inner Radius
        ''                                       // Text
      );

      // minutes Marker (Ring 2)
      rotation := IntToStr((current_seconds_3600 div 10) - 2);
      Sparkline_Donut(
        50, 0, 300, 300,                         // T, L, W, H
        ringMinutesMarker,                       // TWebHTMLDiv
        '4/360',                                 // Data
        '["var(--TxRing2)","transparent"]',      // Fill
        rotation+'deg',                          // Rotation
        93,                                      // Inner Radius
        ''                                       // Text
      );

      // Hours (Ring 3)
      segment := IntToStr(current_seconds);
      Sparkline_Donut(
        75,25,250,250,                           // T, L, W, H
        ringHours,                               // TWebHTMLDiv
        segment+'/86400',                        // Data
        '["var(--TxRing3)","var(--TxRingB)"]',   // Fill
        '0deg',                                  // Rotation
        118,                                     // Inner Radius
        ''                                       // Text
      );

      // Hours Marker (Ring 3)
      // 86400s in day / 360deg = 240s/deg rotat
      rotation := IntToStr((current_seconds div 240) - 2);
      Sparkline_Donut(
        50, 0, 300, 300,                         // T, L, W, H
        ringHoursMarker,                         // TWebHTMLDiv
        '4/360',                                 // Data
        '["var(--TxRing3)","transparent"]',      // Fill
        rotation+'deg',                          // Rotation
        93,                                      // Inner Radius
        ''                                       // Text
      );

    end;
The last two rings don't have markers and don't need to be complete rings either. The Sunrise/Sunset and Dawn/Dusk rings are drawn in the same way as the markers though, with the alternate color being transparent. We only need to update these rings and the related information if the values have changed.
    // Every minute we check to see if we need to update the Sunrise/Sunset and Dawn/Dusk information
    if (current_seconds_60 = 0) or (tmrSeconds.Tag = 1) then
    begin

      try
        display := FormatDateTime(editConfigSHORTTIME.Text, SunRise)+
                   FormatDateTime(editConfigSHORTTIME.Text, SunSet)+
                   FormatDateTime(editConfigSHORTTIME.Text, SunDawn)+
                   FormatDateTime(editConfigSHORTTIME.Text, SunDusk);
      except on E: Exception do
        display := 'Invalid Format';
      end;

      segment := dataHomeRise.Caption+
                 dataHomeSet.Caption+
                 dataHomeDawn.Caption+
                 dataHomeDusk.Caption;

      // If any of these four values has changed, then update all of them
      if (segment <> display) or (tmrSeconds.Tag = 1) then
      begin

        try
          display := FormatDateTime(editConfigSHORTTIME.Text, SunRise);
          if dataHomeRise.Caption <> display
          then dataHomeRise.Caption := display;
        except on E: Exception do
          dataHomeRise.Caption := 'Invalid Format';
        end;

        try
          display := FormatDateTime(editConfigSHORTTIME.Text, SunSet);
          if dataHomeSet.Caption <> display
          then dataHomeSet.Caption := display;
        except on E: Exception do
          dataHomeSet.Caption := 'Invalid Format';
        end;

        try
          display := FormatDateTime(editConfigSHORTTIME.Text, SunDawn);
          if dataHomeDawn.Caption <> display
          then dataHomeDawn.Caption := display;
        except on E: Exception do
          dataHomeDawn.Caption := 'Invalid Format';
        end;

        try
          display := FormatDateTime(editConfigSHORTTIME.Text, SunDusk);
          if dataHomeDusk.Caption <> display
          then dataHomeDusk.Caption := display;
        except on E: Exception do
          dataHomeDusk.Caption := 'Invalid Format';
        end;


        // Dawn/Dusk (Ring 4)
        segment_start := Trunc(SunDawn * 360);
        segment_end := Trunc(SunDusk * 360);
        segment := IntToStr(segment_end - segment_start);
        rotation := IntToStr(segment_start);
        Sparkline_Donut(
          85, 35, 230, 230,                        // T, L, W, H
          ringDawnDusk,                            // TWebHTMLDiv
          segment+'/360',                          // Data
          '["var(--TxRing4)","transparent"]',      // Fill
          rotation+'deg',                          // Rotation
          108,                                     // Inner Radius
          ''                                       // Text
        );

        // Rise/Set (Ring 5)
        segment_start := Trunc(SunRise * 360);
        segment_end := Trunc(SunSet * 360);
        segment := IntToStr(segment_end - segment_start);
        rotation := IntToStr(segment_start);
        Sparkline_Donut(
          95, 45, 210, 210,                        // T, L, W, H
          ringRiseSet,                             // TWebHTMLDiv
          segment+'/360',                          // Data
          '["var(--TxRing5)","transparent"]',      // Fill
          rotation+'deg',                          // Rotation
          98,                                      // Inner Radius
          ''                                       // Text
        );

//        dataHomeTwilight.Caption := FormatDateTime('h"h"n"m"s"s"', SunDusk - SunDawn);
//        dataHomeDaylight.Caption := FormatDateTime('h"h"n"m"s"s"', SunRise - Sunset);
        dataHomeTwilight.Caption := FormatDateTime('h"h "n"m"', SunDusk - SunDawn);
        dataHomeDaylight.Caption := FormatDateTime('h"h "n"m"', SunRise - Sunset);
      end;
That gets us all of our rings, as well as all of the text blocks on the page.
Adding a Bit of Style.
One little problem, though,
relates to the z-order that these are drawn. We want them to be layered in a certain way. It
wouldn't do, for example, to have a marker appear above one ring and below another. We can address this with a
bit more CSS added to the mix. For the rings, we'll use or CSS variable to insert the appropriate filter: drop-shadow which we've
been using everywhere. Which, as it turns out, can be applied to SVG just like anything else. Which is pretty
fun! At least as far as these kinds of things are concerned. Here's our CSS for this section.
/* Used for drawing rings on the Home Page */
.Ring {
  z-index: 3;
  opacity: 0.65;
}
.TxRing {
  filter: var(--TxRingF);
}

/* Want faster (outer?) moving markers to appear on top of slower (inner?) moving circles */
#ringDayMarker { z-index: 4; }
#ringMinutesMarker { z-index: 5; }
#ringSecondsMarker { z-index: 6; }
Here, we want the main rings at the bottom. They don't overlap, so there isn't any reason for a separate z-index. The markers, though, should always be above all of the rings, and we've arranged them here so that the faster outer markers are drawn over the slower inner markers. When it comes to the text, we'll do the same thing, with all of the text always appearing above everything ring-related, and larger text appearing above smaller text.
/* Used for displaying various bits of Text on Home Page and elsewhere */
.Text {
  overflow: visible;
  filter: drop-shadow(0px 0px 1px black) drop-shadow(0px 0px 1px black);
}
.TextCover {
  z-index: 15;
}
.TextSM {
  font-size: 18px;
  z-index: 10;
}
.TextRG {
  font-size: 24px;
  z-index: 11;
}
.TextLG {
  font-size: 32px;
  font-weight: 700;
  z-index: 12;
}
.TextXL {
  font-size: 48px;
  font-weight: 700;
  z-index: 13;
}

/* Used so we can assign arbitrary colors via CSS classes */
.White {
  color: white;
}
.Gray {
  color: silver;
}
.Yellow {
  color: yellow;
}
.Orange {
  color: darkorange;
}
.Red {
  color: red;
}
.Green {
  color: green;
}
.Blue {
  color: royalblue;
}
.Lime {
  color: lime;
}
.DarkGray {
  color: darkslategray;
}
There's a gap in the z-index values between rings and text classes just in case we end up with more rings or smaller text at some point. Colors are included here primarily to make it easy to set them by assigning them to the ElementClassName property in the Delphi IDE. This might get changed at some point to have the different kinds of text assigned a color based on a CSS variable to make it easier to change them all at once. Challenges for another day. We'll likely incorporate this kind of thing into an overhaul that includes a better overall theming system, but let's get the app out the door before we worry about that too much.
To the Moon!
The next element of the Time panel on the Catheedral Home page that we have to deal with is the Moon phase.
We get this as a state value or an icon from Home Assistant, and we can also tell what the other values
are going to be by looking at the options for this particular Home Assistant object.
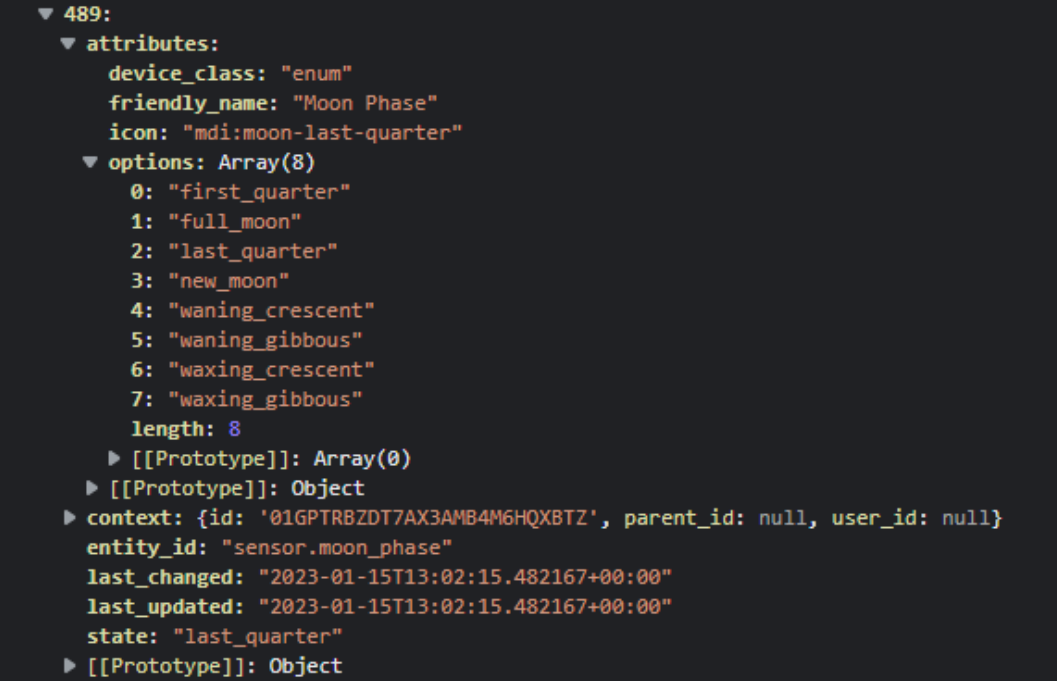
Moon Phase from Home Assistant.
We could use this to place an icon using the Material Design Icons if we were so inclined, using the same
approach as we took in the last post when displaying the Home Assistant icon. Instead, we know we're going to
want to use some fancy animated weather icons, so why don't we get that bit out of the way? And as it turns
out, those fancy animated weather icons include a set of moon phase icons as well.
The fancy animated weather icons we're going to use come from another GitHub repository - Meteocons by Bas Milius - available from https://github.com/basmilius/weather-icons. There is a pretty solid array of weather-related icons, as well as different styles (filled vs. outline) and formats (SVG, animated SVG, PNG) as well as all of the source material used to create them (Adobe Illustrator files). Couldn't ask for much more than that!
To use these in our project, we can download this repository and
drop it into our project folder. When uncompressed, the icons we're after can be found in
"weather-icons-dev/production/fill/svg/" and "weather-icons-dev/production/fill/svg-static/". We can add all of
those files to our project. Perhaps we'll pare it down when we're done as we won't likely use all of them.
With those SVG files in place, we just need to take our value from Home Assistant and convert it to a
corresponding link to one of those SVG files. The SVG filenames are similar enough to the name of the icons
that we can just do a little text manipulation to get what we're after, going from the Home Assistant "icon"
value to the SVG "filename" value. With that in hand, we can drop it into an <img> tag within our
favorite TWebHTMLDiv component, and we're all set. We've already shown the code above for this, which gets
executed whenever the state changes. Note that this only gets executed very infrequently.
  if (Entity = MoonSensor) then
  begin
    asm
      this.MoonState = State.attributes.icon;
    end;
    MoonIcon := '<img width="70" height="70" src="weather-icons-dev/production/fill/svg-static/moon'+StringReplace(StringReplace(StringReplace(MoonState,'_','-',[rfReplaceAll]),'mdi:moon','',[]),'-moon','',[])+'.svg">';
    MoonTitle := Trim(StringReplace(StringReplace(StringReplace(MoonState,'_',' ',[rfReplaceAll]),'mdi:moon','',[]),'-',' ',[rfReplaceAll]));
    asm
      this.MoonTitle = window.CapWords(this.MoonTitle);
    end;
  end;
We could have just as easily started with the "state" value from Home Assistant instead of the "icon" value,
but originally this was displayed as an icon, and it might have use elsewhere, so we'll stick with the icon for
now. All we're doing in the above is taking something that looks like "mdi:moon-new-moon" and replacing it with
a valid filename from our collection, while also making a nicer text version for display if someone hovers their
mouse over the moon image on the page.
Conveniently, Bas' icons are also SVG and you know what that means! We get to apply our
filter: drop-shadow here as well. We are keeping everything nice and consistent. While we're at it, we can add a bit of flair
to things (or pollute it terribly, depending on your point of view) by adding his icons for sunrise and sunset.
And just for fun, we can flip them upside down and use them for dawn and dusk as well. These were all added by
adding a TWebLabel component like all of the other text and setting the Caption property to reference an <img>
tag. To flip the icons, it was just a matter of adding a transform to this HTML.
<img style="transform: rotate(180deg);"width=50 height=50 src="weather-icons-dev/production/fill/svg-static/sunset.svg">
Just a quick note about animation. Here, we've got all of the icons in place so far using the "static"
version. There is an animated version of each of these that we could use instead. However, we've got to be
mindful of performance. One day, perhaps, browsers will be a little smarter and be able to render a page using
multiple threads (would be super-interesting to see how well Flow
Browser works in a Miletus project!). But at the moment, like JavaScript itself, browser rendering is a
single-threaded affair, which means it has a lot of work to do in a short period of time.
Adding animated SVG
icons to this project, on my desktop system, incurs about a 5% CPU hit - for each icon - so not ideal.
This doesn't impact things too much generally, since my desktop has far more than one CPU thread, but it is still
something to be carefully weighed. The same goes for having an animated GIF as a background. It can certainly work
very well, but always at a cost. When it comes to deploying on Raspberry Pi devices, that cost might be
performance-related, but also brings other issues into play, like CPU temperature throttling. Topics for
another day.
Next Time.
That about covers our Time panel. There are other pages that we'll get to that are related to this particular panel. For example, timers and more detailed astronomical data (moon rise/set, and so on) that we'll get to, closer to the end of this mini-series. Next time, though, we'll be covering the Climate panel, which refers mostly to inside climate, nothing to do with anything outside the home, particularly. We'll dig a little deeper into more interesting Home Assistant objects, including our first encounter with lighting, but quite a lot of attention will be paid to thermostats.
The Catheedral project is now live on GitHub. Note that there may well be discrepancies between the code presented here in the blog post and what you'll find in the repository, given the delay between writing these posts. This also means you can see code from parts of the project we've not yet covered here on the blog.
https://github.com/500Foods/Catheedral
Follow Andrew on 𝕏 at @WebCoreAndMore or join our 𝕏 Web Core and More Community.
Andrew Simard
Bookmarks:

This blog post has received 2 comments.
 2. Monday, February 13, 2023 at 5:09:21 PM
Thank you Pawel :)
2. Monday, February 13, 2023 at 5:09:21 PM
Thank you Pawel :)
Masiha Zemarai
All Blog Posts | Next Post | Previous Post
Pawel Dmitruk